


Bottle Jacks For technical questions, please call 1-800-444-3353. Page 6
2. WARNING! Make sure the vehicle is parked on a flat, level, solid, ground
surface safely away from oncoming traffic. Turn off the vehicle’s engine. Place
the vehicle’s transmission in “PARK” (if automatic) or in its lowest gear (if manual).
Set the vehicle’s emergency brake. Then, block the wheels that are
not
being lifted.
3. Check to make sure the Jack is fully lowered. If not, assemble the Handle Assem-
bly. Insert the lower portion of the Handle Assembly into the Valve Release Screw,
and turn the Handle Assembly
counterclockwise
to lower the Jack. Once the Jack
is fully lowered, turn the Handle Assembly firmly
clockwise
to close the Valve Re-
lease Screw. (See Diagrams, pg. 5.)
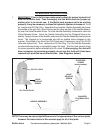
4. Carefully position the Saddle of the Jack under the vehicle manufacturer’s recom-
mended lifting point. If equipped, the Elevating Screw can be used to alter the
height of the jack’s saddle; it is adjusted by turning it clockwise or counterclockwise.
(See vehicle manufacturer’s owner’s manual for location of
seam
lifting point when
lifting only one wheel and
frame
lifting points when lifting the entire front or rear end
of the vehicle.) (See Diagrams, pg. 5.)
5. Pump the Handle Assembly until the top of the Jack’s Saddle has nearly reached
the vehicle lifting point. NOTE: The Jack should be positioned at 90 degrees to the
vehicle’s lifting point to ensure the Jack’s Saddle and vehicle lifting point are in
alignment. If not, remove and reposition the Jack before lifting the vehicle.
6. To lift the vehicle, pump the Handle Assembly of the Jack. Use smooth, full strokes
for best results. (See Diagrams, pg. 5.)
7. Once the vehicle is raised, slide a jack stand of appropriate capacity (not included)
to the proper lifting point referred to in the vehicle owner’s manual. If using two jack
stands, make sure they are on the same point on each side of the vehicle.
8. Center the vehicle’s lifting point(s) on the saddle of the jack stand(s). Set up the
jack stand(s) according to the manufacturer’s instructions, making sure that they
lock securely into position. NOTE: If using two jack stands make sure they are
at the same height.
9. Slowly turn the Handle Assembly
counterclockwise
to
open the Valve Release Screw
and lower the vehicle onto the saddle(s) of the jack stand(s). Then, turn the Upper/
Lower Handle Assembly firmly
clockwise
to close the Valve Release Screw.
(See Diagrams, pg. 5.)
10. While standing safely aside, gently rock the vehicle to determine if it is stable on the
jack stand(s). If it is not, raise the vehicle, and reposition the jack stand(s).
WARNING! When performing this procedure be prepared and stand clear of
the vehicle, as the vehicle can fall off the jack stand(s) causing personal in-
jury and/or property damage.
11. When the repair work to the vehicle is completed, make sure to remove all tools, old
vehicle parts, etc. from under the vehicle.