


Bottle Jacks For technical questions, please call 1-800-444-3353. Page 7
INSPECTION, MAINTENANCE, AND CLEANING
1. Before each use, inspect the general condition of the Bottle Jack. Check for bro-
ken, cracked, or bent parts, loose or missing parts, and any condition that may
affect the proper operation of the product. If a problem occurs, have the problem
corrected before further use. Do not use damaged equipment.
2. Before each use, make sure to thoroughly test the Bottle Jack for proper op-
eration prior to its actual use. If the Bottle Jack appears
not
to be working
properly, it may be necessary to
bleed
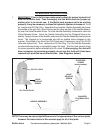
its hydraulic system of excess air. To d o
so, remove the Oil Filler Plug. Assemble the complete Handle Assembly and lower
the saddle of the jack fully. Insert the lower portion of the Handle Assembly onto the
Valve Release Screw. Turn the Handle Assembly
clockwise
to close the Valve Re-
lease Screw. Insert the Handle Assembly into the Plunger/Fulcrum Assembly. Apply
pressure to the Saddle, and pump the Handle Assembly slowly several times. The
trapped air is pressurized and will be audible when released in this manner. Once
bled of air check the Oil Fill Hole and, if necessary, top off the Oil Fill Hole with
hydraulic oil. Then, replace the Oil Filler Plug. Turn the Handle Assembly
counter-
clockwise
slowly to completely lower the Jack. Test the Jack several times for proper
operation before attempting to lift a load. If, after purging, the Jack still does
not
appear to be working properly, do not use the Jack until it has been repaired
by a qualified service technician. (See Diagrams, pg. 5.)
3. Change the hydraulic oil at least once every three years. To do so, with the
Bottle Jack fully lowered, remove the Oil Filler Plug on the side of the Housing. Tip
the Bottle Jack to allow the old hydraulic oil to drain out of the Housing completely,
and dispose of the old hydraulic oil in accordance with local regulations. With the
Bottle Jack upright, completely fill the Housing with a high quality hydraulic oil (not
included) until the oil just begins to run out of the Oil Fill Hole. Then, reinstall the Oil
Filler Plug. (See Diagrams, pg. 5.)
4. When cleaning, use a clean cloth with a detergent or mild solvent. Then, store the
Bottle Jack in a safe, dry location out of reach of children and other non-authorized
people.
5. WARNING! All maintenance, service, or repairs not listed in this manual are
only to be attempted by a qualified service technician.
12. Make certain that the Saddle is still in position under the lifting point. Turn the Handle
Assembly firmly
clockwise
to close the Valve Release Screw, and pump the Upper/
Lower Handle Assembly to raise the vehicle slightly above the saddle(s) of the jack
stands. Then, collapse the jack stand(s) and remove it from under the vehicle.
13.
Slowly
turn the Handle Assembly
counterclockwise
(never more than two full turns)
to lower the vehicle onto the ground. (See Diagrams, pg. 5.)
14. Lower the Bottle Jack completely. Then, store the Jack in a safe, dry location out of
reach of children.