


SKU 65063 For technical questions, please call 1-800-444-3353. Page 8
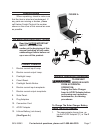
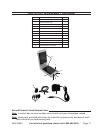
To charge the Battery (12) of the 2.
Solar Charger, insert the Plug of the
AC/DC Adapter (11) into the Electric
Current Input Receptacle (6).
(See Figure A.)
Plug the Power Cord of the AC/DC 3.
Adapter (11) into the nearest 110 volt,
grounded, electrical outlet.
(See Figure A.)
The Electric Current Input Lamp (1) 4.
will illuminate RED. In approximately
60 to 90 minutes, the Lamp will il-
luminate GREEN indicating the Solar
Charger is fully charged. Do not
overcharge. (See Figure A.)
When fully charged, unplug the 5.
AC/DC Adapter (11) from its electrical
outlet. Then unplug the Plug of the
AC/DC Adapter from the Solar Char-
ger’s Electric Current Input Recep-
tacle (6). (See Figure A.)
To Charge The Solar Charger Battery
Using Solar Power:
The approximate charge time, using 1.
solar power is 4 to 6 hours.
To charge the Battery (12) of the So-2.
lar Charger, open the Solar Charger
to expose the Solar Panel (8). Then
set the Solar Charger on a clean, dry
location in full sunlight.
(See Figure A.)
For increased pickup of solar en-3.
ergy, and to minimize the collection
of debris on the Solar Panel (8), it is
recommended that the Solar Panel
be positioned so that it points directly
at the sun. (See Figure A.)
Performance of the Solar Charger 4.
may vary depending on site location,
angle of the Solar Panel in relation
to the arc of the sun, and available
sunlight.
The Electric Current Input Lamp (1) 5.
will illuminate RED. In approximately
4 to 6 hours, the Lamp will illuminate
GREEN indicating the Solar Charger
is fully charged. Do not overcharge.
(See Figure A.)
When fully charged, close the Solar 6.
Charger to keep the Solar Panel (8)
free of dirt and debris.
(See Figure A.)
To Test The Circuit:
To make sure the Solar Charger is 1.
operating properly, press the Flash-
light Switch Button (5) to see if the
LED illuminates. If it illuminates, the
circuit of the Solar Charger is oper-
ating properly. If the LED does not
illuminate, press the Circuit Reset (4).
This will reset the Solar Charger to
begin charging. (See Figure A.)
To Charge A Mobile Unit:
Select the proper Plug Adapter (9) for 1.
the mobile unit you wish to charge.
(See Figure A.)
Attach the Plug Adapter (9) to the 2.
Connection Cord (10).
(See Figure A.)
Insert the Plug Adapter (9) into the 3.
charging input receptacle of the mo-
bile unit. (See Figure A.)
Insert the other end of the Connec-4.
tion Cord (10) into the Solar Char-
ger’s Electric Current Output Recep-
tacle (7). (See Figure A.)