


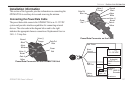
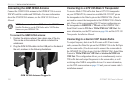

Connecting the GXM 30/30A Antenna
Connect the GXM 30/30A antenna to the GPSMAP 396 to access
XM WX satellite weather and XM Radio. For more information
about the GXM 30/30A antenna, see the GXM 30/30A Owner’s
Manual.
NOTE: You must subscribe to XM Radio and/or XM WX
Satellite Weather to use the XM Radio and/or XM Weather
features on your GPSMAP 396.
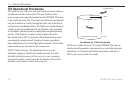
To connect the GXM 30/30A antenna:
1. Position the antenna where it has a clear view of the sky.
This can be on the outside of the vehicle or behind the
windscreen.
2. Plug the GXM 30/30A cable into the USB port on the back of
the unit, as shown in the following illustrations.
GXM 30/30A Antenna Plugged In
Connecting to a GTX 330 Mode S Transponder
To receive Mode S TIS traffic data from a GTX 330 transponder
on your GPSMAP 396, connect an available RS-232 OUT pin on
the transponder to the Data In pin on the GPSMAP 396. (You do
not need to connect the transponder to the GPSMAP 396’s Data In
pin). Then, set the corresponding RS-232 output configuration on
the transponder to REMOTE + TIS and set the GPSMAP 396’s
Serial Data Format to TIS In or TIS In/NMEA & VHF Out. For
more information, see the TIS section on page 146 and the GTX 330
Transponder Installation Manual.
Connecting to a Garmin VHF Comm Radio
To output frequency data to an SL40 comm or SL30 nav/comm
radio, connect the Data Out pin on the GPSMAP 396 to the RxD pin
on the comm radio. (You do not need to connect the comm radio to
the GPSMAP 396’s Data In pin.) Set the GPSMAP 396’s Serial Data
Format to TIS In/NMEA & VHF Out or Aviation In/NMEA &
VHF Out. This configuration allows you to simultaneously receive
TIS traffic data and output frequencies to the comm radio, as well
as driving other NMEA-compatible devices. For more information,
see the VHF comm section on page 153 and your nav/comm radio’s
installation manual.
158 GPSMAP 396 Owner’s Manual
APPENDIX > INSTALLATION INFORMATION