


Training Methods
NOTE: Training features are not available in all areas for
tracking collars.
Tone: Activates an audible tone instead of stimulation. A tone
can be used as either a positive or negative training cue,
depending on your training program.
Vibration: Applies vibration instead of stimulation to the dog the
entire time you press the training key, for a maximum of 8
seconds. The effectiveness of vibration may vary based on
the dog's temperament and experience.
Setting Up the Training Keys for One Dog
NOTE: Training features are not available in all areas for
tracking collars.
Before you can assign the training keys to a dog, you must add
the dog to the handheld device (Adding a Dog Over MURS/
VHF).
By default, the training keys are set to tone (T), vibration (V), or
light (L) for each key. This mode is most useful when training
only one dog. When training multiple dogs, it may be helpful to
customize a training key for each dog and for each training
method (Customizing the Training Keys).
1
Select Setup > Training > Training Buttons.
2
Select the area at the top of the screen directly below the
keys.
3
Select .
In this mode, the left key provides a tone. The right key provides
a vibration.
Customizing the Training Keys
NOTE: Training features are not available in all areas for
tracking collars.
Before you can assign the training keys to a dog, you must add
a dog to the handheld device (Adding a Dog Over MURS/VHF).
You can assign a specific dog training method to each training
key. You can add multiple pages of training key settings. This
mode is most useful when training multiple dogs.
1
Select Setup > Training > Training Buttons > Change
Mode.
2
Select below the key you are customizing.
3
Select the dog to train with this key.
4
Select tone (T), vibration (V), or light (L).
5
Repeat steps 2-4 for all three keys.
6
If you need to train with more than three keys, select >
Insert Page, and program the additional keys.
7
Select .
Contact Tracking
You can track other hunters so you know where they are at all
times. You can also send messages to your contacts. One
Alpha handheld device can track up to 20 devices, including T5
dog collar devices and Alpha handheld devices.
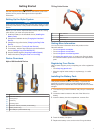
Adding a Contact Using MURS/VHF
Before you can add a contact using MURS/VHF, you should be
near the contact, and you must turn on the transmitter (Turning
On the Transmitter).
You can add fellow hunters to your handheld device so you can
track them on the map (Tracking a Contact) and send
messages to them (Sending a Message to Your Contacts).
1
On your handheld device, select > Contacts > Add.
2
Bring the two handheld devices near each other, and select
Yes on your handheld device.
3
On the contact's handheld device, select > Contacts >
Pair.
4
On your handheld device, enter the name of the contact, and
select > OK.
The contact is added to your handheld device.
You can repeat this procedure using another hunter's handheld
device to add your contact ID to that device.
Adding a Contact Using a Contact ID
Before you can add a hunter using a contact ID, the hunter must
find the contact ID (Finding Your Contact ID) and send it to you.
You must also turn on the transmitter (Turning On the
Transmitter).
If you are not near the hunter you want to add, you can add the
hunter using a contact ID.
1
On your handheld device, select > Contacts > Add.
2
When asked if you are near the other handheld device,
select No.
3
When asked if you know the contact ID, select Yes.
4
Select the contact ID for the contact you are adding.
5
Enter the name of the contact, and select > OK.
The contact is added to your handheld device.
You can repeat this procedure using another hunter's handheld
device to add your contact ID to that device.
Initiating an Emergency Alert
Before you can initiate an emergency alert, you must turn on the
transmitter (Turning On the Transmitter).
Before someone can receive your emergency alert, someone
must add you as a contact (Adding a Contact Using MURS/
VHF).
You can use an emergency alert when you need immediate
assistance and you are away from your group.
Select > Contacts > > Yes.
When your contact accepts your emergency alert request,
the device displays a message indicating that your contact
has started navigating to your location.
After receiving the alert, your contacts can navigate to your
location.
Sending a Message to Your Contacts
You can send and receive automated messages. There are 18
messages choose from, such as "Help" and "I'm Coming."
1
Select > Contacts > Message.
2
Select a message.
The message is sent to your contacts with your name before the
message. Anyone tracking your handheld device receives the
message.
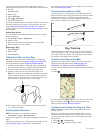
Tracking a Contact
You can keep track of contacts' locations using the map.
Select .
Finding Your Contact ID
Select Setup > Contacts > Pairing Setup.
The contact ID for your handheld device is listed under ID.
6 Contact Tracking