


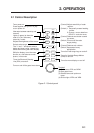

2-9
2.22 Selecting Ranges
This radar has 14 ranges, some which you
may not require. You can select or deselect
ranges as follows.
1. Press the [MENU] key to open the menu.
2. Operate the trackball to select “6.
RANGE”.
3. Press the [RANGE] key to place the un-
derline under the range you want to se-
lect or deselect.
4. Press the [RING] key to select or dese-
lect.
5. Repeat step 4 and 5.
Maximum number of ranges is all ranges.
Minimum number of ranges is two.
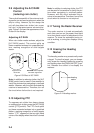
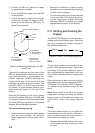
2.23 EBL/Cursor Bearing
Reference
EBL and cursor bearing can be displayed
relative to own ship’s heading (Relative) or
with reference to North (True).
Note: Magnetic compass or gyrocompass
connection required for true bearing.
1. Press the [MENU] key to open the menu.
2. Operate the trackball to select “9. EBL/
+CURSOR”
3. Press the [RANGE] key to select “TRUE”
or “REL (Relative)”.
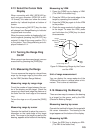
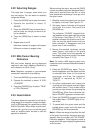
2.24 Guard Alarm
The alarm allows the operator to set the de-
sired range (0 to maximum range) and bear-
ing (0 to 360 degrees) for a guard zone, called
Auto In/Out alarm. When ships, islands, land-
masses, etc. go into (or go out of) the guard
zone an audible alarm sounds to call the
operator’s attention.
Before setting the alarm, be sure the [GAIN]
control is properly adjusted, because the au-
dible alarm sounds when the fifth or more
level quantization echoes go into or go out of
the guard zone.
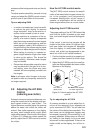
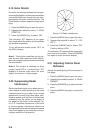
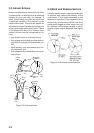
1. Mentally create the guard zone you want
to display on-screen. See Figure 2-12.
2. Set upper (lower) left edge of the guard
zone with the cursor, and press the
[GUARD] key.
The indication “*GUARD” (asterisk blink-
ing) appears at the upper right-hand side
of the screen. See Figure 2-12 (2). The
asterisk indicates the guard zone is par-
tially set, but the alarm function has not
been actuated. It disappears once the
guard zone is set completely.
3. Moving the trackball clockwise, set the
lower (upper) right edge of the guard
zone. The guard zone now appears on
the display and alarm function has been
actuated, See Figure 2-12 (3).
Note: To create a 360 degree guard zone,
rotate the cursor counterclockwise instead of
clockwise.
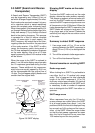
4. Press the [GUARD] key again. The as-
terisk disappears and the alarm function
is actuated after three to five antenna
scannings, and then, the indication
“GUARD” is replaced by “G(IN)” or
“G(OUT)”.
5. Any ships, landmasses, etc. coming into
or going out of the guard zone will trigger
the audible alarm. If the audible alarm
sounds you can silence it by pressing the
[GUARD] key. When this is done the indi-
cation “GUARD” appears in reverse video.
6. Press the [GUARD] key again to restore
the audible alarm. “GUARD” lights in nor-
mal video.
7. To cancel both the guard zone and the
audible alarm, press and hold down the
[GUARD] key for three seconds.
Note 1: When the range is less than the half
of the guard zone range, the guard zone dis-
appears from the screen and “UP RANGE”
indication appears. If this happens, select a
range which will again display the guard zone
on the screen.