


5. INITIAL SETTINGS
13
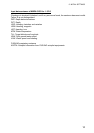
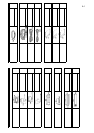
DATA 1 output setting
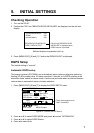
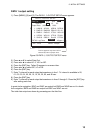
1) Press [MENU], [9] and [3]. The DATA 1, 3 OUTPUT SETUP menu appears.
Talker ID GP LC DE
Output Data (00-90 sec) 100%
1. AAM:00 APA:00 APB:04 BOD:00
2. BWC:00 BWW:00 GGA:00 GLL:01
3. RMB:01 RMC:00 VTG:01 WCV:00
4. VDR:00 WPL:00 XTE:00 ZDA:01
5. GNS:00 GBS:01 Rnn:00 RTE:00
DATA3. Log Pulse
400ppm
DATA 1, 3 OUTPUT SETUP
MENU : Escape
ENT : Enter
200ppm
Settings shown here are default settings.
This line appears only when LOG is
selected by internal jumper wires.
Data Fmt. V1.5 V2.0 IEC
Figure 5-3 DATA 1, 3 OUTPUT SETUP menu
2) Press
S or T to select Data Fmt.
3) Press
W or X to select V1.5, V2.0 or IEC.
4) Press the [ENT] key. Talker ID appears in reverse video.
5) Press
W or X to select GP, LC or DE.
6) Press the [ENT] key.
7) Enter Tx interval for each output data sentence in line 1. Tx interval is available in 00,
01, 02, 03, 04, 05, 06, 10, 15, 20, 30, 60, and 90 sec.
8) Press the [ENT] key.
9) Enter Tx interval for each output data sentence in lines 2 through 5. Press the [ENT] key
after setting each line.
In great circle navigation, BWC and WNC are output but BWR and WNR are not. In rhumb
line navigation, BWR and WNR are output but BWC and WNC are not.
The total data output are shown by percentage on the third line.