


8-3
Diagnostic Tests
This unit has eight diagnostic test which check it for proper op-
eration. These tests are mainly for use by service technicians,
however the user may execute them to identify possibly defec-
tive components.
Starting, quitting diagnostic tests
1. Press the MENU key.
2. Operate the GAIN control to select the System menu.
3. Operate the RANGE control to select SELF TEST.
4. Operate the GAIN control to select a test.
5. Press the TX switch to start the test.
6. To exit a test, press the MENU key for several seconds.
Note: After the SINGLE test is completed control is returned to
the System menu.
Diagnostic tests description
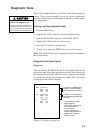
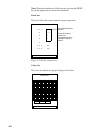
Single test
This test checks the MAIN Board in the display unit and the
transceiver unit for proper operation one time, after which nor-
mal operation is restored. After the test is completed, the results
of each device checked are indicated as OK or NG (No Good),
to the right of the device checked.
SINGLE TEST
MAIN
TRX
I/F
105-0557-0xx
ROM
RAM
P.W
105-0569-000
ROM
RAM
105-0267-0xx
ROM
RAM
= OK
= OK
= OK
= OK
= OK
= OK
= OK
Program no. of display unit
appears, and ROM, RAM
and password are checked.
Program no. of transceiver
unit and ROM and RAM are
checked.
• Last two digits change
with program no.
• ROM, RAM check results
are shown as OK or
NG (No Good).
• Check results circum-
scribed with dashed lines
appear when interface
module is used.
Figure 8-2 Results of single test
CAUTION
Raise the transducer before
conducting the diagnostic tests.
In the diagnostic tests the MENU key
raises the transducer. Thus, personal
injury can result if the key is operated
while someone is near the transducer.