


7
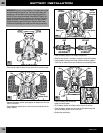
BATTERY CHARGING
F
J7826a-0920
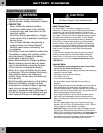
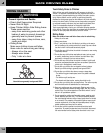
• Plug the charger and battery connectors together. Push firmly to
make sure the two connectors are completely joined.
• Plug the charger into a standard 120 volt wall outlet.
Note: If power flow to the wall outlet is controlled by a switch, make
sure the switch is “ON”.
• Before first time use, charge the battery for at least 18 hours.
Never charge the battery longer than 30 hours.
• Recharge the battery for at least 14 hours after each use of your
vehicle. Do not charge the battery longer than 30 hours.
• Once the battery is charged, disconnect the charger connector from
the battery connector. Unplug the charger from the wall outlet. The
battery is now charged and is ready to be installed in your vehicle.
Please see "Battery Installation" on page 12 for detailed battery
installation instructions.
2
W
A
R
N
IN
G
P
R
E
V
E
N
T
F
I
R
E
•
D
o
n
o
t
b
y
p
a
s
s
a
P
o
w
e
r
W
h
e
e
l
•
U
s
e
o
n
l
y
a
R
e
d
P
o
w
e
r
W
h
e
e
l
s
•
N
e
v
e
r
m
o
d
i
f
y
t
h
e
e
l
e
c
t
r
i
c
a
l
P
R
E
V
E
N
T
F
I
R
E
•
D
o
n
o
t
b
y
p
a
s
s
a
P
o
w
e
r
W
h
e
e
l
•
U
s
e
o
n
ly
a
R
e
d
P
o
w
e
r
W
h
e
e
ls
•
N
e
v
e
r
m
o
d
if
y
th
e
e
l
e
c
t
r
ic
a
l
A
v
e
r
t
i
s
s
e
m
e
n
t
®
W
A
R
N
I
N
G
P
R
E
V
E
N
T
F
I
R
E
•
D
o
n
o
t
b
y
p
a
s
s
a
P
o
w
e
r
W
h
e
e
l
•
U
s
e
o
n
l
y
a
R
e
d
P
o
w
e
r
W
h
e
e
l
s
•
N
e
v
e
r
m
o
d
i
f
y
t
h
e
e
l
e
c
t
r
i
c
a
l
P
R
E
V
E
N
T
F
I
R
E
•
D
o
n
o
t
b
y
p
a
s
s
a
P
o
w
e
r
W
h
e
e
l
•
U
s
e
o
n
ly
a
R
e
d
P
o
w
e
r
W
h
e
e
ls
•
N
e
v
e
r
m
o
d
i
f
y
th
e
e
l
e
c
t
r
ic
a
l
A
v
e
r
ti
s
s
e
m
e
n
t
A-Style Charger
Connector
A-Style Battery
Connector
1
GAP NO GAP
INCORRECT CORRECT
E
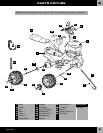
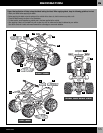
ASSEMBLY
Children can be harmed by small parts,
sharp edges and sharp points in the vehicle's
unassembled state, or by electrical items.
Care should be taken in unpacking and
assembly of the vehicle. Children should not
handle parts, including the battery, or help in
assembly of the vehicle.
WARNING
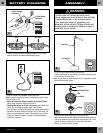
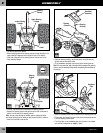
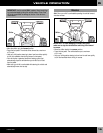
• Fit a .437 cap nut onto one end of the rear axle.
• Tap the other end of the rear axle with a hammer to secure the cap
nut on the end of the rear axle.
Hint: You may want to position the cap nut on a scrap block of wood
to protect the assembly surface.
1
.437"
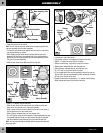
• Slide a hubcap, indented side down, onto the rear axle.
• Slide a wheel onto the rear axle. Make sure the ribs on the wheel face up.
• Slide a rear wheel driver, ring side down, onto the rear axle. Fit the
grooves on the rear wheel driver onto the ribs on the wheel.
• Slide a
7
/16" washer onto the rear axle.
2
Rib
Wheel
Rear Wheel Driver
Hubcap
7
/16" Washer
Rear Axle
.437 Cap Nut