


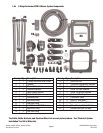


Catalog #70080, #70081, #70082, #70083
Brochure No. 63-0312
©2008 Edelbrock Corporation
Rev. 07/08
Page 16
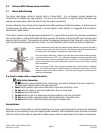
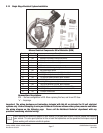
2.10 Nitrous Injection Plate Installation
The Edelbrock Nitrous System injection plate is a precision-designed CNC-machined component. It has been designed to
safely introduce a precise, metered nitrous and fuel signal to promote proper mixing and distribution into the intake
manifold. The jet map
(see Jet Map Information section)
will give you the proper jets to use for each of the power levels
available for this plate.
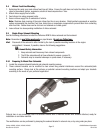
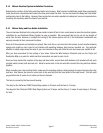
The jet fittings are color-coded for use with nitrous (blue) and fuel (red). The red fitting faces the front of the engine and
the blue fitting faces the rear of the engine. Look at the brass tubes, a properly oriented plate will have the nitrous tube
above the fuel tube ensuring the angled orifices machined into the tube face oriented to the floor of the intake manifold.
Use the following procedure to install the injector plate:
1. Remove the carburetor air cleaner.
2. Mark all of the vacuum lines and external connections attached to the carburetor and disconnect them.
3. Disconnect the throttle linkage from the carburetor.
4. Remove the carburetor.
5. Remove the stock carburetor studs and clean the mounting surface.
6. Install the extended carburetor studs supplied with the nitrous system.
7. Install the injector plate and gaskets supplied on to the intake manifold.
8. Install the carburetor.
9. Re-connect linkage and all external vacuum lines and fuel lines.
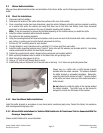
Note: Every precaution has been taken to ensure the cleanliness of our components during the assembly of your
Edelbrock Nitrous System. However, because of the importance of the jets and their calibration, extra care should be
taken before you install your jets. Wash them thoroughly with carburetor cleaner or another non-oil based cleaner,
before installing them into the plate.
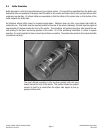
2.11 Solenoid/Plate Plumbing Installation
1. Choose the final mounting location for your solenoids and mount them solidly.
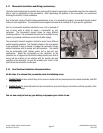
2. Install the desired nitrous and fuel jets in the jet fittings of the plate. Remember, the red fitting is for fuel and the blue
fitting is for nitrous. Mixing the jets up when installing can result in serious engine damage.
3. Using the braided steel line with the red ends, install the line on the red jet fitting on the plate and run the other end
to the fuel solenoid. Make sure that you do not use any thread sealant on these types of fittings. Tighten both ends
of the line.
4. Using the braided steel line with the blue ends, install the line of the blue jet fitting on the plate and run the other end
to the nitrous solenoid. Make sure that you do not use any thread sealant on these types of fittings. Tighten both ends
of the line.