


Catalog #66032, #66033
©2006 Edelbrock Corporation
Page 2 of 3
Brochure #63-66032
Rev. 9/06 - DA/mc
• DISASSEMBLY
1. Disconnect negative battery cable.
2. Raise vehicle and unplug both O2 sensor cables.
3. Starting with the driver's side, remove the three
bolts on the inlet flange on the catalytic converter.
4. Just behind driver's side catalytic is a two-bolt
flange; unbolt and set catalytic converter aside.
NOTE: Leave O2 sensor plug in the drivers side
catalytic assembly- there is no additional
modification to this unit.
5. On passenger's side, remove the three bolts at the
manifold/exhaust pipe connection.
6. Just behind passenger's side catalytic is a two-bolt
connection and a counter-balance weight bracket.
Remove both bolts and weight bracket and set unit
aside.
NOTE: Remove O2 sensor plug from stock pipe on
passenger side. A new T.E.S. extension pipe will
take its place during installation.
• LEFT SIDE
1. Disconnect and remove spark plugs.
2. Disconnect A.I.R. assembly from stock manifold.
3. Remove manifold bolts.
4. Remove manifold from underneath car.
5. Install T.E.S. flange gasket and one 3/8"-16 x 1" bolt,
lock washer, and flat washer at rearmost bolt hole
(leave bolt loose enough to accept T.E.S.).
6. Place manifold into position from above. Start all
bolts and washers, then tighten.
7. Replace spark plugs and wires.
8. Replace A.I.R. assembly.
• RIGHT SIDE
1. Disconnect and remove spark plugs.
2. Disconnect temperature sender.
3. Disconnect A.I.R. fitting from manifold.
4. Remove fan belt.
5. Remove alternator support bracket and set aside
(bracket is located between back of alternator and
manifold bolt #3).
6. Disconnect and remove alternator.
7. Remove dipstick.
8. Remove 1/2" bolt from EGR flange for disassembly
of EGR.
9. Remove manifold bolts.
INSTALLATION INSTRUCTIONS
10. Remove manifold from underneath car.
11. Install T.E.S. flange gasket and one 3/8"-16 x 1"
bolt, lock washer, and flat washer at rearmost bolt
hole (leave bolt loose enough to accept T.E.S.).
12. Place manifold into position from above and start
one bolt at front (use flat washers at slotted ends
and lock washers on all bolts). NOTE: Bending of
the A/C line may be necessary to provide
clearance. Be sure that re-routed line does
not contact suspension components!
13. Using 3/4" long spacer tube, 3/8"-16 x 2" header
bolt and 3/8" lock washer, re-attach small alternator
bracket in the forward-most bolt hole in cylinder
head.
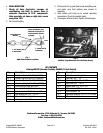
14. After referring to
Fig. 1
, install all manifold bolts and
tighten except header bolt #4 (3/8"-16 x 1-1/4")
which stays loose to accept large alternator bracket.
15. Re-attach EGR tube.
16. Re-attach dipstick tube.
17. Re-attach spark plugs and wires.
18. Re-attach small alternator bracket.
19. Install large alternator bracket provided in kit.
20. Install alternator and connect wires.
21. Re-attach fan belt.
22. Re-attach temperature sensor.
• EXTENSION PIPE
1. Bolt on left side catalytic using flange gasket
supplied, three 3/8"-16 x 1-1/2" hex bolts, three
3/8" flat washers, three 3/8" lock washers, and
three 3/8" hex nuts.
2. Plug in O2 sensor.
2. On right side, cut O.E.M. exhaust pipe approximately
1/2" in front of the weld on the catalytic converter.
2. Bolt the little extension pipe with donut gasket onto
the T.E.S. manifold using two 3/8"-16 x 2" hex bolts.
3. Bolt right side catalytic converter back into vehicle,
making sure that cat. sets in original position.
5. With everything in place and properly positioned,
tack weld T.E.S. extension pipe to stock cat.
6. After tack welding, remove assembly and complete
weld.
7. Re-install assembly and tighten all bolts.
4. Install O2 sensor using anti-seize compound on
threads and plug in.