


©
2007 Edelbrock Corporation
Brochure No. 63-641540
Catalog #641540
Rev. 10/07 - AJ/mc
Page 3 of 5
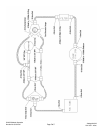
FORD EFI 302 COMPLETE KIT FUEL RAIL INSTALL
Russell fuel rail install:
1. Attach supplied brackets to the supplied fuel rails using
the supplied hardware. Use thread locking compound.
Note:
Install most of the necessary components onto the fuel
rail before installing in vehicle for ease of assembly. Be
sure to use thread sealing compound on NPT threads to
prevent leaks. Please note that the instructions below
give an example of how this fuel system can be routed.
It is highly recommended that the installer pre-plan the
routing of the fuel system kit to determine which
fittings should be used for inlets and outlets on the fuel
rails, as well as the other components included in this
kit.
2. Using the supplied 3/8 NPT plug, install into the front
end of the driver’s side fuel rail. This end of the fuel rail
will be located behind the distributor.
3. Install the 3/8 NPT male to -8 AN male fittings into the
inlets of the fuel rails.
4. Install the 3/8 NPT male to -6 AN male fittings into the
outlets of the fuel rails.
5. Depending on which intake manifold is used in
conjunction with this fuel system kit, the fuel rail
spacers (included) might need to be used to properly
space the driver’s side fuel rail from the intake
manifold.
6. Mount the assembled fuel rails onto the intake
manifold. Careful attention should be paid to prevent
any damage to the injector o-rings during installation.
Fasten the fuel rails to the intake manifold using the
supplied hardware or the factory hardware.
Fuel pressure regulator install:
1. Find a safe and clean location in the engine
compartment for the placement of the fuel regulator
and its mounting bracket (supplied). In most
applications, the best placement for the regulator is on
the firewall. Make sure that the location will allow
access for three hoses, entering from the sides and
exiting from the bottom of the regulator.
Note:
Some modification to the fuel pressure regulator
bracket may be needed for the correct fitment in your
desired location. Refer to the included fuel pressure
regulator instructions for details.
2. Following the instructions provided with the fuel
pressure regulator, mark and drill the mounting holes
for the fuel pressure regulator bracket.
3. Install 3 dry sump fittings (-6 AN) into the inlet and exit
ports of the regulator.
4. Install the vacuum hose from the regulator to the intake
manifold. It might be possible to use your stock
vacuum hose for the regulator depending on the
placement of the fuel pressure regulator.
5. Roughly install the fuel pressure regulator onto the
vehicle to facilitate hose assembly installation.
Edelbrock fuel pump install:
1. Install two (2) -10 AN to -8AN fittings into the fuel
pump.
2. Find a suitable location for the fuel pump on the
vehicle. It is highly recommended that the fuel pump is
located below the sump of the fuel tank to prevent any
fuel from draining back into the tank.
3. Following the instructions included with the fuel pump,
install the fuel pump to the vehicle.
Russell Relay kit install:
1. Mount Edelbrock fuel pump relay at a suitable location
under the hood (e.g. radiator support, inner fender,
firewall) away from extreme heat.
2. Run one large (12 gauge) red relay wire back to red
lead wire on the fuel pump. Wire can be routed
underneath along with other wires, hardlines, etc., or
through the interior of the vehicle. A 10 amp inline fuse
(not supplied) is recommended on this relay circuit.
Note:
Route wires so that any possible cutting, chafing,
snagging, pinching, or burning from suspension,
driveline, or exhaust components will be avoided. Cover
wires with supplied Russell Wrap-It protective sleeve,
and use supplied cable ties to secure wires.