


© 2001 Edelbrock Corporation
Brochure No. 63-0048
Page 4 of 8
Rev 1/02
REMOVING THE STOCK MANIFOLD:
1. Disconnect battery.
2. For ease of installation, keep all parts in some sort of order.
WARNING: Do not remove manifold if engine is hot.
3. Drain radiator coolant (drain plug will normally be located on lower
right facing engine).
NOTE: See individual manifold installation sheet for water
draining requirement. Some engines do not require draining, such
as Cadillac, 383-440 Chryslers, 351-C and 351-M Fords.
4. Remove gas cap to relieve pressure. Disconnect fuel line and plug.
Replace gas cap.
5. Disconnect all linkage from carburetor such as throttle, throttle
springs, transmission, cruise control and automatic choke.
6. Tag and remove coil wires and sensor wires.
7. Remove previously marked vacuum lines.
8. Remove radiator hose, thermostat housing and thermostat, if
mounted on manifold.
10. Remove all brackets that are on the manifold.
11. Loosen or remove valve cover bolts on valve covers for manifold
removal and replacement. It may be necessary to replace valve
cover gaskets, if broken, to prevent oil leakage.
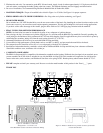
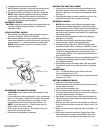
REMOVING IGNITION:
CAUTION: Follow instructions carefully, as serious damage can
occur when ignition is not installed correctly.
1. Remove distributor cap.
2. Note position of rotor and make a mark on the distributor case in
line with the rotor point.
3. Note position of distributor vacuum canister and place one type of
mark on valve cover or firewall in line with the vacuum outlet.
4. Note position of points (or magnetic trigger wheel), if open, how
much; if closed, note the distance from point block to cam lobe.
5. See Figure 5 for all details.
6. Remove distributor.
7. Do not rotate engine after removing distributor.
INSTALLING YOUR EDELBROCK MANIFOLD
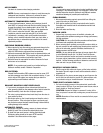
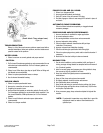
PORT SURFACE CLEANING:
See Figure 6. To prevent gasket pieces from falling into ports and
combustion chambers when cleaning old gaskets from head
surfaces, lay rags in lifter galley and stuff paper or rags into ports.
When clean, remove stuffing carefully making sure all particles fall
on rags in lifter galley. Carefully remove rags containing particles.
Wipe surfaces clean with rags using lacquer thinner to remove
any oil or grease.
NOTE: This is a MUST to ensure proper sealing.
INSTALLING FITTINGS, PIPE PLUGS & STUDS:
1. Do not over-tighten or cross-thread fittings, pipe plugs, studs or
bolts in your aluminum manifold. Damage to threads or a cracked
mounting boss may result unless caution is used when installing
accessories.
2. Use Teflon tape or PST thread sealer or equivalent. Install fittings,
pipe plugs and carburetor studs from your stock manifold.
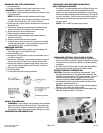
GASKET SURFACE PREPARATION:
CAUTION: Always use new gaskets as recommended. Check
with gasket manufacturer for compatibility with aluminum intake
manifolds. We recommend Fel-Pro Printoseal gaskets. The use of
Permatorque gaskets can lead to improper sealing due to the
hardness of the gasket. Don’t USE Permatorque gaskets.
1. Check gaskets on head surface and manifold to make sure they
are correct. Beaded side faces up.
NOTE: In some cases there may be a right and left side gasket
difference. Be sure they are placed correctly.
2. Coat head surface and cylinder head side of intake gaskets with
Edelbrock Gasgacinch #9300. See Figure 7.
Figure 5
DOWEL PIN REMOVAL:
WARNING: On most Chrysler and Ford engines, there are dowel
pins in the front and rear valley seal surfaces. These dowel pins
MUST be removed. Edelbrock manifolds are not drilled for dowel
pins and will not seal if they are not removed. Damage may result.
PREPARATION PROCEDURE FOR
Figure 6
Figure 7.