


©2007 Edelbrock Corporation
Brochure #63-16046 of 6
Catalog #1604, 1606, 1607, 1624, 16041 & 16061
Rev. 3/07 - RS/mc
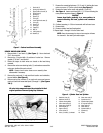
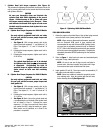
4. Install bolts and washers (11 and 12, 13 and 14). Slowly snug lower
rocker box fasteners in small increment (one at a time) in a cross
pattern. This will bleed the lifters. Check carefully as you go to be
certain push rods are still in their proper position in the rocker arm.
Tighten the 5/16" bolts (11, 12) to 15-18 ft./lbs. and tighten the 1/4"
bolts (13, 14) to 10-13 ft./lbs.
CAUTION
Do not turn engine over until push rods spin freely.
Damage could occur to valves.
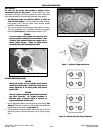
4. Install the middle (4) and top (3) rocker arm covers, using new
gaskets and new fiber seals. The fiber seals must be under the steel
washers. Be sure the middle cover section is spaced evenly on all
sides before tightening the cover screws. Tighten the screws to 10-
13 ft./lbs. following a crisscross pattern. If a torque wrench cannot
be used, tighten securely by hand.
Edelbrock Corporation • 2700 California St. • Torrance, CA 90503
Tech-Line: 1-800-416-8628 • E-Mail: Edelbrock@Edelbrock.com
The words Evolution, Harley and Harley-Davidson are registered trademarks of
Harley-Davidson, Inc., Milwaukee, Wisconsin, USA and are used in this
instruction sheet for reference only.
Edelbrock is a registered trademark of Edelbrock Corp, Torrance, CA, USA.
5. Install the intake manifold according to the instructions provided
with the intake manifold.
6. Install the carburetor, V.O.E.S. and ignition components.
7. Reassemble all components removed during disassembly, connect
battery cables, and re-fuel gasoline tank.
8. To prevent discoloration when the engine reaches operating
temperature, carefully wipe off grease, fingerprints, stains, etc.,
from all chrome and polished surfaces with a lint-free cloth and
alcohol, Windex, etc., before starting engine.