


INSTALLATION
INSTALLATION PRECAUTIONS:
1. Secure the mirror tightly to the windshield so that it can not become loose under any
circumstances (Sudden braking, accidents, etc) and cause injuries to the occupants of the
vehicle.
2. Do not install the mirror in an area that is in close proximity with an airbag, as this could cause
injury if the airbags are deployed.
3. Make sure to connect the mirror to the correct voltage. Failure to do so may result in damage
to the mirror or injury to the vehicle occupants
4. Do not submerge the mirror under water. The mirror is not waterproof and this will damage
the electrical components inside of it.
5. The Mirror has built-in circuitry to reverse the image so objects on the right of vehicle appear
on the right and objects on the left appear on the left when looking at the monitor. (See
Reverse Imaging in next section for more information.)
6. Do not attempt to take apart the mirror under any circumstances.
7. Do not operate the monitor if the mirror housing has been damaged.
MIRROR MONITOR INSTALLATION:
1. Remove the OEM Rear View Mirror from the vehicle. Usually the OEM mirror should unscrew
from a mounting plate on the vehicle’s windshield. Do not use excessive force when removing
the factory mirror.
2. Some factory rear view mirrors may have “Reading Lamps” or “Map Lights” built into them. In
order to remove this type of mirror, there will be a wiring harness that will need to be
unclipped before you can proceed with the removal of the mirror itself. Make sure the vehicle
owner is aware that the SV-9155 does not have any lamps built into it and that they will be
losing this accessory once the factory mirror is removed.
3. Once the factory mirror is removed, place the SV-9155 into the position of where the factory
mirror was located for a fest fit.
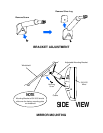
4. Adjust the angle of the SV-9155 to the best position by rotating the ball-joint of the adjustable
mounting bracket on the back of the mirror.
5. Remove the screw and silver lug form the base of the SV-9155 mounting bracket.
6. Slide SV-9155 Mounting Bracket over the factory mounting plate on the windshield.
7. Make sure that the mounting bracket fits over the entire windshield mounting plate.
8. Re-insert the screw into the mounting bracket and secure the mirror tightly over the factory
mounting plate.
9. DO NOT overturn the mounting screw. This will cause the screw’s threads to strip and may
also damage the threads inside the mounting bracket itself.
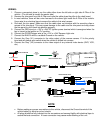
10. Route the electrical cable of the SV-9155 up the windshield and underneath the headliner of
the vehicle
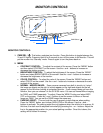
NOTE: The holes in the back and the bottom of the unit are provided for ventilation to prevent
overheating of the unit and to ensure reliable operation of the monitor equipment. These holes
must not be blocked with any kind of electrical tape or silicon. If the ventilation holes are
blocked, this could cause damage to the monitor