


Quick Start
5
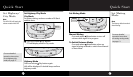
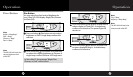
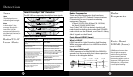
Turn On and Adjust Volume
Turn On and
Adjust Volume
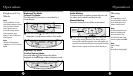
Installation
4
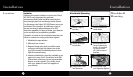
Note
It will be easy for you to
remove and reinstall your
Cobra® XR-1050 detector at
any time using this hook
and loop material on the
dashboard.
Remember:Without the
means to adjust the angle
of the detector (when
mounted as above),be
sure that your Cobra®
XR-1050 has a level,clear
view of the road before you
attach the hook and loop
material.
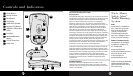
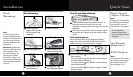
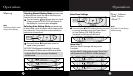
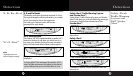
Dash Mounting
Dash
Mounting
Plug power cord
into detector.
Plug power cord
into cigarette lighter.
Peel protective
paper off one side
of hook and loop
material.
Place on dash.
Peel top paper off.
Place detector on
hook and loop pad.
1
2
3
4
5
6
Press the power button to activate the unit. In
both tone and voice modes,the unit will
announce “Testing”and the message “Test”will be
displayed.
The volume control has 8 volume settings.Adjust
the volume up or down using the volume rocker
switch.
A
Note
Display Dim,City/Highway,
and Muting mode settings
are retained in memory
when power is unplugged.
L
A
Z
E
R
E
Y
E
B
A
N
D
L
A
Z
E
R
E
Y
E
B
For more detailed
operation instructions
on turn on/adjust volume,
see page 9.
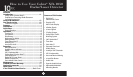
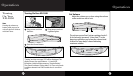
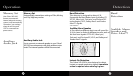
Set Display Brightness
Select from four levels of LED brightness display:
Bright,Dim, Dimmer and Dark.The state-of-the-art
readout presents clear alerts even in sunlight.
Set Display
Brightness
PRESS &
RELEASE
C
i
T
Y
ᕡ Press and release Dim button once to select
Dim setting.
Press and release Dim button a second time
to select Dimmer setting.
Press and release Dim button a third time to
select Dark setting.
Press and release Dim button again to select
Bright setting.
LED Displays
Note
A four position Dim mode is
provided for dusk or night
driving (please see Dim
Button,pages 10-11.