


Example of setting a new valet code:
Lets say you want to change the valet code from its original single-digit “2” code to a
double-digit code of “31.” You would do the following:
Turn the ignition on, enter your current code, tap the momentary side of the
switch 8 times, press the latched side, then enter the new code: momentary,
momentary, momentary, latched (3 chirps), momentary, latched (1 chirp),
center. Wait 2 seconds for the the system to exit program mode (1 chirp and
the LED turns off), then turn the ignition off (3 chirps confirm program mode exit).
That’s it, but be sure to perform step 6 on the previous page to verify your new code.
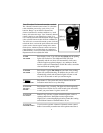
Dual-Sensor Protection
Your SuperNova has two sensors: A Glass Tampering Sensor that can detect attempts to
break any of the vehicle’s windows, and a Magnetic Resonance Sensor that detects
intrusion-related vibrations and impacts. This provides twice the level of protection
offered by most other brands of car alarms. For an even greater level of security,
consider Clifford Electronics optional sensors: OmniSensor (a digital analysis
vibration/impact sensor) and/or the Proximity Sensor (a passenger compartment radar
sensor, particularly important for convertible and other open-top vehicles).
Smart AutoTesting™
Each time you remotely arm your SuperNova, it will automatically perform an extensive
series of tests on all the system’s triggers and sensors. If a trigger malfunction is found,
you will be visually and audibly alerted immediately with 4 chirps and 4 flashes of the
parking lights instead of the usual 2 and 2. If a
sensor
is malfunctioning, you will
receive the usual 2 chirps and 2 flashes, then,
a few seconds later
, there will be
4 chirps
and 4 flashes.
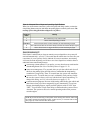
Specific malfunction identification:
Your SuperNova not only tells you if the problem is a trigger or sensor, but it can also
indicate the
specific
trigger or sensor that is malfunctioning. This feature saves you time
and money since your installer won’t have to spend hours trying to determine where the
problem is. Here’s how it works, you receive the 4-chirp/4-flash signal upon remote
disarming:
1. When you insert your key and turn on the ignition, the LED indicator inside the
vehicle will be flashing, pause, then repeat.
2. Count the number of blinks in one cycle between pauses (for your convenience,
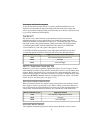
the blink cycle repeats 5 times) and refer to the chart below:
Number of LED blinks between pauses Malfunction
1 blink
Glass Tampering or Magnetic Resonance sensor
2 blinks
Door trigger
3 blinks
Trunk or hood trigger
8