


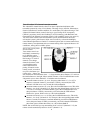


Remote controlled sensor testing and adjustment
Because of ever-changing conditions, all alarms require periodic fine-tuning of the sensors.
In fact, an improperly adjusted sensor is, by far, the biggest cause of false alarms. With
other alarm brands, this requires repeated trips back to the dealer. Not so with Concept
50. You can adjust sensitivity without any tools and without even knowing where the
sensor is mounted! All you need is your car alarm’s remote control. If at any time you
find the setting(s) of your system’s sensors to be either too sensitive (i.e., it tends to false
alarm) or not quite sensitive enough, you may individually test and adjust the sensitivity
settings yourself. To adjust the Glass Tampering Sensor or either zone of the Dual-Zone
Magnetic Resonance Sensor, just use the following procedure:
1. Insert your car key and turn the ignition switch to its “ON” position, but do not start
the engine.
2. Enter your disarming code, then press and hold the switch to its spring-loaded
momentary side for about 3 seconds until you hear a siren chirp. You’ll also notice
that the system’s LED is on to indicate that the system is in its programming mode.
4. Toggle the switch in and out of the latched position 3 times (i.e., latched, center,
latched, center, latched, center). You will hear a chirp for each latched-center you
perform.
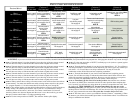
5. To select either the sensor and/or zone, perform either a, b or c of this section:
a. To test/adjust the primary (normal) sensing zone of the Magnetic Resonance
Sensor, tap and release the momentary side of the switch one time.
b. To test/adjust the secondary (high) sensing zone of the Magnetic Resonance
Sensor, tap and release the momentary side of the switch two times.
c. To test/adjust the Glass Tampering Sensor, tap and release the momentary side of
the switch three times.
6. Turn the ignition off, exit the vehicle and close the doors.
7. To test the current sensitivity setting:
a. Magnetic Resonance Sensor: “Thump” the window pillar with the side of your
fist. (For the primary zone, thump somewhat firmly, but not nearly so hard as to
dent the window pillar. For the secondary high-sensitivity zone, thump rather
lightly). If the sensor registered the thump, you will hear a single siren chirp.
b. Glass Tampering Sensor: Firmly tap on the window with a coin (the larger the
better). If the sensor registered the tap, you will hear a single chirp.
8. To increase sensitivity, press button 2 on your remote control. To decrease it, press
button 4. To confirm the change of setting, each time you increase sensitivity, the
siren will chirp in higher and higher pitched tones. Conversely, as you decrease
sensitivity, the chirps will have lower and lower pitched tones. Release the button
when you hear the chirp. Press and release the appropriate button until the desired
sensitivity is reached. There are 16 sensitivity steps for each sensor zone. If you
reach the highest or lowest setting, the system will confirm this with two chirps of
the siren.
9. Press remote control button 1 when done to exit programming mode (you’ll hear a
chirp and the LED inside the vehicle will turn off to indicate that the system has
exited programming mode). You may now either enter the vehicle to drive it or
program another feature, or press button 1 to arm the system.
14