


IMPORTANT
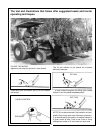
Each time after mounting the loader, operate
loader for a short period of time, then retighten
the quick attach nuts. Check nuts for tightness
during normal maintenance
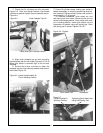
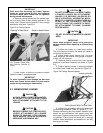
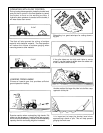
H. Remove parking stands from the parked posi-
tion and return them to their storage positions in the
cross tube. Secure parking stands in the storage
position by using pins. Figure 2-8.
Figure 2-8 Parking Stands
I. Lower loader to ground and secure loader
hydraulic hoses in a protected area.
IMPORTANT
To avoid hydraulic hose damage, be alert and
make sure hoses do not catch on tractor and/or
loader during mounting or dismounting.
2-3 DISMOUNTING LOADER
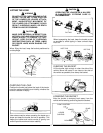
CAUTION
ALWAYS PARK LOADER WITH MATERI-
AL BUCKET OR AUTHORIZED BUSH
HOG ATTACHMENT ATTACHED TO THE
LOADER.
CAUTION
BEFORE LEAVING THE TRACTOR SEAT,
LOWER ATTACHMENT OR LOADER
BOOM TO GROUND, STOP ENGINE,
LOCK BRAKES, RELIEVE HYDRAULIC
PRESSURE, AND REMOVE KEY.
DO NOT STAND, WALK, OR WORK UNDER
A RAISED LOADER OR ATTACHMENT
UNLESS IT IS SECURELY BLOCKED OR
HELD IN POSITION. ACCIDENTAL MOVE-
MENT OF A CONTROL LEVER/LEVERS OR
LEAKS IN THE HYDRAULIC SYSTEM
COULD CAUSE THE LOADER TO DROP,
OR ATTACHMENT TO DUMP, CAUSING
SEVERE INJURY.
CAUTION
CAUTION
DO NOT ALLOW BYSTANDERS IN LOADER
AREA.
IMPORTANT
Never allow weight of tractor to be placed on
parking stands when mounting or dismounting
loader.
A. Position the loader on a hard level surface.
The more level the surface, the easier the loader is
to mount and dismount.
B. Raise loader, dump bucket over, and then
lower loader so that bucket cutting edge is approxi-
mately 1/2” off of ground.
C. Remove parking stands from their storage
positions in the boom crosstube as shown in Figure
2-8.
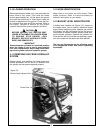
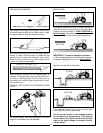
D. Position parking stands in attaching brackets
on inside of each loader arm and secure. Figure 2-9.
Figure 2-9 Parking Stands Installed
Attaching Bracket
12
Preparing To Store Stands Stands In Stored Position
Pin Through Cross Tube
Will Secure Stands In
Place
Parking Stands With Flat Side Down
E. Dismounting procedures will be the reverse of
the mounting procedure. Refer to Figures 2-3 -- 2-7.
Remove self storing tool from holder. Remove quick
attach nut and lockwasher from eyebolt using self
storing tool. Remove quick pin and clamp from work-
ing position. Place clamp and quick pin in storage
position. Store lockwasher, quick attach nut, and self
storing tool in holder.