


THE GUIDE TO SMALL ENGINES 7
SERVICING AIR CLEANERS
A properly maintained air cleaner is your engine’s first line of defense
against the destructive effects of dirt. When the air cleaner is in good
condition, it keeps airborne dirt particles from entering through the
carburetor. If the air cleaner is not maintained, dirt and dust will
gradually make their way into the engine. And don’t underestimate
dirt’s potential to cause damage. It can lead to a sharp drop in engine
power, or—worse—cause premature wear of critical engine
components.
Many types of air cleaners are used in small engines. Most contain a
foam or pleated-paper element.
Dual-element air cleaners contain a pleated-paper element with a
foam pre-cleaner, offering two layers of protection. Discard the paper
element when you can no longer remove dirt from the pleats by
tapping the element on a hard, dry surface. You may be able to wash
and reuse the foam pre-cleaner. Foam elements can be cleaned with
hot water and liquid dish detergent that contains a grease-cutting
agent.
Single-element air cleaners should be serviced every 25 hours (or once
a season). In a dual-element system, the pre-cleaner should be cleaned
every 25 hours. The cartridge should be cleaned every 100 hours.
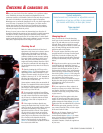
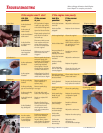
Servicing a foam air cleaner
1.
Loosen the screws or wing nuts that hold
the air cleaner assembly in place (photo A).
Disassemble.
2. Inspect the foam element. Replace it if it
is torn or shows signs of considerable wear.
4. Saturate the element with engine oil
(photo B). Then, squeeze it to spread the oil
throughout.
5. Inspect the rubbery sealing gasket
between the air cleaner and carburetor.
Replace it if it is worn.
6. Reassemble and reinstall the air cleaner.
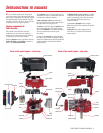
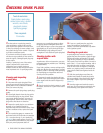
Servicing a pleated-paper or
dual-element air cleaner
Dual-element air cleaners come in a variety
of designs. Two of the most common are
shown here.
1. With the cover removed, separate the pre-
cleaner (if equipped) from the cartridge
(photo C).
2. Tap the cartridge gently on a flat surface
to remove any loose dirt. Inspect the element
and replace it if it is heavily soiled, wet or
crushed.
3. Inspect the pre-cleaner, if equipped. Note
the mesh backing, designed to act as a barrier
between the oily pre-cleaner and the pleated-
paper element. Replace it when soiled or
worn.
4. Look for oiling instructions on the pre-
cleaner (photo D). If directed, lubricate the
pre-cleaner with oil. NOTE: Not all foam pre-
cleaners should be oiled.
5. Clean the cartridge housing with a dry
cloth (photo E). Do not clean with solvents or
compressed air.
6. Reassemble the air cleaner. If the pre-
cleaner is the oiled type, take care to insert
the mesh toward the paper element so that
the paper is never exposed to the oil.
7. Reinstall, making sure that any tabs on
the cartridge are in their slots on the engine
housing. Gaps around the cartridge permit
unfiltered air and damaging dirt particles to
enter the engine.
Tools & materials:
Engine oil, screwdrivers, liquid detergent.
Time required:
30 minutes.
E
D
C
A B
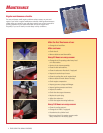
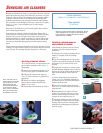
Don’t wait until your air
cleaner element looks like
this to replace it. If your
element has become
permanently discolored
or has begun to break
down or tear, extend the
life of your small engine
by installing a new one.
Pleats in a paper element that are discolored, bent or
water-damaged can no longer provide adequate air
to the carburetor. Replace the element when it
approaches this condition.
Pleated-paper
element
Pleated-paper
element
Pre-cleaner
Pre-cleaner