


7
en
Determine The Starting System
Before startingthe engine, youmust determine thetype of starting systemthat is onyour
engine. Your engine will have one of the following types.
ReadyStart
®
System: This features a temperature controlled automatic choke. It
does not have a manual choke or a primer.
Primer System: This features a red primer to be used forstarting in cool
temperatures. It does not have a manual choke.
To start your engine, follow the instructions for your type of starting system.
Note: Equipment may have remote controls. See the equipment manual for location and
operation of remote controls.
ReadyStart
®
System - Figure
4 5
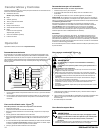
1. Check the oil level. See the How To Check/Add Oil section.
2. Make sure equipment drive controls, if equipped, are disengaged.
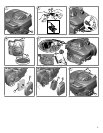
3. Move the throttle control (C, Figure 4) to the fast
position. Operate the engine
in the fast
position.
4. If the product is equipped with an engine stop lever (D), hold the engine stop lever
against the handle (Figure 5).
5. Firmly hold the starter cord handle (E). Pull the starter cord handle slowly until
resistance is felt, then pull rapidly (Figure 4).
Note: If the engine does not start after repeated attempts, go to
BRIGGSandSTRATTON.COM or call 1-800-233-3723 (in USA).
WARNING: Rapid retraction of the starter cord (kickback) will pull your
hand and arm toward the engine faster than you can let go. Broken bones, fractures,
bruises or sprains could result.When starting engine, pullthe starter cord slowly until
resistance is felt and then pull rapidly to avoid kickback.
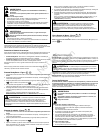
Primer System - Figure
5 6
1. Check the oil level. See the How To Check/Add Oil section.
2. Make sure equipment drive controls, if equipped, are disengaged.
3. Move the throttle control (C, Figure 6) to the fast
position. Operate the engine
in the fast
position.
4. Push the red primer (F) three times.
Note: Priming is usually unnecessary when restarting a warm engine.
Note: If you push the primer too many times, excessive fuel willflood the carburetor
and the engine will be difficult to start.
5. If the product is equipped with an engine stop lever (D), hold the engine stop lever
against the handle (Figure 5).
6. Firmly hold the starter cord handle (E). Pull the starter cord handle slowly until
resistance is felt, then pull rapidly (Figure 6).
Note: If the enginedoes not start after repeated attempts, repeatSteps 4, 5, and6. If
it still does not start, go to BRIGGSandSTRATTON.COM or call 1-800-233-3723 (in
USA).
WARNING: Rapid retraction of the starter cord (kickback) will pull your
hand and arm toward the engine faster than you can let go. Broken bones, fractures,
bruises or sprains could result.When starting engine, pullthe starter cord slowly until
resistance is felt and then pull rapidly to avoid kickback.
How To Stop The Engine - Figure
5 7
Release the engine stop lever (A, Figure 5)
or
Engine with Throttle Control: Move the throttle control (B, Figure 7) to the stop
position.
Maintenance
NOTICE: If the engine is tipped during maintenance, the fuel tank must be empty and
thesparkplugsidemust be up. If thefuel tank is not emptyand if theengine is tippedin
any other direction, it may be difficult to start due to oil or gasoline contaminating the air
filter and/or the spark plug.
WARNING: When performing maintenance that requires the unit to be
tipped, the fuel tank must be empty or fuel can leak out and result ina fire or
explosion.
We recommend that you see any Briggs & Stratton Authorized Dealer for all
maintenance and service of the engine and engine parts.
NOTICE: All the components used to build this engine must remain in place for proper
operation.
Emissions Control
Maintenance, replacement, orrepair of theemissions control devices andsystems
may be performed by any non-road engine repair establishment or individual.
However, to obtain “no charge” emissions control service, the work must be performed
by a factory authorized dealer. See the Emissions Warranty.
Unintentional sparking can result in fire or electric shock.
Unintentional start-up can result in entanglement, traumatic
amputation, or laceration.
Fire hazard
WARNING
Before performing adjustments or repairs:
Disconnect the spark plug wire and keep it away from thespark plug.
Disconnect battery at negative terminal (only engines with electric start.)
Use only correct tools.
Do not tamper with governor spring, links or other parts to increaseengine
speed.
Replacement parts must be of the same design and installed in the same
position as the original parts. Other parts may notperform as well, may damage
the unit, and may result in injury.
Do not strike the flywheel with a hammer or hard object becauset he flywheel
may later shatter during operation.
When testing for spark:
Use approved spark plug tester.
Do not check for spark with spark plug removed.
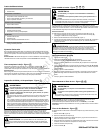
Maintenance Chart
First 5 Hours
Change oil
Every8HoursorDaily
Check engine oil level
Clean area around muffler and controls
Clean finger guard
Every 25 Hours or Annually
Clean air filter *
Every 50 Hours or Annually
Change engine oil
Check muffler and spark arrester
Annually
Replace air filter
Replace spark plug
Clean air cooling system *
* In dusty conditions or when airborne debris is present, clean more often.
Carburetor Adjustment
Never make adjustments to the carburetor. The carburetor was set at the factory to
operate efficiently under most conditions. However, if adjustments are required, see any
Briggs & Stratton Authorized Dealer for service.
NOTICE: The manufacturer of the equipment on which this engine is installed specifies
the top speed at which the engine will be operated. Do not exceed this speed.
Not for
Reproduction