


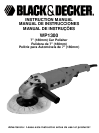


Technical Specifications
Rated Voltage 120V~ 220V~
Power (watts) 1300W 1300W
Frequency 60Hz 50Hz
Rated current 11 A 6 A
USE OF EXTENSION CORDS
Make sure the extension cord is in good condition
before using. Always use the proper size extension
cords with the tool – that is, proper wire size for various
lengths of cord and heavy enough to carry the current
the tool will draw. Use of an undersized cord will cause
a drop in line voltage resulting in loss of power and
overheating. For proper size cords see chart below.
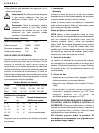
Minimum Gage for Cord Sets
Volts Total Length of Cord in Feet
120V~ 0-25 26-50 51-100 101-150
240V~ 0-50 51-100 101-200 201-300
Ampere Rating
More Not more American Wire Gage
Than Than
0 - 6 18161614
6 - 10 18 16 14 12
10 - 12 16 16 14 12
12 - 16 14 12 Not Recommended
Motor
Be sure your power supply agrees with nameplate
marking.
1. Assembly and Adjustment
Place the polisher disk on the spindle, mount the
concave recess side of the locking nut over the spindle,
and tighten with the two –hole spanner.
Mount the outside spindle over the spindle, Install the
woolen fabrics cover by simply stretching the elastic
and slipping the woolen fabrics cover over the outside
spindle. And let it operate for more than three minutes
for checking it up without load.
Caution: Turn off and unplug from power
supply.
Before Operating
NOTE: Although this discussion deals with polishing a
car, your polisher is capable of polishing a wide array of
flat surfaces such as hardwood floors, furniture, boats
and other surfaces that could use an occasional shine.
Before you begin, make sure the car is clean and dry.
The work area should be dry also. If necessary, remove
road tar with a general cleaner before polishing. Also
remove excess grease spots, bug stains, etc.
2. Selecting the Correct Operating Speed
The work speed of the rotating part is controlled by the
timing. Switch indicated in figures. The further the
switch is moved away from its off position, such as
from 1 to 2, the faster the work part rotates.
3. Operation
MAKE SURE THE POLISHER IS IN THE “OFF”
POSITION BEFORE PLUGGING THE POLISHER INTO
AN APPROPRIATE POWER OUTLET.
• To switch your polisher on, press the on/off
switch on the side marked “ON”. To switch it off
press the on/off switch on the side marked “OFF”.
• ALWAYS START AND STOP THE POLISHER ON
OR AGAINST THE SURFACE. Place the cord over
your shoulder and do flat surfaces first - hood, trunk
and roof. Cover areas quickly with broad, sweeping
strokes in a criss-cross pattern.
• DO NOT press down on the polisher. The
machine’s action, not pressure, does the best job.
• After flat surfaces are covered with wax, do sides of
the car. Let the cord hang free. It is not necessary to
use a criss-cross motion on doors and fenders.
• Put a clean polishing bonnet on the polisher
• Polish the wax. Use long, sweeping strokes in a
criss-cross pattern. Do not press hard. Let the
polisher do the work.
Warning: Before working , let it operate
for no less one minute without load.
ENGLISH
4