


Part No. 790294 Form No. F120602A
Page 3 of 12
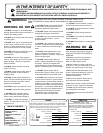
For your safety and the safety of others, these directions should be followed:
Use of Ear Protection is recommended while
operating this machine.
Do not operate this machine without first reading
owner's manual and engine manufacturer's manual.
Use of Eye and Breathing protection is recom-
mended when using this machine, especially in dry
and dusty conditions.
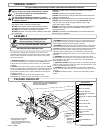
·DO NOT place hands or feet inside nozzle intake opening,
near debris outlet or near any moving parts.
·DO NOT start engine without hose and exhaust elbow
connected firmly in place to housing and exhaust outlet.
.DO NOT allow children to operate this equipment.
.DO NOT transport unit without elbow retension cable (item
87) assembled.
GENERAL SAFETY
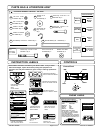
PACKING CHECKLIST
ASSEMBLY
·DO NOT operate without discharging exhaust into enclosed
container.
·DO NOT operate during excessive vibration.
·DO NOT remove hose until engine has been turned off and has
come to a complete stop.
·DO NOT operate machine with hose or exhaust elbow removed.
·DO NOT use this machine for vacuuming exclusively sand,
dust, fine dirt, rock, glass, string like material, grain, rags,
cans, metal, bark or water.
·DO NOT operate this machine on slopes greater than 45%(25°).
·DO NOT pick up any hot or burning debris, or any toxic or
explosive material.
.DO NOT operate this unit freestanding. Unit must be secured in
place during any operation.
PUT OIL IN ENGINE BEFORE STARTING.
Read all safety and operating instructions
before assembling or starting this unit.
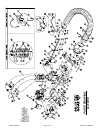
Your Billy Goat is shipped from the factory in one carton and is
completely assembled except for the exhaust elbow, nozzle, handle
loop for nozzle, hose boom, hose band, hose coupler, hose clamps
and related hardware.
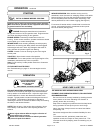
1. SECURELY ATTACH unit to the bed of a truck or to a trailer, so that
the exhaust discharges into an enclosed container. NOTE: This unit
must be securely mounted to the bed of a truck or to a trailer before
operating.
2. ATTACH hose to hose coupler, using hose clamp (item 26) NOTE:
This unit is equipped with a unidirectional hose. Assemble hose so that
interior hose material seams face toward unit. Refer to flow direction
arrow printed on outside of hose. When installed arrow should point
toward vac housing.
3. ATTACH hose coupler w/hose to housing intake, that is
preassembled to housing front plate, and rotate to lock it in place.
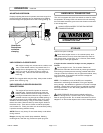
4. ASSEMBLE handle loop nozzle (item 45), to nozzle handle (item 44)
using capscrew (item 53), and lock nut (item 60). Adjust handle loop to
desired height and angle and securely tighten in place.
5. ASSEMBLE nozzle handle (item 44), to nozzle (item 25), using screws
(item 52), washers (item 66), washers (item 68) and lock nuts (item 60).
8. ATTACH assembled nozzle to hose using hose clamp (item 26). Before
tightening hose clamp, position nozzle handle upward when hose is
stretched to prevent twisting load on hose assembly during operation.
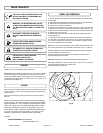
9. ATTACH preassembled hose boom on top of housing using a hitch pin
(item 10).
10. ASSEMBLE hose band (item 29) around hose and secure chain
between flanges of the hose band using capscrew (item 53) and lock nut
(item 60) Repeat same steps on the other chain. (see ADJUSTING
HOSE BOOM on page 6).
11. SECURELY ATTACH exhaust elbow (item 21) capturing both flanges
inside the clamp, then firmly tighten the clamp, securing the elbow to the
housing (see MOUNTING on page 5).
12. ASSEMBLE battery (not included) by using battery bracket QL
(item no. 70, hold down rods (item 71), washers (item 70), and lock nuts
(item 59).
13. ATTACH red battery cable to + terminal and black battery cable to -
terminal.
BATTERY NOT INCLUDED WITH UNIT.
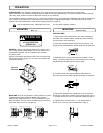
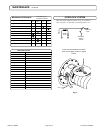
Boxing Checklist
Exhaust Elbow Assembly
Hose Boom Assembly
Check
Band Hose Boom 12" (305mm)
790153 Qty. 2
Hose Coupler Assy
Hose Clamps 12" (305mm) 790150
Qty. 2
Handle Nozzle 811020
Nozzle QL 790149
Hose 12"x 10' QL 790148
Parts Bag & Literature Assy
790297
Engine
Manual Per
Model
KOHLER COMMAND PRO
23 HP
Parts Bag &
Literature
Assy
Handle Loop Nozzle
811019
Denotes parts found in Parts Bag
Assembly (shown on page 4).
These items should be included in your
carton. If any of these parts are missing,
contact your dealer.
Nozzle Tray Assembly
NOTE: BATTERY IS NOT INCLUDED. REQUIRES 12 V
BATTERY, 40 AH, 240 CCA MIN. U1 SERIES GROUP
BATTERRY FOR PROPER FIT