


View Instruction & Updates
Online at
www.pro-fit-intl.com
© Pro.Fit International, Eagan, MN 2009
Pro.Fit International, Inc.® may not be held liable for any damage to a vehicle before, during or after the installation or removal of this VSM
G3
TM
. Pro.Fit International may not be held liable for any personal injury resulting from accident or improper installation. Pro.Fit International,
Inc.® 1335 Eagandale Court, Eagan, MN 55121, Ph: 651.688.3588 or 800.388.0073 Fx: 651.688.9876
PLEASE READ COMPLETE INSTRUCTIONS BEFORE INSTALLING THIS VSM G3
All instructions assume a drivers seat vantage point. Caution is advised when removing and reassembling
wood or plastic parts of a dash. Applying unnecessary force or pressure may cause a piece to crack or break.
When properly installed, the metal between the ball and 2 small holes is all that is exposed.
(Some exceptions apply).
Dash Trim Removal Tool (DTRT), Phillips screwdriver
VSM G3, A Plate, J Stem
Right of Radio
TOOLS REQUIRED:
PARTS INCLUDED:
LOCATION:
Page 8
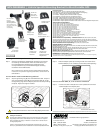
Step 1: Place the DTRT in between the radio
bezel and the dash molding Photo #1. Gently
use the DTRT in a twisting motion around the
radio bezel releasing a series of eight (8)
retainer clips. Do not disconnect any wiring to
the bezel and simply set the radio bezel off to
the side.
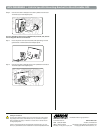
Step 2: Remove the two Phillips screws securing
the right side of the radio to the dash molding
and carefully set them off to the side. Place
the VSM G3 flush to dash molding over the screw
holes and evenly tighten the VSM G3 to the right
side of the radio molding as pictured in Photo
#2.
Step 3: Once the VSM G3 is flush and secured
to the right side of the radio, replace the radio
bezel back into its secured original position.
You have successfully installed your VSM G3!
Note: Note: See the Assembly Instructions for G3
Components for additional information.
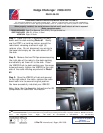
Dodge Challenger 2009-2010
DG-92-08-G3
Insert DTRT
Here
1
2
3