


Page 6
Normal Door Lock Operation
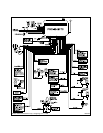
6 Pin Door Lock Output Connector:
The orange, blue w/ white tracer, yellow, white, green, and blue wires in the 6 conductor connector are the
contacts of the on board door lock relays. The function of each of these wires is listed below;
Lock Relay Unlock Relay
Blue w/ White Trace = N.O. Relay Contact Orange = N.O. Relay Contact
Dark Green = N.C. Relay Contact Dark Blue = N.C. Relay Contact
Yellow = Common Relay Contact White = Common Relay Contact
3 Wire Ground Switched Door Lock Circuits :
In this application, the dark green and dark blue door lock wires are not used.
The white and yellow wires must be connected to a chassis ground source.
The blue w/ white stripe wire is the ground pulse “lock“ output, and should be connected to the negative
lock wire in the vehicle.
The orange wire is the ground pulse “unlock“ output, and should be connected to the negative unlock wire
in the vehicle.
3 Wire Ground Switched 2 Step Door Locks
In this application, the Dark Green is not used, the Yellow wire connects to chassis ground, and the
Blue w/White wire connects to the negative switched low current door lock wire, or the lock wire at
the door switch.
Next, locate the drivers door unlock motor wire and cut it at a convenient location to allow wiring of an The
White and Dark Blue wires, White will connect to the vehicle side of the cut wire, and Dark Blue will connect
to the "Unlock Drivers Door Motor" side of the cut wire. Most vehicles door lock/unlock motor legs rest at
ground, and switch +12 volts to the door lock/unlock motor legs for operation, if this is the case in the
vehicle you are working on, connect Orange to a + 12 volt source. In the rare instance that the vehicle door
lock/unlock motor legs rest at + 12 volts and switches ground to the door lock/unlock motors, connect
Orange to chassis ground.
Connect the Green/Black wire of the two pin 2nd step unlock connector to the low current ground switched
door unlock wire. The Red/Black wire is not used for this application.
3 Wire Positive Switched Door Lock Circuits:
In this application, the dark green and dark blue wires are not used.
The orange and blue w/ white stripe wires must be connected to a + 12 volt battery source.
The yellow wire is the positive pulse “ lock “ output, and should be connected to the positive lock wire in the
vehicle.
The white wire is the positive pulse “ unlock “ output, and should be connected to the positive unlock wire
in the vehicle.
3 Wire Positive Switched 2 Step Door Locks
In this application, the Dark Green is not used, the Blue/White connects to + 12 volt source, and the
Yellow wire connects to the positive switched low current door lock wire, or the lock wire at the
door switch.
Next, locate the drivers door unlock motor wire and cut it at a convenient location to allow wiring of an The
White and Dark Blue wires, Dark Blue will connect to the vehicle side of the cut wire, and White will connect
to the "Unlock Drivers Door Motor" side of the cut wire. Most vehicles door lock/unlock motor legs rest at
ground, and switch +12 volts to the door lock/unlock motor legs for operation, if this is the case in the
vehicle you are working on, connect Orange to a + 12 volt source. In the rare instance that the vehicle door
lock/unlock motor legs rest at + 12 volts and switches ground to the door lock/unlock motors, connect
Orange to chassis ground.
An optional relay will be required for this application. Connect the Green/Black wire of the two pin 2nd step
unlock connector to terminal 85 of a VF45F11 P&B relay or equivalent automotive 12 volt relay. Connect
Red/Black to terminal 86. Connect terminal 87 to a fused + 12 volt source, and connect terminal 30 to the
low current +12 volt switched wire from the door unlock switch.
5 Wire Alternating Door Lock Circuits :
In this application, it is necessary to cut the existing door lock by - pass wires. These wires run from the
master door lock switch to the slave door lock switch, and then on to the door lock motors.
Cut the existing lock wire, and connect the yellow wire to the slave switch or motor side of the cut wire.