


2. Strike the windshield support pillar with the palm of your
hand, the unit will emit a few short chirps from the siren.
This is the warn away (pre-detect) stage.
3. Striking the support pillar firmly will cause the siren to
sound. This is the full trigger stage.
4. Repeat the above procedure from various support areas
of your vehicle, Bumpers, B Pillars, etc.
If your system fails to operate as described, review the
following section concerning shock sensor adjustment.
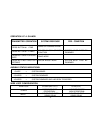
SHOCK SENSOR ADJUSTMENT:
The shock sensor of the AA-929 security system is elec-
tronically adjusted and is capable of 8 different sensitivity
levels. To adjust or change the setting of your shock sen-
sor disarm the system and within 8 seconds, simultaneously
press both buttons of your transmitter until the siren emits
a low tone. This indicates that the unit is ready to accept
a sensitivity level change. Press button #2 of your trans-
mitter to make adjustments. The siren will emit a tone
synonymous with the changing levels. The lower the tone,
the lower the setting, the higher the tone, the higher the
setting. While in the adjustment mode, strike a support
pillar of the vehicle, the unit will emit a 2 second tone indi-
cating your setting. The system will allow you to keep this
setting or make further adjustments. Once you've reached
the desired level, press button #1 to lock in your setting.
The siren will emit two high chirps to confirm your setting
is locked. Follow steps 1-4 above to test the sensitivity
level change.
-4-
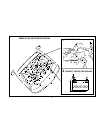
INSTALLING THE WARNING DECALS:
Once you've confirmed the operation of your security sys-
tem, you may elect to install the security systems warning
decals. Typically these decals are installed on the lower left
of the driver side and lower right of the passenger side win-
dows as shown. Remove the decal backing paper and hold
the ends of the decal toward you. This will cause the center
to bend toward the window. Place the center of the decal on
the window and roll the sides out one at a time. This will
insure no air bubbles get under the decal when affixing it to
the window. Once in place, smooth out the entire label press-
ing it firmly to the window.