Page 6
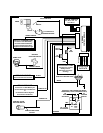
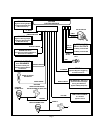
2 Pin White Connector : DASH MOUNTED L.E.D.
Route the red and blue wires in the 2 pin white connector from the L.E.D. to the control module, and plug
it into the mating white connector on the side of the module.
4 Pin White Connector : SHOCK SENSOR
Route the red, black, blue, and green wires in the 4 pin white connector from the shock sensor to the
control module, and plug one end into the shock sensor, and the other end into the mating white connec-
tor on the side of the module.
NORMAL DOOR LOCK OPERATION
6 Pin Door Lock Output Connector :
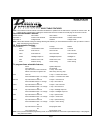
The orange, blue w/ white tracer, yellow, white, green, and blue wires in the 6 conductor connector are
the contacts of the on board door lock relays. The function of each of these wires is listed below;
Lock Relay Unlock Relay
Blue w/ White Trace = N.O. Relay Contact Orange = N.O. Relay Contact
Dark Green = N.C. Relay Contact Dark Blue = N.C. Relay Contact
Yellow = Common Relay Contact White = Common Relay Contact
3 Wire Ground Switched Door Lock Circuits :
In these vehicles, the dark green and dark blue door lock wires are not used.
The white and yellow wires must be connected to a chassis ground source.
The blue w/ white stripe wire is the ground pulse “ lock “ output, and should be connected to the negative
lock wire in the vehicle.
The orange wire is the ground pulse “ unlock “ output, and should be connected to the negative unlock
wire in the vehicle.
3 Wire Positive Switched Door Lock Circuits :
In these vehicles, the dark green and dark blue wires are not used.
The orange and blue w/ white stripe wires must be connected toa+12volt battery source.
The yellow wire is the positive pulse “ lock “ output, and should be connected to the positive lock wire in
the vehicle.
The white wire is the positive pulse “ unlock “ output, and shouls be connected to the positive unlock wire
in the vehicle.
5 Wire Alternating Door Lock Circuits :
In this application, it is necessary to cut the existing door lock by - pass wires. These wires run from the
master door lock switch to the slave door lock switch, and then on to the door lock motors.
Cut the existing lock wire, and connect the yellow wire to the slave switch or motor side of the cut wire.
Connect the green wire to the master switch side of the cut wire.
Cut the existing unlock wire, and connect the white wire to the slave switch or motor side of the cut wire.
Connect the blue wire to the master switch side of the cut wire.
The orange and blue w/ white stripe wires must be connected to a fused + 12 VDC battery source.
Refer to the door lock wiring supplement for proper connection of these wires into the various locking
circuits available in current vehicles.


