


www.accel-ignition.com ACCEL2
the switch to the on position, you are switching the
ACCEL Afterburner coil into the high RPM mode. By
closing the switch cover you are also turning the
switch toggle off at the same time and also returning
the ACCEL Afterburner coil to the low RPM mode.
Remember to NEVER
switch the modes of the
ACCEL Afterburner coil while the engine is
running!
Step #5
Route the green and brown leads of the ACCEL wiring
harness through the fire wall, behind the dash to the
selected switch mounting point, making sure the two
pre-insulated terminals can reach the desired switch
location. If you need to drill any holes in the firewall
to gain access for the harness, make sure to use the
supplied grommet in the hardware kit to protect the
wires from chaffing. Also make sure that once the
harness is positioned and secured that you seal up
any openings that you may have had to make in the
fire wall with a water proof material such as an RTV
sealant (not included).
The arming switch is a DPDT (double pole, double
throw) type switch. That means it has two rows of
terminal tabs on the back of the switch. Each one of
these terminal tabs are numbered, #1 though #6. You
need to plug the pre-insulated terminal on the green
lead of the ACCEL harness onto terminal tab #1 and
the pre-insulated terminal on brown lead of the
ACCEL harness onto terminal tab #2. The ring
terminal on the other end of the brown lead must be
secured to a ground. Typically a good ground source
would be one of the dashboard support bolts or one
of the grounding posts found under the dash used by
the OEM dash harness.
NOTE: Make sure the green and brown leads are
properly plugged into the switch prior to mounting
the switch.
Step #6
Once a favorable switch location is found, it is deter-
mined that the ACCEL green and brown leads can
reach that location and are both plugged into the back
of the switch, it’s time to mount the arming switch.
Use either a 15/32" or a 1/2" drill bit to drill the hole in
the mounting surface to locate the switch. Make sure
not to damage any components that might be found
behind the mounting surface. Insert the switch into
the hole from behind the mounting surface. Slip the
You can usually find a source for 12 V switched
ignition source on the ignition “on” powered side of
the fuse panel. Depending on the vehicle, there are
some times extra terminal positions in the ignition “on”
powered side of the fuse panel that can be plugged
into or tap into with the proper fuse panel
terminals (not included). If in doubt, please refer to
your specific vehicle’s shop manual.
Plug the 3-way weather pack connector on the
ACCEL harness to the 3-way connector on the
ACCEL Afterburner switchable coil. Do not force
the connectors together as they are designed to be
inserted only one way.
Install the relay onto the mating 5-way connector on
the harness. Again the connector and relay are
designed to be inserted only one way, with the lock
tabs aligned on the same side. Be careful not to
bend any of the tabs on the bottom of the relay when
inserting the connector. Secure the relay inside the
engine compartment so that it is not free to move
around.
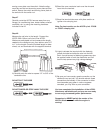
Step #4
Find an appropriate location inside the vehicle for the
arming switch. This can be anywhere on the lower
dash, console or hidden under the dash, inside the
console or other compartments. There must be
approximately 2-1/2" of clear space behind the
mounting surface to fit the switch and the wiring
harness.
Note: It takes a bit of force to flip up the cover on
the arming switch, so make sure the mounting
location is strong enough to handle the job. You
may have to reinforce the location with additional
sheet material to spread the force out and keep
the switch firmly attached.
The switch must be installed from behind the mount-
ing surface, so make sure you can gain the required
access behind the mounting surface. If desired, a
remote switch mount (not included) can also used to
mount the switch from say below the dash. Also note
the alignment tab on the arming switch cover plate
and the slot in the switch threads. This means that the
arming switch and cover plate can only be assembled
one way. You want to position the arming switch so
that the cover flips forward or upward to gain access
to the switch toggle. The ACCEL Afterburner coil is
switched between modes by the arming switch. When
the arming switch is in the normal or off position, the
Afterburner coil is in the low RPM mode. By toggling