W
EBASTO
S
CHOLASTIC
S
ERIES
5INSTALLATION
5-1
5. Installation
5.1 General Information
Webasto will take you step by step through the installation process to ensure successful operation for years to come.
The installation must be performed in accordance with the installation instructions provided in this manual.
NOTE:
This manual does not cover all possible installations. This manual is a general guideline only. For special
applications or installations differing from what is described in this manual, contact Webasto Thermosystems directly
at 1-800-555-4518 for further information.
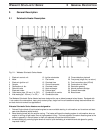
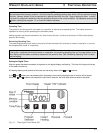
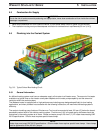
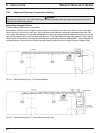
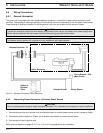
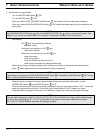
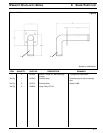
5.2 Installation Locations
Fig. 5-1: Installation Locations
WARNING
Due to the risk of carbon monoxide poisoning and asphyxiation, the heater must never be installed inside the
passenger compartment.
Heater is to be installed in an existing enclosure (spare battery compartment) on the driver’s (road) side of vehicle.
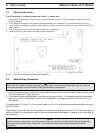
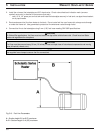
The installation template provided with heater kit must be used.
Do not mount to the slide-out tray. The heater and tray must be mounted solidly. The heater inertia safety switch will
only function properly if the heater and tray are mounted solidly.
The heater should be installed as low as possible in the cooling system to assure static bleeding of the heater and the
circulating pump.
NOTE:
The coolant circulating pump is not self-priming. Always prime coolant circulating pump, heater and cooling circuit
before initial starting of heater. See section 5.9 “Initial Operation.”