8
Advanced Controls window
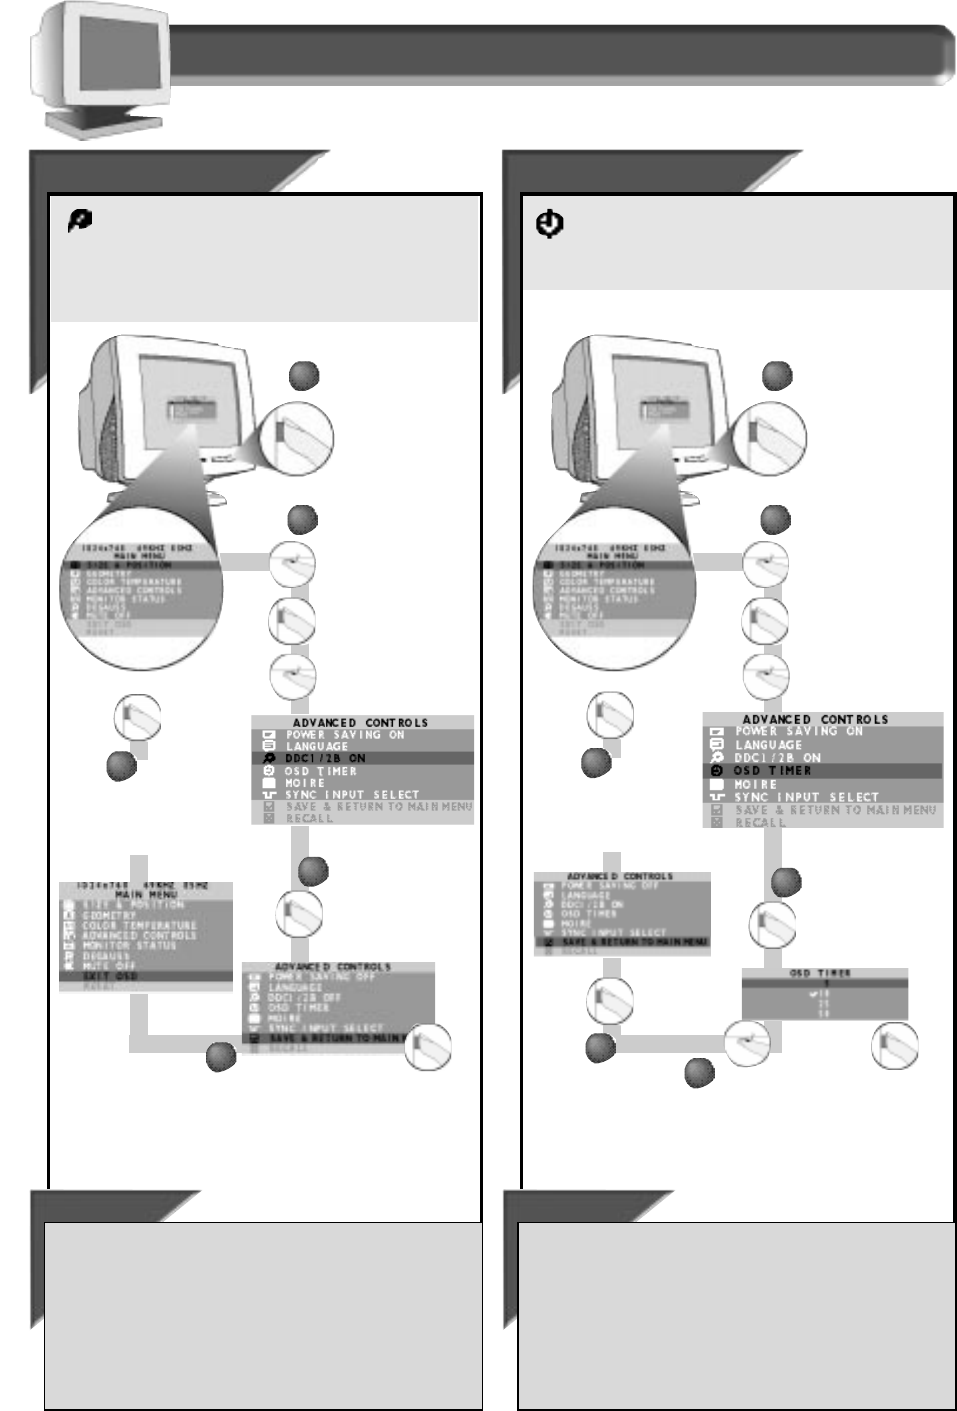
How to Use the On Screen Display (OSD)
DDC1 / 2B
DDC1 / 2B
Many newer computers have DDC technology that this monitor
takes advantage of to provide you better picture quality.
“DDC1 / 2B O
N
”
is the default setting.
If your computer’s video card is
not DDC compatible, you may experience interference,“noise,” or no
color on your monitor. If so, try turning this feature off.
Smart Help
Press the ON SCREEN
DISPLAY button.
3
3
Press the ON SCREEN
DISPLAY button to
change to DDC1 /
2B O
FF.
1
1
Turn the ROTARY knob
until the A
DVANCED
CONTROLS window is
highlighted. Next,
press the O
N SCREEN
DISPLAY button.Then,
turn the R
OTARY knob
until DDC1 / 2B O
N is
highlighted.
To make other changes in the ADVANCED CONTROLS window . . .
. . .
after returning to A
DVANCED
C
ONTROLS
window [but before pressing
the O
N
S
CREEN
D
ISPLAY
(OSD) button in
STEP
4],
turn the ROTARY knob
until another feature – for example, OSD T
IMER – is highlighted. Next,
follow steps 2 - 6 under OSD T
IMER.
. . . after you have exited completely,
press the OSD button and
follow the steps under that feature, for example, OSD T
IMER.
2
2
OSD Timer
OSD Timer
With OSD TIMER you can set the time for the On Screen Display
to time out. Your choices range from 5 to 50 seconds. To select
OSD T
IMER, follow the steps below.
Note: Ten seconds is the default
setting.
Smart Help
Press the ON SCREEN
DISPLAY button.
3
3
Press the ON SCREEN
DISPLAY button to
bring up OSD T
IMER
screen.
4
4
Turn the ROTARY knob until the
desired time out period is
selected. Then, press the O
N
SCREEN DISPLAY button.
Note: a
checkmark appears beside the
current OSD
TIMER
period.
Press the
O
N SCREEN
DISPLAY button to
exit the Main
Menu.
6
6
1
1
Turn the ROTARY knob
until the A
DVANCED
CONTROLS window is
highlighted. Next,
press the O
N SCREEN
DISPLAY button.Then,
turn the R
OTARY knob
until OSD T
IMER is
highlighted.
To make other changes in the ADVANCED CONTROLS window . . .
. . .
after returning to A
DVANCED
C
ONTROLS
window [but before pressing
the O
N
S
CREEN
D
ISPLAY
(OSD) button in
STEP
5],
turn the ROTARY knob
until another feature – for example, M
OIRE – is highlighted. Next, turn
to the next page and follow steps 2 - 6 under M
OIRE.
. . . after you have exited completely,
press the OSD button and
follow the steps under that feature, for example, M
OIRE.
2
2
Press the ON
SCREEN DISPLAY
button again to
save your
selection.
5
5
4
4
Press the ON SCREEN DISPLAY
button again to save your
selection.
Press the
O
N SCREEN
DISPLAY button
to exit the Main
Menu.
5
5