


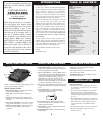

Windshield Mounting
•
Install the two suction cups and rubber bumper onto the
bracket by fitting them into their holes.
•
Press the suction cups onto the windshield at the
location you have chosen.
IMPORTANT: Some newer cars
have a plastic safety coating on the inside of the windshield. The
suction cups may leave permanent marks on this type of surface.
T
o find out if your vehicle has this type of windshield, check the
owner’s manual or ask your dealer. We recommend that you do
not leave the suction cup bracket on the window in direct sunlight.
If the detector is removed, this may cause blistering of the dash
in some vehicles.
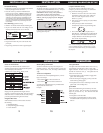
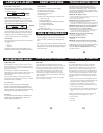
Visor Mounting
(optional accessory)
•
Slide the visor bracket into the bracket mounting slot.
•
Slip the visor bracket onto the visor making sure it is
relatively level and has a clear view of the road.
Power Connection
•
Plug the small end of the power cord into the units
power jack.
•
Plug the large end into the vehicle’s cigarette lighter.
6
INSTALLATION
Insert into bracket mounting slot. Do not bend this
section of bracket.
Slide on view
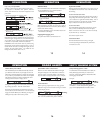
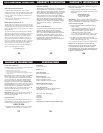
Fuse Replacement
The lighter socket plug is equipped with a replaceable
2 amp 3AG fuse located behind the silver tip. To replace
the fuse, carefully unscrew the tip of the plug.
IMPORTANT: Unscrew slowly. The tip contains a
spring which may fly out when disassembling.
Insert the new fuse with the spring and screw on the tip.
With use, screw cap on plug may loosen. Retighten
occasionally.
Unscrew the tip of the lighter socket plug carefully when
replacing the 2 amp fuse.
7
INSTALLATION
Compass Calibration Set-Up
The unit will need to be calibrated in order for the
compass to provide accurate readings. To calibrate the
unit, perform the following procedure:
1. Mount the unit level in the center of the vehicle’s
windshield in which it will be used. Make sure
there are no other magnetic sources near the
detector (i.e., speaker).
2. Select a large clear area (parking lot or field) without
any power lines.
3. While parked, press both volume buttons
simultaneously until the compass headings start
to rotate.
3. Drive vehicle slowly in two complete circles, in
either direction. If calibration does not automatically
finish press both volume buttons simultaneously to
complete calibration. The unit will beep twice and
show current compass heading.
Note: If unit mounting is relocated in the vehicle, (i.e.
visor to windshield mounting or dash mounting), or if the
unit is moved to another vehicle, you must recalibrate
the compass.
8
COMPASS CALIBRATION SET-UP
N
S
EW
N
S
E
W
Power On And Self-Test
Each time your Whistler detector is turned on, an
automatic self-test sequence confirms that the speaker
and visual displays are functional.
•
Press Power or apply Power. Display reads:
Self-Test Mute
Simply press the Quite button during the self-test
sequence to cancel the self-test audio. This will not effect
radar/laser alerts. To restore the self-test audio, simply
press the Quiet button during the next self-test.
Integrated Real Voice
When selected, Real Voice will be used to articulate
the following:
1. Band Identification
2. Safety Warning System message
3. Feature Selection
9
OPERATION
N
S
EW
N
S
EW
N
S
E
W
N
S
EW
N
S
E
W
N
S
E
W
Memory/Beep Confirmation
All features selected (except Stay Alert and Quiet) are
retained in memory. Each time a button is pressed one
beep confirms feature “on”, two beeps confirm feature
“off”.
Audio Level Adjustment
The audio levels can be adjusted high to low, or low to
high, in seven steps:
•
Press Volume up to increase audio level.
•
Press Volume down to decrease audio level.
As audio level is adjusted, beeps are provided and the
display indicates volume level.
Example:
10
OPERATION
N
S
EW
N
S
EW
N
S
EW
N
S
EW
N
S
EW
N
S
EW
N
S
EW
Auto Quiet Mode
Auto Quiet reduces the selected audio level to a level (1)
approximately 5 seconds after a radar or safety radar
signal is detected. The alert for any new signal within 20
seconds will resume at level (1). Auto Quiet does not
affect VG-2 or laser alerts.
•
Press Quiet (before a signal is detected) to engage Auto
Quiet. Unit will beep once.
•
Once the Auto Quiet is engaged, you may cancel the
audio alarm by pressing Quiet.
•
Press Quiet (when the unit is not alarming) to cancel Auto
Quiet mode. Unit will beep twice.
Quiet Mode
Quiet cancels audio during an alert and any new alert
within 20 seconds. After 20 seconds, approximately 2
beeps are provided on any new alert and unit then
remains quiet.
•
Press Quiet to cancel the audio.
•
Press Quiet a second time during an alert to restore
the standard audio alert pattern; or turn the unit off,
then on.
11
OPERATION