


7
4. Remove battery from vehicle. MAKE SURE THAT THE BATTERY HAS GOOD
VENTILATION. The process causes the release of hydrogen and oxygen. An
accumulation of these gases presents a real danger of explosion.
5. Open the battery cap, if removable.
6. Fill the battery with distilled water according to the manufacturer’s instructions.
Since batteries may rapidly bubble while being charged, remember to refill (only
with distilled water) after the equalization process is complete and the voltage is
back to normal.
7. Follow the steps in the “Charging the Battery” section on page 5 of this manual.
8. Push the Battery Type Selector Switch until “WET” is displayed. (This mode will
only work if a WET battery is selected.)
9. Choose the correct charge rate and start charging. You can check the battery
voltage by pushing the Battery Voltage button.
10. Push the Equalize button at any time and the battery will automatically begin to
equalize in 4 amp limited current. Note that in order to push the recessed button
you will need a small pin or ballpoint pen.
11. Every hour, the temperature should be checked by touching the battery. If the
battery is hot to the touch, stop the charging and allow the battery to cool.
12. The voltage rises, but does not go over 15.3v to 16.2v (2.55-2.7v per cell).
13. The “WET” LED flashes while the charger is in equalize mode.
14. The Digital Display will show “FUL” when the equalization process is complete.
Engine Start
The Engine Start function can supply 150 amps for engine starting.
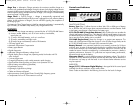
1. Set the 4/15/30/50 AMP button to 50 amp mode and immediately press the
150A button switch to activate the Engine Start mode.
2. The Digital Display will countdown from “999” to “000”.
3. When the “000” count is reached and begins flashing on the Display, the vehicle
is ready to start.
4. Crank the engine using manufacturer’s guidelines, typically in 3 to 5 second
bursts. The high current engine starting function requires a resting/cooling period
between tries. The charger will switch back to regular charge mode after
5 seconds and will not allow operation in this mode for 4 minutes. Wait 4 to 5
minutes before a second attempt at starting the engine, if needed.
5. During the rest period, the battery is charging at 50 amps. After engine starts,
follow the steps outlined in “Important Safety Instructions” at the front of this
manual to disconnect.
Recondition Mode
Whenever a lead-acid battery begins to discharge, lead sulfate, an insulator, begins
to build up on the battery’s internal plates. This reduces the ability of the battery to
hold a full charge. When that battery has an immediate charge, most of the lead
sulfate is dissolved and the plates are free of this insulation. If a battery remains in a
discharged condition over a longer period of time, the lead sulfate changes to a hard
crystalline form, making a full charge difficult to achieve. Reconditioning may “save”
a sulfated battery.
BATTERY RECONDITION MODE should only be used with 10 amp hour (Ah) or
larger capacity lead-acid batteries. Charge the battery to be treated for 20 minutes,
6
the microprocessor, and the unit will stop charging if the selected rate is too fast
or too slow for battery size or condition.
As the battery nears full charge, the unit’s output will automatically drop to a
lower charge rate.
Pressing the 4/15/30/50 AMP button repeatedly advances to standby mode;
the unit sounds a beep, displays “000” and stops charging.
4. The battery charger displays the charge current. To view the battery voltage,
press BATTERY VOLTAGE button. The charger will sound a beep and display the
battery voltage for 3 seconds, then returns to displaying the charge current.
5. The display shows “FUL” when the battery is fully charged.
6. Follow the steps outlined in “Important Safety Instructions” at the front of this
manual to disconnect.
Automatic Float Charging
Automatic Float Charging is ideal for maintaining a fully charged battery.
1. Keep the AC power and battery connected after battery is fully charged.
2. The charger monitors the battery and tops it off as needed.
3. The Float Charge indicator lights; the display shows charge current when topping
off the battery and returns to “FUL” when completed.
4. To view battery voltage, press the Battery Voltage button.
Note: Charging can be terminated by repeatedly pressing the Charge Rate Selector
button until the circulating pattern appears on the display.
After AC power interruption, charging restarts at 4 amp rate automatically.
WARNING
If battery size is not known, charge at the 4 amp rate. DO NOT
overcharge batteries.
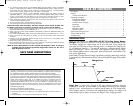
Equalizing
Equalizing is the process by which the fluid in each of a battery’s cells is equalized.
This process takes place after charging is complete.
WARNINGS
• NEVER TRY TO EQUALIZE A GEL OR AGM CELL. THE RESULTING
EXPLOSION COULD CAUSE PROPERTY DAMAGE, SERIOUS INJURY
AND/OR DEATH.
• Remove or disconnect the vehicle’s battery when equalizing.
The frequency which the equalization process needs to be run depends on the use of
the battery. The more the battery is used, the more undercharged it becomes; thus the
more frequently the battery should be equalized.
1. Do not use this mode on sealed or valve regulated batteries. This mode is only
meant for wet (unsealed/vented) batteries.
2. Make sure there are no flammable sources near the recharging site.
3. Wear safety glasses, gloves and protective clothing.
VEC1098A_Manual_082606 8/26/06 12:56 PM Page 6