


7
Fuse Replacement (DC Charging Adapter)
1. Remove the plug from the accessory outlet. Remove the gold cap by turning
counterclockwise and lifting off.
2. Remove the center pin and spring. Remove the fuse.
3. Replace the fuse with a same type and size fuse (8 amp).
4. Replace the center pin and spring inside the plug.
5. Replace the gold cap by turning clockwise onto the plug.
Battery Replacement/Disposal
It is recommended that the unit be returned to manufacturer for battery replacement.
Contact Customer Service, toll-free, at (866) 584-5504.
Battery Disposal
Contains a maintenance-free, sealed, non-spillable, lead acid
battery, which must be disposed of properly. Recycling is
required — contact your local authority for information. Failure
to comply with local, state and federal regulations can result in
fines or imprisonment. For more information on recycling this
battery, call toll-free (877) 288-7722.
WARNINGS
Do not dispose of the battery in fire, as this may result in an explosion.
Before disposing of the battery, protect exposed terminals with
heavy-duty electrical tape to prevent shorting (shorting can result in
injury or fire).
Do not expose battery to fire or intense heat, as it may explode.
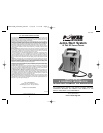
SPECIFICATIONS
Model: VEC012POB
Boost Ampere: 450 instantaneous cranking amps
Battery Type: Sealed, high energy density, AGM, lead-acid,
rechargeable, maintenance-free, 12 volt DC
Area Light: Light Emitting Diode (LED)
Booster Cables: Heavy duty welding cable with
450 amp copper clamps
Accessory Outlet: Self-resetting breaker 5 amps
DC Charging Adapter: 12 volt DC
AC Charging Adapter: 120 volt AC (700mA, 12 volt DC output)
USB Power Port: 5 volts/500 mA (maximum) DC power
6
Charging/Recharging
For maximum battery life, we recommend the
Jump-Start System
be kept fully
charged at all times. If the battery is allowed to remain in a discharged state,
battery life will be shortened.
Note:
Recharging battery after each use will prolong battery life; frequent heavy
discharges between recharges and/or overcharging will reduce battery life.
120 Volt AC Recharge
1. Plug the AC plug of the AC/DC adapter/charger into any standard 120 volt
AC wall outlet.
2. Plug the barrel connector attached to the AC/DC adapter into the small barrel
receptacle on the jump-starter.
3. After initial charge, recharge this device as necessary for at least 14-16 hours
or until the green FULL indicator lights.
Recharge at least once a month
when not in frequent use.
4. When charging is complete and the FULL indicator lights, remove the AC/DC
charger plug and store in a safe place.
Note:
The unit cannot be overcharged using the AC method. The Jump-Starter also
comes with a DC/DC charging adapter for recharging the unit from a vehicle’s
12 volt DC accessory outlet.
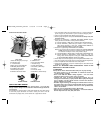
12 Volt DC Charging
The DC recharging method will NOT recharge the unit as effectively as recharging
from 120 volt AC. The 12 volt DC recharging procedure is recommended only
when it is necessary, since frequent use of the 12 volt DC recharging procedure
may shorten the battery system’s life.
1. Insert the gold-tipped DC/DC charging adapter plug into the vehicle’s 12 volt
DC accessory outlet.
2. Insert the silver-tipped end plug into the 12 volt DC accessory outlet on the front
panel of the unit.
3. To check the charge status of the battery during DC charging, disconnect the
DC adapter from the accessory outlet and push the Battery Charge Level
pushbutton. Observe the battery charge indicator.
4. When charging is complete, remove the power cord and return it to the storage
compartment.
WARNING
Do not recharge for more than 5 to 6 hours maximum using the 12
volt DC method.
Replacement Parts
For replacement parts (charging adapters, etc.), contact Technical Support, toll free
at (866) 584-5504.
WARNING
Do not operate unit if there is any evidence of damage. The product
must be returned to Vector Products, Inc. for testing and repair.
Replace any damaged Charging adapters immediately before further
use.
VEC012POB_ManualEN_042506 5/19/06 4:14 PM Page 6