


TOPCOM SMC-3000 5
TOPCOM SMC-3000
ENGLISH
The massage cushion comes with a screw located on the backside of the unit to protect the massage
mechanism during shipment.
This screw must be removed before use to allow that the massager functions properly.
Properly dispose the screw and install the included black plug into the hole that was left by the screw.
4.2 Strapping system
The massage cushion can be installed to almost and chair.
Slip the straps over the seat or chair and the adjust the fastening straps to secure.
The massage won’t slip or slide away.
4.3 Connecting to the main power.
• Plug one end of the power adaptor into the 230V outlet and the other end into the adapter jack
which leads from the massage cushion.
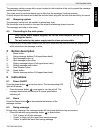
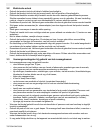
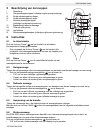
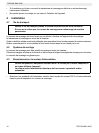
5 Button description
I Demo button
II Swing massage buttons (Full/upper/lower back)
III Spot massage button up
IV Spot massage button down
V Rolling massage buttons (Full/upper/lower back)
VI Rolling massage width button
VII Seat Vibration button
VIII Power button
IX Shiatsu massage button (Full/upper/lower back)
6 Instructions
6.1 Power On/Off
Press the power button to turn the unit on. The corresponding LED
light will illuminate.
• Press the power button once again to turn the unit off. The
massage mechanism will return to its lowest point before
switching off.
6.2 Demo
Press the Demo button to demonstrate the features of the
massage cushion.
6.3 Swing massage
During swing massage, the massage heads will swing from bottom to top and reverse.
• Press the relevant swing massage button to select either:
– “Full” to enjoy a full back massage.
– “Upper” to enjoy only the upper back swing massage.
– “Lower” to select the lower back swing massage.
Only use the power adapter supplied. Do not use other adapters, as this may
damage the device.
The wall outlet for the power supply must be close and accessible.
FULL
FULL
FULL
FULL
UPPER
UPPER
UPPER
UPPER
LOWER
LOWER
LOWER
LOWER
UPPER
UPPER
LOWER
LOWER
FULL
FULL
Shiatsu
Swing
Spot
Spot
Rolling
DEMO
DEMO
POWER
POWER
SEAT
L
H
M
Width
Width
I
II
III
IV
VI
VII
VIII
IX
V
VIII
VIII
I
II