


Section 1. Trailer Adjustments.
WARNING: ALL SUSPENSION ADJUSTMENTS SHOULD BE
MADE TO BOTH SIDES EQUALLY!
The suspension on this trailer system is adjustable for varying loads
and terrain.
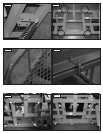
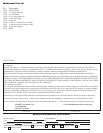
The shocks on this trailer are adjustable. Each shock has a collar in the
middle of the shock just below the spring. Turning the collar counter-
clockwise increases the stiffness of the spring as shown in Figure 1.
It is recommended that the shocks be stiffened for frequent heavy load
use. Lighter loads require less stiffness.
There are three different shock mounting points allowing for three dif-
ferent placements. The closer the shock comes to perpendicular with
respect to the frame, the stiffer it becomes (See Figure 2). Always
adjust both sides equally.
Section 2. Add On Trailer Attachments.
This trailer system has the ability to accept other Summit ATV add ons.
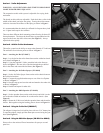
The trailer has four tie down points as shown in Figure 3.
Part 1. Attaching the Bed (PN 84017)
Step 1. Lay the bed on the trailer frame between the welded on brack-
ets as shown in Figure 4.
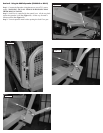
Step 2. Using the supplied U-Bolts, attach the bed to the frame as
shown in Figure 5. Run one side of the bolt through the pre-drilled
hole in the frame and around the bed frame (See Figure 6).
Part 2. Attaching the 40 Gallon Sprayer (PN 84018)
Step 1. Set the 40 Gallon Spayer frame on the trailer chassis between
the welded on brackets.
Step 2. Connect the supplied ratchet strap to one of the tie off points
as shown in Figure 7.
Step 3. Run the strap up and over the tank and attach to the other side
as shown in Figure 8.
Step 4. Ratchet and repeat for other side.
Part 3. Attaching the 400lb Spreader (PN 84019)
Step 1. Set the spreader frame on the trailer chassis and slide it to the
rear so that the welded on brackets t over the trailer chassis. (See
Figure 9).
Step 2. Mount the U-Bolt over both the spreader frame and the trailer
chassis. Bolt together using the backing plate as shown in Figure 10.
Section 3. Using the Trailer Bed (PN 84017)
The tailgate is hinged and it is held in place with two 5/16” detent pins.
To open the tailgate, simply pull the detent pins out and swing the gate
down (See Figure 11).
Section 4. Using the 40 Gallon Sprayer (PN 84014 or 84018)
Please refer to the enclosed Fimco Instructions for sprayer use and
parts lists.
Figure 1
Figure 4
Figure 7