


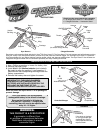

PRE-FLIGHT ENVIRONMENT CHECK
CHARGING YOUR GYROCOPTER
FLYING INSTRUCTIONS
Important Charging Information:
• Before taking your initial flight, charge the Gyro Havoc™ for a complete charge cycle on your charger.
•
Depending upon the length of future play, you will not need to complete a full charge before each flight.
NOTE: A shortened charge results in a shorter play time (may take up to 1/2 hour to fully charge).
1. Location – Fly in a large wide open, grassy location that is free of
buildings, trees, overhead wires, and other obstructions. Do not fly near
people or animals.
2. Weather – Fly on mild, sunny days. Do not fly in electrical storms, rain, sleet,
snow or other adverse weather conditions. Do not fly if the temperature is
below 45°F. In very cold temperatures, the aircraft will become fragile and the
engine performance will decrease.
3. Wind Conditions – Do not fly in wind. Winds may overpower the aircraft and
make it difficult to control. Use the wind ribbon included to measure the wind,
do not fly if the ribbon is 45° or more (see No. 6).
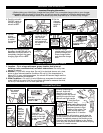
1. Push the aircraft’s
O
N/OFF switch to
the left to set the
aircraft to OFF.
Set the charger/
controller switch to
CHARGE.
4. Push the charge
nozzle all the
way into the
aircraft’s charge
port located at
the bottom of the
aircraft.
3. Flip the
charge
door open
to reveal
the charge
nozzle.
1
4
3
5
5. During the charging process,
the green charge light will turn
ON. When the Gyro Havoc
T
M
is
completely charged, the green
charging light will turn OFF.
6. Remove charge
nozzle gently from the
aircraft’s charge port.
Store charge nozzle
and close the charge
door.
Green
Charge Light
Charge
Door
6
Holes in plug
must align with
p
ins in aircraft.
2. Set the
c
harger/
controller
switch to
OFF.
5
2
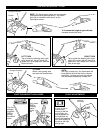
Push the
aircraft’s ON/OFF
s
witch to the r
ight
to set the aircraft
to
ON.
Fully e
xtend
controller
antenna.
Push the
charger/controller
switch to
ON.
P
o
w
er
light will
turn
RED.
1
2
3
8. With the rotors still spinning, gently toss the
aircraft forward into the wind and parallel to the
ground. Immediately ease up the throttle on the
controller until the aircr
aft begins to r
ise
.
Refr
ain
from using the directional until the aircr
aft is flying
forward in a stable manner.
7. Hold the Gyro
Ha
voc™ from
underneath. Wave aircraft
UP and DO
WN using the
downward stroke to start
rotation of the rotors. The
rotors should reach top
speed after 5-10 strokes.
6. When preparing for
take off, check the
direction of the wind.
Always launch the aircraft
against the wind for best
take off and flight results.
54
45
°
Attach
the wind
direction
ribbon to
the end
of the
antenna.