


109821_0508 17
When changing the engine oil, add the exact amount
specified in the engine owner’s manual.
NOTE: Use CD grade or better by API classification
engine oil.
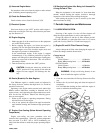
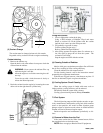
MODELS N843 & N843L ONLY — Add oil at the oil
fill shown.
When changing the engine oil, add the exact amount
specified in the engine owner’s manual.
Use CD grade or better by API classification engine oil.
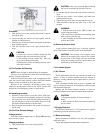
3. Wait about fifteen minutes until the oil gets down to the
oil pan. Then check the oil level with a dipstick. A certain
period of time is required before the engine oil com-
pletely flows down from the oil filler to the crankcase.
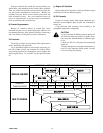
(2) Check For Oil Leaks
Idle the engine to raise the oil pressure, then check for oil
leakage.
Oil level recheck
1. Stop the engine and allow the oil to drain to bottom
(approx. 20 minutes).
2. Use the dipstick to recheck the oil level.
3. Add engine oil, if necessary, to bring level to maximum
level.
CAUTION: When the engine is started, the oil
level will slightly drop from the initial level as the
oil fills into the entire oil circuit.
(3) Engine Oil Additives
Engine oils contain a variety of additives. Your engine
should not need any extra additives if you use the recom-
mended oil quality and change intervals.
(4) Used Oil Disposal
Do not dispose of used engine oil (or any other oil) in a
careless manner such as pouring it on the ground, into sewers,
or into streams or bodies of water. Instead, recycle it by tak-
ing it to a used oil collection facility which may be found in
your community. If you have a problem disposing of your
used oil, it is suggested that you contact your dealer or service
station. (This also applies to diesel fuel which is contami-
nated with water. See "Diesel Fuel" in Section 1.)
(5) Used Engine Oil
WARNING: Used engine oil contains harmful
contaminants that have caused skin cancer in labo-
ratory animals. Avoid prolonged skin contact.
Clean skin and nails thoroughly using soap and
water - not mineral oil, fuels, or solvents. Laun-
der or discard clothing, shoes, or rags containing
used engine oil.
Discard used engine oil and other oil properly.
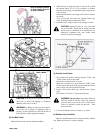
7.2 Cooling System
(1) Fan Belt Tension Adjustment
Adjust fan belt tension when belt becomes loose and when
the belts are replaced. (Refer to Belt Tension section below)
WARNING: To help avoid injury, check and
adjust fan belt tension with engine stopped.
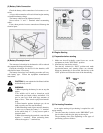
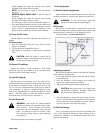
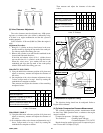
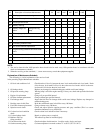
Belt tension
Belt tension is normal when it is depressed 5 mm (0.197
in) with the thumb at the midway between the fan pulley and
alternator pulley. (about 50 N (11 lb) depressing force.)
Fan belt slackness : About 5 mm (0.197 in)
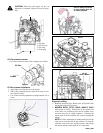
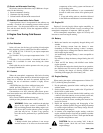
Adjusting procedure
Belt tension adjustment is made by pivoting the alternator
at the alternator mounting bolt.
1. Loosen the alternator adjusting plate bolt and the alterna-
tor mounting bolt.
2. Pivot the alternator at the mounting bolt toward the
engine left or right hand side as required.
3. Tighten the mounting bolt and the adjusting bolt.
CAUTION: Belt tension may vary slightly after
the alternator is tightened. Therefore, recheck the
belt tension after tightening the bolts.
4. After the adjustment, operate the engine about five min-
utes at a low idle speed, stop engine and recheck the belt
tension particularly when installing new belts. Belt ten-
sion may vary due to the initial belt seating.
(2) Fan Belt Change
Use of a low quality fan belt will result in premature belt
wear or belt elongation leading to engine damage such as
overheating. Therefore use of Shibaura genuine fan belt is
highly recommended.