GROUNDINGANDAC POWERCORD
Chargershould be grounded to reduce risk of electric shock.
Chargeris equippedwith an electriccord having anequipment-
grounding conductor and a grounding plug. The plug must be
plugged intoan outlet that is properly installedand groundedin
accordancewith all local codes and ordinances.
DANGER-- Neveralter AC cord or plug provided-if
it will not fit outlet, have proper outlet installed by a qualified
electrician. Improper connectioncan result in a risk of an elec-
tric shock.
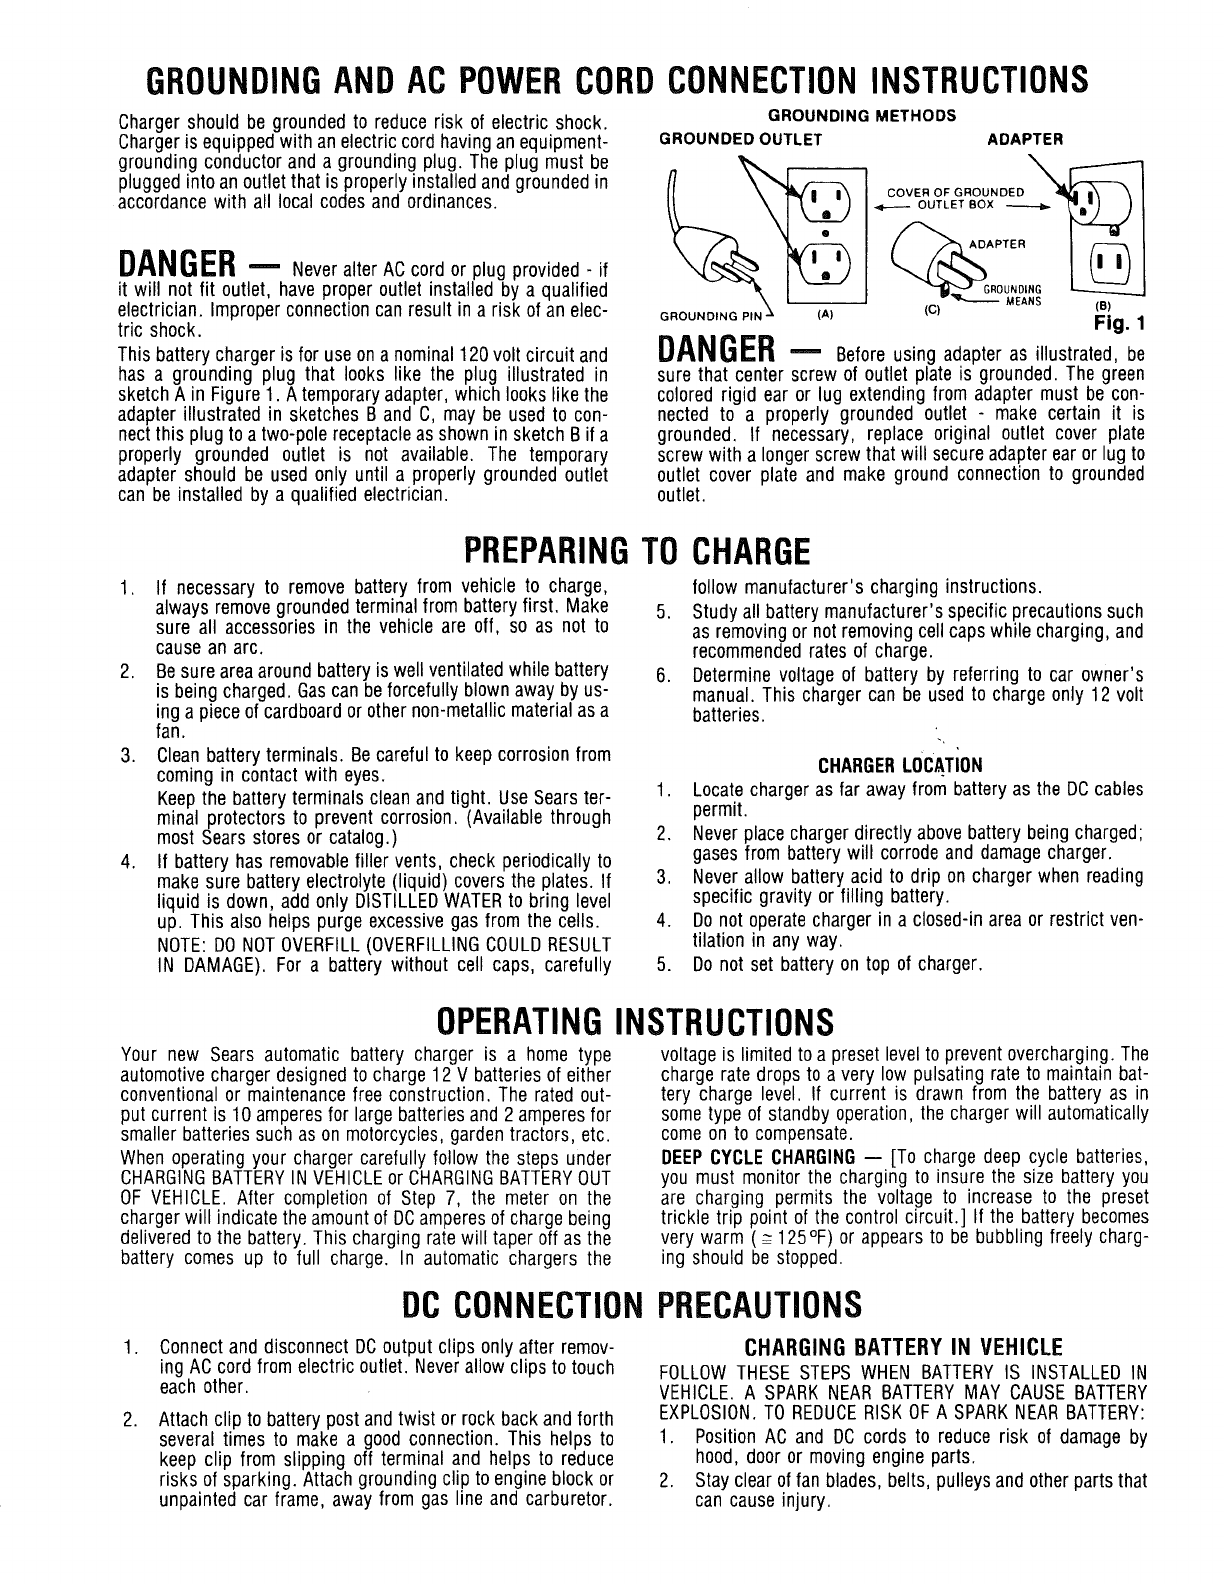
This battery charger is for useon a nominal120volt circuit and
has a grounding plug that looks like the plug illustrated in
sketch A in Figure 1. Atemporaryadapter, which looks like the
adapterillustratedin sketches B and C, may be used to con-
nectthis plug toa two-pole receptacleasshown in sketch B if a
properly grounded outlet is not available. The temporary
adapter should be used only until a properly grounded outlet
can be installed by a qualified electrician.
CONNECTIONINSTRUCTIONS
GROUNDING METHODS
GROUNDED OUTLET
ADAPTER
COVER OF GROUNDED _
OUTLET BOX
DAPTER
"-'_--"_ GROUNDING
MEANS
(c) (B)
Fig. 1
DANGER-- Beforeusing adapter as illustrated, be
sure that center screw of outlet plate is grounded. The green
colored rigid ear or lug extending from adapter must be con-
nected to a properly grounded outlet - make certain it is
grounded. If necessary, replace original outlet cover plate
screwwith a longerscrew that will secureadapterear or lug to
outlet cover plate and make ground connection to grounded
outlet.
PREPARINGTO CHARGE
1. If necessary to remove battery from vehicle to charge,
alwaysremovegroundedterminal from batteryfirst. Make
sure all accessories in the vehicle are off, so as not to
cause an arc.
2. Besure areaaroundbattery iswell ventilatedwhile battery
is being charged. Gascan beforcefully blown away by us-
ing a pieceof cardboardor other non-metallicmaterialas a
fan.
3. Cleanbattery terminals. Be careful to keep corrosion from
coming in contact with eyes.
Keepthe battery terminals cleanand tight. Use Searster-
minal protectors to prevent corrosion. (Available through
most Searsstores or catalog.)
4. If battery has removablefiller vents, check periodically to
make sure battery electrolyte (liquid) covers the plates. If
liquid is down, add only DISTILLEDWATERto bring level
up. This also helps purge excessivegas from the cells.
NOTE:DONOTOVERFILL(OVERFILLINGCOULDRESULT
IN DAMAGE). For a battery without cell caps, carefully
follow manufacturer's charging instructions.
5. Study all batterymanufacturer's specific precautionssuch
as removingor not removingcellcaps while charging, and
recommendedrates of charge.
6. Determinevoltage of battery by referring to car owner's
manual. This charger can be usedto charge only 12 volt
batteries.
CHARGERLOCATION
1. Locate charger as far away from battery as the DCcables
permit.
2. Never placechargerdirectly abovebatterybeing charged;
gases from battery will corrode and damagecharger.
3. Never allow battery acid to drip on charger when reading
specific gravity or filling battery.
4. Donot operate charger in a closed-in area or restrict ven-
tilation in any way.
5. Do not set battery on top of charger.
OPERATINGINSTRUCTIONS
Your new Sears automatic battery charger is a home type
automotivecharger designedto charge 12 V batteriesof either
conventionalor maintenancefree construction. The rated out-
put current is 10 amperesfor large batteriesand 2 amperesfor
smaller batteries such as on motorcycles,gardentractors, etc.
When operating your charger carefully follow the steps under
CHARGINGBATTERYIN VEHICLEor CHARGINGBATTERYOUT
OF VEHICLE. After completion of Step 7, the meter on the
chargerwill indicate the amountof DCamperesof chargebeing
deliveredto the battery. This charging rate will taper off asthe
battery comes up to full charge. In automatic chargers the
voltage is limited toa preset levelto prevent overcharging. The
charge rate drops to a very low pulsating rate to maintain bat-
tery charge level. If current is drawn from the battery as in
some type of standby operation, the chargerwill automatically
come on to compensate.
DEEPCYCLECHARGING-- [To charge deep cycle batteries,
you must monitor the charging to insure the size battery you
are charging permits the voltage to increase to the preset
trickletrip point of the control circuit.] If the battery becomes
very warm (_ 125°F) or appearsto be bubbling freely charg-
ing should be stopped.
DC CONNECTIONPRECAUTIONS
.
.
Connectand disconnect DCoutput clips only after remov-
ing ACcord from electric outlet. Neverallow clips to touch
each other.
Attach clip to battery post and twist or rock back and forth
several times to make a good connection. This helps to
keep clip from slipping off terminal and helps to reduce
risks of sparking. Attach grounding clip to engine block or
unpainted car frame, away from gas line and carburetor.
CHARGINGBATTERYIN VEHICLE
FOLLOWTHESE STEPSWHEN BATTERYIS INSTALLEDIN
VEHICLE. A SPARK NEAR BATTERYMAY CAUSEBATTERY
EXPLOSION.TOREDUCERISKOF A SPARKNEARBATTERY:
1. Position AC and DC cords to reduce risk of damage by
hood, door or moving engine parts.
2. Stay clearof fan blades, belts, pulleysand other parts that
can cause injury.


