


• 11 •
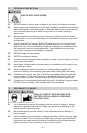
Ammeter
The Ammeter indicates the amount of current, measured in amps, that is being
drawn by the battery. As a battery takes on a charge, it draws less current from
the charger. Correspondingly, the meter will show less current being drawn by
the battery. When the current stops decreasing, the battery is charged. The
start area of the meter indicates a high rate of current being drawn from the
charger. When cranking an engine, the meter needle will be at the extreme
right side of the start area. The 2 amp charge rate may indicate some activity
on the meter, although the meter does not have the resolution to display this
low rate.
OPERATING INSTRUCTIONS11.
This battery charger must be properly assembled in
accordance with the assembly instructions before it is used.
Charging
Ensure that all of the charger components are in place and in good working 1.
condition, for example, the plastic boots on the battery clips.
Connect the battery following the precautions listed in sections 6 and 7.2.
Select the appropriate settings for your battery.3.
Connect the A.C. power following the precautions listed in section 8.4.
Turn the charger on. 5.
Using the Engine Start feature
Your battery charger can be used to jumpstart your car if the battery is low.
Follow these instructions on how to use the ENGINE START feature.
Follow all safety instructions and precautions for charging
your battery. Wear complete eye protection and clothing protection. Charge
your battery in a well-ventilated area.
Using the ENGINE START feature WITHOUT a battery
installed in the vehicle could cause damage to the vehicle’s electrical system.
NOTE: If you have charged the battery and it still will not start your car, do not
use the engine start feature, or it could damage the vehicle’s electrical system.
Set the charge rate switch and the timer to the OFF position.1.
With the charger unplugged from the A.C. outlet, connect the charger to 2.
the battery following the instructions given in section 6: FOLLOW THESE
STEPS WHEN BATTERY IS INSTALLED IN VEHICLE.
Plug the charger A.C. power cord into the A.C. outlet, and then move the 3.
timer switch from OFF to the HOLD position.
With the charger plugged in and connected to the battery of the vehicle, set 4.
the charge rate selector switch to the engine start position.
Crank the engine until it starts or 3 seconds pass. If the engine does not 5.
start, wait 4 minutes before cranking again. This allows the charger and
battery to cool down.
NOTE: During extremely cold weather, or if the battery is under 2 volts, charge
the battery for 5 minutes before cranking the engine.
If the engine fails to start, charge the battery for 5 more minutes before 6.
attempting to crank the engine again.
After the engine starts, move the charge rate selector switch and timer to 7.
the OFF position and unplug the A.C. power cord before disconnecting the
battery clips from the vehicle.