


• 6 •
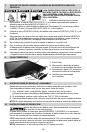
3. Place the solar panel in the sun. For optimum solar panel output, face the front
(glass) side of the solar panel towards the sun, making sure there are no shadows
being cast on the panel by the vehicle or other objects. The best orientation to place
the solar panel is in a south to north direction with the panel tilted at a suitable angle.
The best angle would be the same as your local latitude.
4. To disconnect, reverse the procedure.
The Schumacher SP-400 is a battery charger/maintainer that charges small batteries
and maintains large 12 volt batteries, keeping them at full charge. However, if you were
to use this unit to charge a large battery, you may lose some of the battery’s capacity.
This would cause the battery to be unable to hold a charge and become useless.
NOTE: The maintain mode technology utilized in Schumacher maintainers allows you
to safely maintain a healthy battery for extended periods of time. However, problems
with the battery, electrical problems in the vehicle, improper connections or other
unanticipated conditions could cause excessive current draws. As such, occasionally
monitoring your battery and the maintaining process is recommended.
NOTE: This is a manual charger and will overcharge a battery if permitted to operate for
extended periods of time. Monitor charging often, as not doing so may cause damage to
your battery, or result in other property damage or personal injury.
The manufacturer strongly recommends using a solar charge controller
(p/n 4999000292, not included) in tandem with this solar panel for optimal results, and to
avoid overcharge or discharge of the battery.
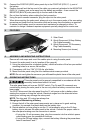
Using The Quick-Disconnect Cable Assemblies
Connect either of the two output cable assemblies to the solar panel. Do not place
on wet ground, anywhere it could be accidently stepped on or in a place or position
where it could fall while being used. Never use the output cables together or for other
applications, as reverse polarity and/or overcharge conditions will occur.
50 Amp Battery Clip Cable Assembly
1. Connect the end of the solar panel output cable to the end of the 50 amp battery
clips cable.
2. Follow the steps in sections 6 and 7 to connect the output clips to the battery.
3. After a good electrical connection is made to the battery, place the solar panel in the
sun, per the instructions in step 4 of the solar panel location section.
12V Accessory Plug Cable Assembly
Maintain or charge your battery without lifting the hood.
1. Connect the end of the 12V accessory plug cable to the solar panel.
2. Insert the 12V accessory plug into the 12V accessory outlet.
3. Route the power cord from the solar panel through the vehicle’s open window.
4. Place the solar panel in the sun, per the instructions in step 4 of the solar panel
location section.
11. MAINTENANCE INSTRUCTIONS
11.1 After use and before performing maintenance, unplug and disconnect the solar panel
(see sections 6, 7 and 8).
11.2 Use a dry cloth to wipe all battery corrosion and other dirt or oil from the battery clips,
cords and the solar panel.
11.3 The solar panel uses a glass substrate; please handle with care.
11.4 Always keep the glass surface clean using a soft cloth in order to ensure its maximum output.
11.5 Ensure that all of the solar panel components are in place and in good working
condition, for example, the plastic boots on the battery clips.
11.6 Servicing does not require opening the unit, as there are no user-serviceable parts.
11.7 All other servicing should be performed by qualied service personnel.