


• 9 •
10. ASSEMBLY INSTRUCTIONS
Remove all cord wraps and uncoil the cables prior to using the
battery charger.
11. CONTROL PANEL
LED Display
CHECK BATTERY (red) LED lit: Indicates that the battery is not
properly connected to the charger or the battery is bad.
CHARGING (yellow) LED lit: Indicates the charger is charging
the battery.
CHARGED (green) LED lit: Indicates the battery is fully charged and
the charger is in maintain mode.
12. OPERATING INSTRUCTIONS
This battery charger must be properly assembled in
accordance with the assembly instructions before it is used.
Charging
NOTE: Examine the battery for excessive wear, cracks, bulging
or damage each time you charge it. If damage is detected, do not
charge the battery, replace it immediately. If the battery is hot, allow it
to cool before charging.
1. Select the proper output cable by matching the output cable
connector to the vehicle’s battery connector.
2. Connect the battery following the connection instructions described
in Using the Quick-Disconnect Cable Connectors section.
3. Connect the AC power following the precautions listed in section 6.
4. If you’ve connected everything correctly, the CHARGING LED
should be lit indicating that the charger is charging.
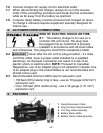
Using the Quick-Disconnect Cable Connectors
Connect the output cable assembly to the charger. Make sure to place
the charger on a dry, non-ammable surface like metal or concrete.
• With the charger disconnected from the wall outlet, connect the
supplied harness assembly by connecting the black connector
to the black connector on the end of the charger cable. Connect
the other end of the cable assembly to the battery.