


3 Attaching the actuator to the
valve
If the actuator has not already been
mounted on the valve by the manufacturer
or when the original actuator on a valve is
to be replaced with a controller with electric
actuator, proceed as follows.
Note!
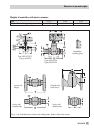
Fasten the actuator and valve together either
at the valve connection or at the intermedi
-
ate insulating piece, depending on the valve
version, with a tightening torque of 20 Nm.
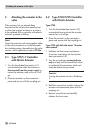
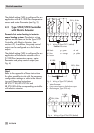
3.1 Type 5757/-7 Controller
with Electric Actuator
1. Turn the handwheel (see section 5.1)
counterclockwise when the actuator is
disconnected from the power supply to
retract the actuator stem as far as it will
go.
2. Place the actuator on the connection
piece and secure with the coupling nut.
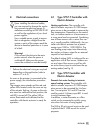
3.2 Type 5724/5725 Controller
with Electric Actuator
Type 5724
1. Turn the handwheel (see section 5.2)
counterclockwise to retract the actuator
stem as far as it will go.
2. Place the actuator on the connection
piece and secure with the coupling nut.
Type 5725 with fail-safe action “Actuator
stem extends”
1. Unfasten the front cover and place a
4 mm hex screwdriver on the actuator
stem (see section 5.2).
2. Turn the screwdriver counterclockwise
only and only until the travel final value
is reached at the maximum, which acti-
vates the bottom torque switch.
Caution!
Turning the actuator too far will destroy
it.
3. Hold the screwdriver in place. Secure the
actuator and connection piece with the
coupling nut.
4. Remove screwdriver and carefully
refasten the front cover.
10 EB 5766 EN
Attaching the actuator to the valve