


TROUBLESHOOTING
If you have problems operating your detector, the suggestions in this section might help. If you cannot solve the problem after trying
these suggestions, take your detector to your local RadioShack store for assistance.
Problem Suggestion
The detector does not turn on Be sure all power connections are secure.
The cigarette lighter socket might be dirty. Clean it with fine emery cloth to ensure a good,
clean connection.
Check the fuse in the power cord’s cigarette lighter plug. See “Replacing the Fuse”.
Check the fuse that controls power to your vehicle’s cigarette-lighter socket. See your
vehicle’s owner’s manual.
The detector gives a false alert when you use
vehicle accessories such as power windows,
motorized mirror, brakes, and so on
Check the vehicle’s electrical system for a loose connection, including the main battery
cable and alternator connections.
Install a filter capacitor (1000µF, 35 volts) on the back of the cigarette lighter socket, across
the power connections.
The detector performs the self-test, but does not
respond to radar signals when you see a police
car.
A police car might not be equipped with radar (see the supplied booklet, “Questions and
Answers About Vehicle Speed Detection”).
Police might be using VASCAR type speed detection (See the supplied booklet, “Questions
and Answers About Vehicle Speed Detection”).
The detector has poor laser detection range Be sure the laser detection lens is not blocked.
Be sure the detector is properly mounted.
Use lens cleaning solution to clean the laser detection lens.
SELECTING DISPLAY BRIGHTNESS
Your detector has three levels of display brightness: Bright, Dim, and
Dark. The indicator’s brightness level is always set to bright when you
turn it on.
1. Press
Dim once to reduce brightness to Dim (50% darker).
2. Press
Dim again to reduce brightness to Dark (turns off all
indicators except the P indicator).
3. Press
Dim a third time to return all indicators to Bright.
MUTING THE AUDIO ALERT
While the detector sounds an alert signal, press Mute to temporarily
silence the detector.
The detector automatically turns Mute off 20 seconds after the alert
signal stops. To return the detector to normal operation sooner, press
Mute before the detector resets itself.
AUTO MUTE MODE
Your detector has Auto Mute Mode which automatically reduces the
audio volume of all alerts after 4 seconds for as long as the signal is
detected. If the same radar signal is encountered within 20 seconds,
the detector maintains a reduced audio-volume.
RECEIVING AND
IDENTIFYING SIGNALS
When your detector senses a radar signal, it responds with different
audible and visual alarms to indicate the signal type for X-, K-, and
Ka-band signals. The detector also indicates the signal strength by
increasing the rate at which the LEDs flash and the tones sound as
you get closer to the radar source. The
2 and 3 signal strength LEDs
also flash to indicate the strength of radar signals.
Ô Note Ô
If there is another detector in the vicinity, you might receive false
signals.
© 2003 RadioShack Corporation. All Rights Reserved.
RadioShack and RadioShack.com are trademarks
used by RadioShack Corporation.
03A03
PrintedinChina
THE FCC WANTS YOU TO KNOW
This equipment has been tested and found to comply with the limits for a Class B digital device, pursuant to Part 15 of the FCC Rules.Theselimits
are designed to provide reasonable protection against harmful interference in a residential installation. This equipment generates, uses, and can
radiate radio frequency energy and, if not installed and used in accordance with the instructions, may cause harmful interference to radio
communications.
However, there is no guarantee that interference will not occur in a particular installation. If this equipment does cause harmful interference to radio
or television reception, which can be determined by turning the equipment off and on, the user is encouraged to try to correct the interference by one
or more of the following measures:
• Reorient or relocate the receiving antenna.
• Increase the separation between the equipment and receiver.
• Connect the equipment into an outlet on a circuit different from that to which the receiver is connected.
• Consult your local RadioShack store or an experienced radio/TV technician for help.
• If you cannot eliminate the interference, the FCC requires that you stop using your radar detector.
Changes or modifications not expressly approved by RadioShack may cause interference and void the user’s authority to operate the equipment.
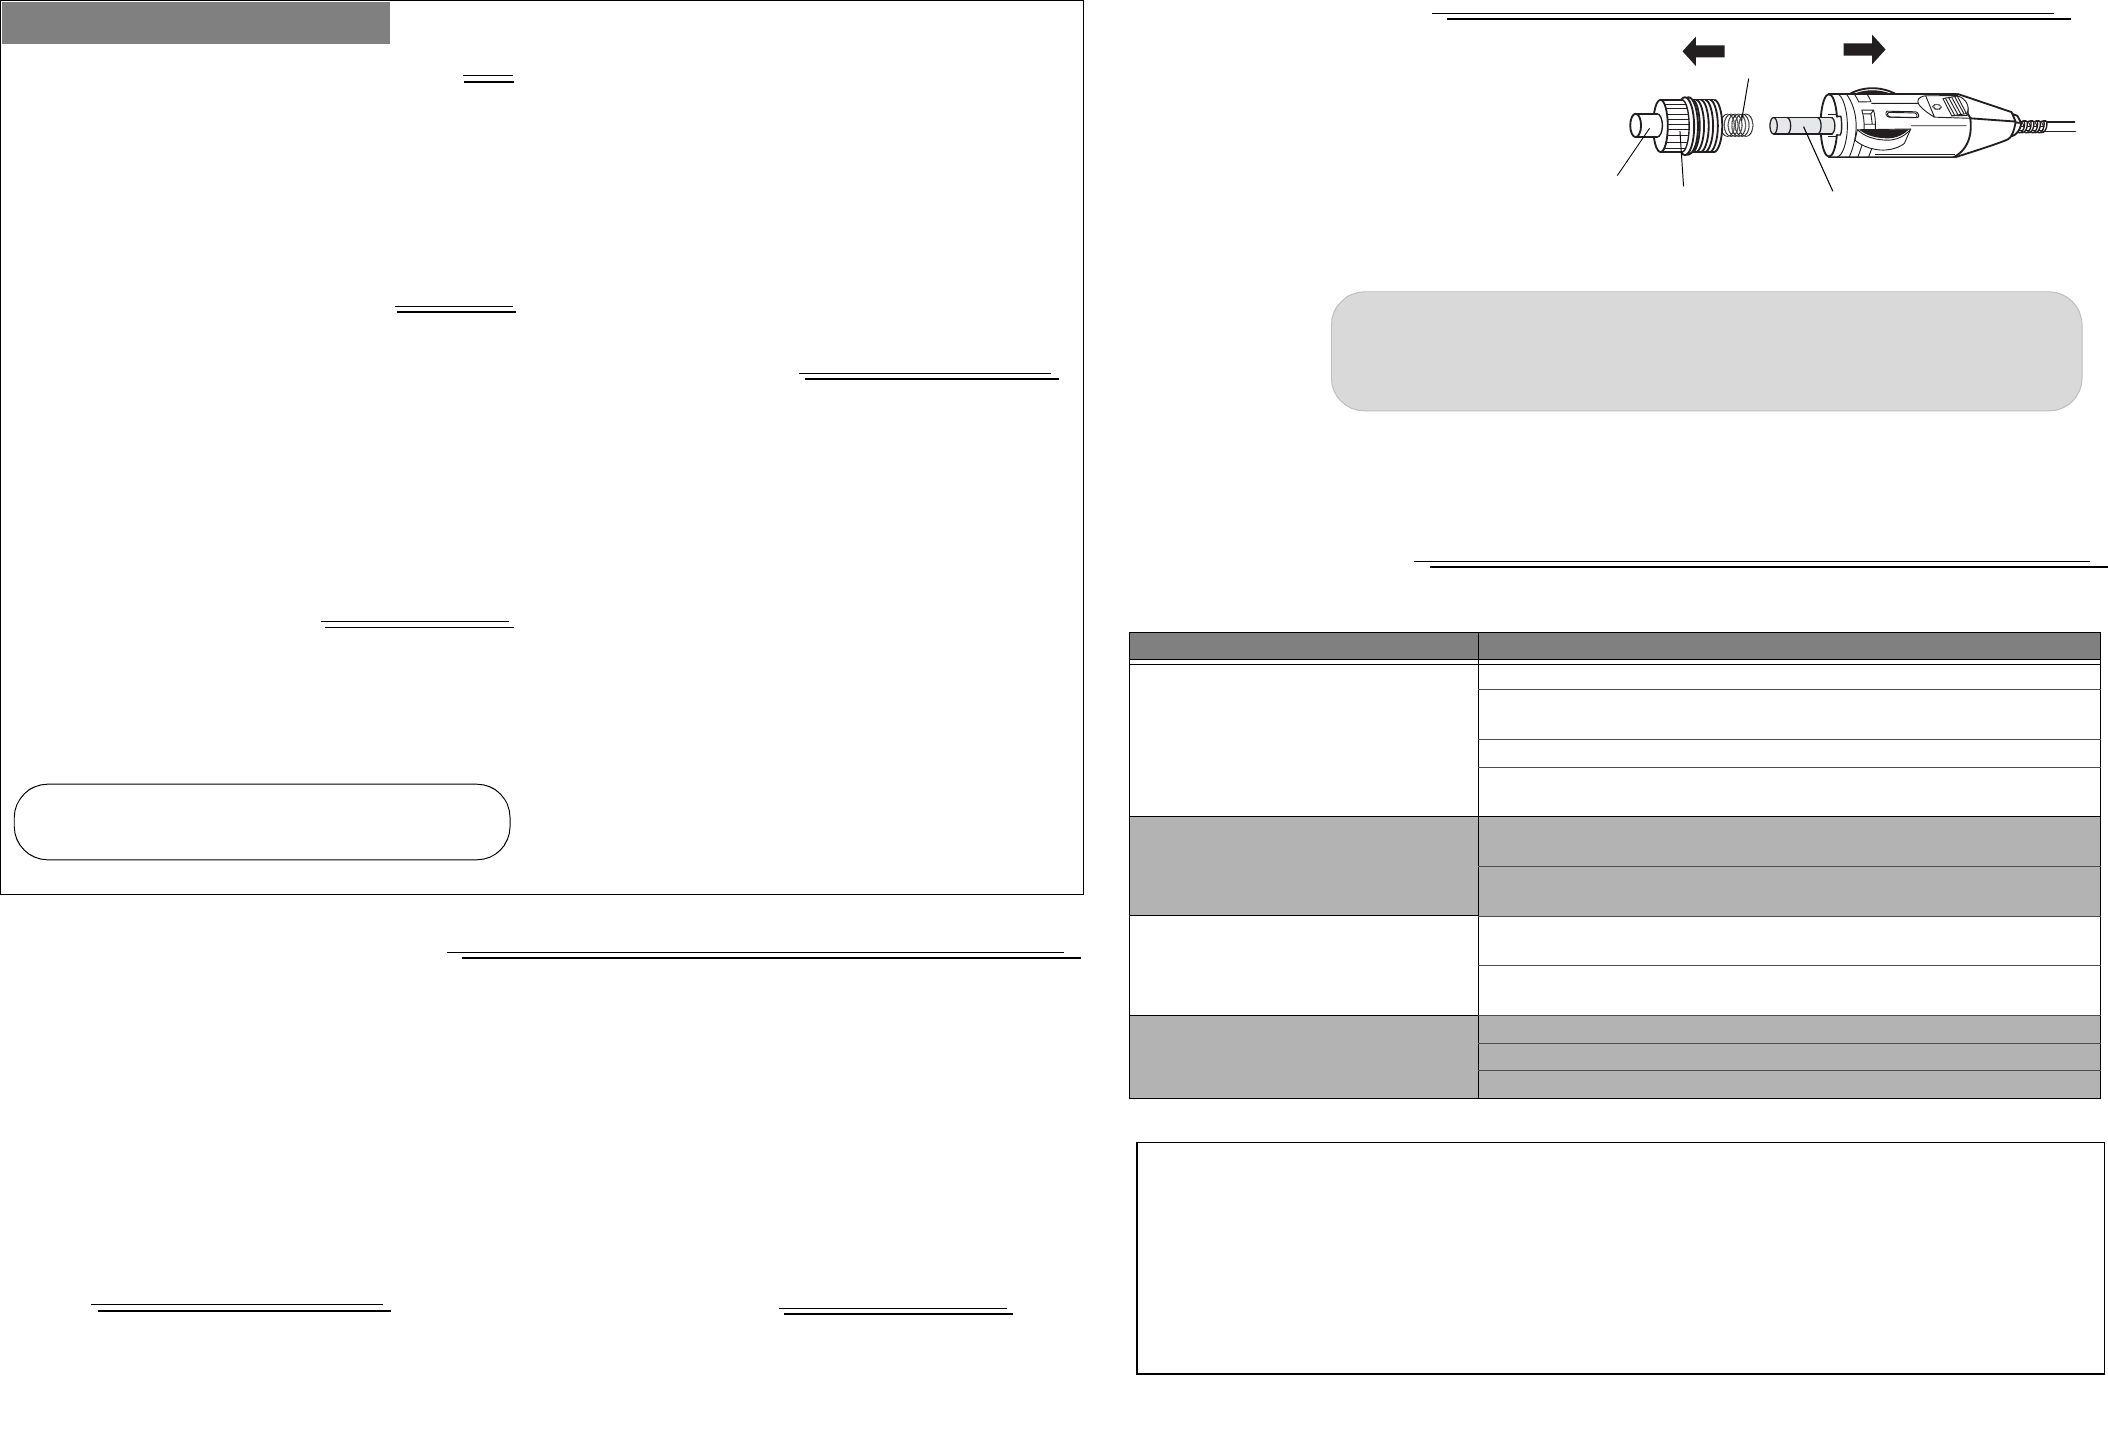
REPLACING THE FUSE
If the detector stops operating, follow these steps to check the fuse
in the power cord’s cigarette lighter plug and, if necessary, replace it
with a 2 amp, 1
1
/4 ×
1
/4 -inch, fast-acting fuse (supplied).
1. Carefully turn the knurled ring on the cigarette lighter plug
counterclockwise to unscrew it.
Take care not to lose the ring, tip, or the spring inside the
plug when removing the ring.
2. Remove the ring and tip from the cigarette lighter plug, then
remove the old fuse.
3. Check the fuse. If it has
blown, replace it.
4. Replace the metal tip
inside the ring, make
surethespringis
intact, then place the
fuse inside the
cigarette lighter plug and screw the ring back onto the plug.
Make sure the tip is visible
when you reassemble the cigarette lighter plug.
CAUTION
• Using a fuse that does not meet the requirements listed above can damage your detector, the power
cable, or the vehicle’s electrical system.
• If you must use pliers to loosen the ring, be careful not to crush the ring or the metal tip inside the ring.
• Never use pliers or other tools to retighten the ring on the cigarette lighter plug.
Limited One-Year Warranty
This product is warranted by RadioShack against manufacturing defects in material and workmanship under normal use for one (1) year from the date of purchase from RadioShack company-owned stores and authorized RadioShack
franchisees and dealers. EXCEPT AS PROVIDED HEREIN, RadioShack MAKES NO EXPRESS WARRANTIES AND ANY IMPLIED WARRANTIES, INCLUDING THOSE OF MERCHANTABILITY AND FITNESS FORA PARTICULAR
PURPOSE, ARE LIMITED IN DURATION TO THE DURATION OFTHE WRITTEN LIMITED WARRANTIES CONTAINED HEREIN. EXCEPT ASPROVIDED HEREIN, RadioShack SHALL HAVE NO LIABILITY OR RESPONSIBILITY
TO CUSTOMER OR ANY OTHER PERSON OR ENTITY WITH RESPECT TO ANY LIABILITY,LOSS OR DAMAGE CAUSED DIRECTLY OR INDIRECTLY BY USE OR PERFORMANCE OF THE PRODUCT OR ARISING OUT OF
ANY BREACHOF THIS WARRANTY, INCLUDING, BUT NOTLIMITED TO, ANY DAMAGESRESULTINGFROMINCONVENIENCE, LOSS OF TIME, DATA, PROPERTY, REVENUE,OR PROFITOR ANY INDIRECT,SPECIAL,INCI-
DENTAL, OR CONSEQUENTIAL DAMAGES, EVEN IF RadioShack HAS BEEN ADVISED OFTHE POSSIBILITY OF SUCH DAMAGES.
Some states do not allow limitations on how long an implied warranty lasts or the exclusion or limitation of incidental or consequential damages, so the above limitations or exclusions may not apply to you.
In the event of a product defect during the warranty period, take the product and the RadioShack sales receipt as proof of purchase date to any RadioShack store. RadioShack will, at its option, unless otherwise provided by law: (a) cor-
rect the defect by product repair without charge for parts and labor; (b) replace the product with one of the same or similar design; or (c) refund the purchase price. All replaced parts and products, and products on which a refund is made,
become the property of RadioShack. New or reconditioned parts and products may be used in the performance of warranty service. Repaired or replaced parts and products are warranted for the remainder of the original warranty period.
You will be charged for repair or replacement of the product made after the expiration of the warranty period.
This warranty does not cover: (a) damage or failure caused by or attributable to acts of God, abuse, accident, misuse, improper or abnormal usage, failure to follow instructions, improper installation or maintenance, alteration, lightning
or other incidence of excess voltage or current; (b) any repairs other than those provided by a RadioShack Authorized Service Facility; (c) consumables such as fuses or batteries; (d) cosmetic damage; (e) transportation, shipping or in-
surance costs; or (f) costs of product removal, installation, set-up service adjustment or reinstallation.
This warranty gives you specific legal rights, and you may also have other rights which vary from state to state.
RadioShack Customer Relations, 200 Taylor Street, 6th Floor, Fort Worth, TX 76102
12/99
CARE
Keep the radar detector dry; if it gets wet, wipe it dry
immediately. Handle the radar detector carefully; do
not drop it. Keep the radar detector away from dust
anddirt,andwipeitwithadampclothoccasionallyto
keep it looking new.
SERVICE AND REPAIR
If your radar detector is not performing as it should, take it to your local
RadioShack store for assistance. To locate your nearest RadioShack,
use the store locator feature on RadioShack's website
(www.radioshack.com), or call 1-800-The Shack (843-7422) and follow
the menu options. Modifying or tampering with the radar detector's
internal components can cause a malfunction and might invalidate its
warranty and void your FCC authorization to operate it.
OPERATION (continued)
• If your detector senses a Pro-Laser, Pro-Laser 3, or LTI2020
laser signal, both the X- and K/Ka indicators flash, and the
detector sounds continuous tones.
• If your detector senses an UltraLyte laser signal, the X-, K/Ka-,
2 and 3 indicators flash in order.
• If VG-2 is detected, the VG-2 indicator flashes and the detector
sounds a distinctive tone. The detector does not respond to any
radar source during a VG-2 alert, and laser alerts are not
affected.
• If your detector senses a safety alert signal, it responds with
distinctive audible and visual alarms to indicate the alert type
for emergency vehicle (M), Rail Road Alert (O), or Road Hazard
(S).
TUTORIAL MODE
Your detector has a tutorial mode to demonstrate and check the
status of all of its alert indicators.
1. To enter Tutorial mode, turn on the detector while holding down
any button. The detector sounds 3 beeps and P flashes.
2. To select the demonstration for each alert, press
Dim.The
detector displays each alert with its corresponding audio alert.
The detector demonstrates the alerts in the following order.
• X-Band Alert
• K-Band Alert
• Ka-Band Alert
• Pro-Laser Alert
• Pro-Laser3 Alert
• LTI2020 Laser Alert
• Ultralyte Laser Alert
•VG-2Alert
• Emergency Vehicle Alert
• Railroad Alert
• Road Hazard Alert
3. To exit Tutorial mode, press
City.
Fuse
Knurled Ring
Tip
Spring
22-1695.fm Page 2 Tuesday, April 1, 2003 9:20 AM