


3
3. The mounting plate has nuts in its
recessed screw areas. Slide the
mounting plate off the back of the
phone holder, taking care not to
lose the nuts.
4. Follow the same process
described in Steps 1–3 in “Mount-
ing with the Phone Holder
Attached” to mount both the
phone holder and the speaker-
phone in separate locations, then
follow Step 4 in that section to
mount the microphone.
Making the Connections
Caution:
To avoid damaging your car
kit or phone, only use your car kit in
vehicles that have a negative ground
chassis and supply a maximum power
of 14.4 volts.
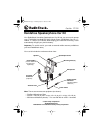
1. Connect the microphone’s plug to
the microphone jack on the bot-
tom of the speakerphone.
2. Connect the antenna lead to the
matching connector on the exter-
nal antenna’s wire.
3. Slide a thin, flat object (such as
your fingernail) under a corner of
the protective cover on your
phone’s power socket (on the
base of the phone) and pull up on
the cover to remove it. Then con-
nect the speakerphone’s coil cord
connector to the socket.
4. With the phone’s antenna facing
up and the display facing out,
slide your phone into the holder
until it clicks.
5. Connect the power cable’s barrel
plug to the DC jack on the speak-
erphone.
6. Make sure the tip of the power
cable’s lighter socket connector is
tightly connected, then insert the
connector into your vehicle’s ciga-
rette lighter socket. Your phone
beeps and turns on its charging
display to indicate that its battery
is charging (see the section on
charging the battery in your
phone’s Owner’s Manual).
Caution:
Unplug the power cord
from your vehicle’s cigarette-
lighter socket when you turn off
the ignition. This prevents vehicle
battery drain if you leave the
phone on when you turn off the
ignition.
17-741.fm Page 3 Thursday, July 22, 1999 9:34 AM