


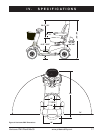


25
Hurricane PMV/RevK/Mar03 www.pridemobility.com
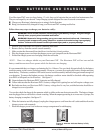
VI. BATTERIES AND CHARGING
Your Hurricane PMV uses two long-lasting, 12-volt, deep-cycle batteries that are sealed and maintenance free.
They are recharged by an onboard 3-amp charging system designed for ease of use and convenience.
n Charge your Hurricanes batteries prior to using it for the first time.
n Keep your batteries fully charged to keep your Hurricane PMV running trouble free.
Follow these easy steps to charge your batteries safely:
1. Position your Hurricane PMV close to a standard wall outlet.
2. Remove the key from the control console assembly.
3. Make certain that the manual freewheel lever is in the drive (down) position.
4. Plug the charger power cord into the charger power cord receptacle on the Hurricane PMV.
5. Extend the charger power cord and plug it into the wall outlet.
NOTE: There is a charger inhibit on your Hurricane PMV. The Hurricane PMV will not run and the
battery condition meterwill not operate while the batteries are charging.
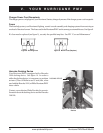
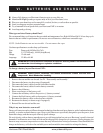
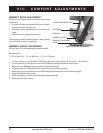
It is recommended that you charge your batteries for 8 to 14 hours. You can check this periodically by the battery
condition meter on the control console assembly. However, you must first unplug the battery charger and then
insert the key. The battery condition LED on the control console assembly indicates the approximate strength of
your batteries. To ensure the highest accuracy, the battery condition meter should be checked while operating
your PMV at full speed on a level surface. See figure 11.
n Green indicates the Hurricane PMVs batteries are fully charged.
n Yellow indicates that the Hurricane PMVs battery voltage level is getting low and will require a charge soon.
n Red indicates that your Hurricane PMVs battery voltage level is very low, and the batteries should be re-
charged as soon as possible.
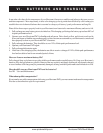
You can also check the charge by the ammeter which is visible on the rear electronics module. The battery charger
must be plugged into a wall outlet to obtain a reading. When the amperage reading is at or near zero (0) amps, the
battery charging is complete. See figure 12.
6. When the batteries are fully charged, unplug the charger power cord from the wall outlet and then from the
charger power cord receptacle.
7. Place the charger power cord in the rear storage compartment for safekeeping.
Figure 12. Ammeter Indicates Battery Is Fully
Charged
Figure 11. Battery Condition Meter
WARNING! Never use an extension cord to plug in your battery charger. Plug the charger
directly into a properly wired standard wall outlet.
WARNING! Removal of the grounding prong can create an electrical hazard. If necessary
properly install an approved 3-prong adaptor to an electrical outlet having 2-pronged plug
access. Failure to heed could result in personal injury and or property damage.