Renewed Points through this Upgrade
If you upgrade your navigation system by this
disc, the system will have the following changes.
Renewal data
The following data are updated:
— Map database
— Gracenote
®
Database
— XM channel icons
POI data coverage
Approximately 12 million POIs are included in the
database.
❒ Some facilities and categories used in POI
Search, Vicinity Search, and Overlay POI
will be modified (Including “Locate Car Ser-
vice” in “Emergency Info”).
❒ For the additional categories that can be used
on the voice recognition, see “Category list for
vicinity search (Renewal)”.
❒ Some POI information may not be accurate or
may become inaccurate through the passage
of time. Please directly contact the POI to ver-
ify the accuracy of the information about the
POI which appears in this database. POI infor-
mation is subject to change without notice.
Keyboard operation
The following operations change.
Input screen of “Address
Search” and “POI Search”
[Sym.], [0-9]:
Touch to toggle the selection.
Input screen for “Address
Book”, “Phone Book”,
“LIBRARY (Music Library)”
[Others], [0-9]:
Touch to toggle the selection.
[Small], [Caps.]:
This is the new feature. Either lowercase or
uppercase letters can be selected. Touch to
toggle the selection.
Input screen for “Edit VIN” and
“Edit Policy Number”
[Small], [Caps.]:
This is the new feature. Either lowercase or
uppercase letters can be selected. Touch to
toggle the selection.
Time restrictions
This is the new feature. This setting controls
whether streets or bridges have traffic restric-
tions during a certain time should be taken into
account.
❒ If you want to set your route to avoid opened
bridges, select [On].
1 Touch the key in the following order in
the navigation menu.
[Destination]
➞ [Route Overview]
➞ [Options]
•[Route Overview] is displayed only when
the route is set.
2 Touch [Time restrictions] to change the
route calculation conditions.
Touching this option switches the setting on or
off.
[On]*:
Calculate a route while avoiding streets or
bridges with traffic restrictions during a certain
time.
[Off]:
Calculate a route while ignoring traffic restric-
tions.
3 Touch [OK].
The route is recalculated, and “Route confir-
mation screen” appears.
❒ The system may calculate a route that
includes streets or bridges that are subject to
traffic restrictions during a certain time even if
[On] is selected.
If the time difference is not set correctly, the
navigation system cannot consider traffic
regulations correctly. Set the time difference
correctly (For details, refer to Operation
Manual of your navigation system.).
shows for routes that contain streets or
bridges that are subject to traffic regulations dur-
ing a certain time when the setting [Time
restrictions] is [On].
2D Twin Map View and 3D Twin
Map View
Either “2D Twin Map View” or “3D Twin Map
View” can directly be selected in “View Mode
Selection” screen.
1 Press the MAP button to display a map of
the area around your current position.
2 Press the MAP button again.
3 Touch the mode name to select the mode
you want to display.
2D Twin Map View
The 2D map appears on the left screen.
3D Twin Map View
The 3D map appears on the left screen.
❒ Touching anywhere on the map changes
the map to “Scroll mode”.
Address Book Icon
You can select whether to display the Address
Book Icon on the map.
❒
When you select [
Address Book Icon Display
]
in [
Short-Cut Selection
], you can switch this
setting with the shortcut menu.
1 Touch the key in the following order in
the navigation menu.
[Map]
➞ [Displayed Info]
2 Touch [Address Book Icon].
Each time you touch the key changes that set-
ting.
[On]*:
Displays the Address Book Icon on the map.
[Off]:
Hides the Address Book Icon on the map.
❒ Even if [Address Book Icon] is set to [Off],
the alarm sounds when you approach the reg-
istered location and the set image pops up. To
turn off the sound output and image pop up,
select [No Sound] and [No Picture] for the
entry.
❒ If you set (dot), the registered name of that
entry can be displayed on the map. The regis-
tered name does not appear if [Address
Book Icon] is set to [Off].
3D Landmark
You can select whether to display the 3D Land-
mark on the map.
1 Touch the key in the following order in
the navigation menu.
[Map]
➞ [Displayed Info]
2 Touch [3D Landmark].
Each time you touch the key changes that set-
ting.
[On]*:
Displays the 3D Landmark on the map.
[Off]:
Hides the 3D Landmark on the map.
❒ 3D Landmark only appears when the view
mode is [3D Twin Map View] and the map
scale is set to 0.25 mile (200 m) or lower.
Traffic event icon and line
❒ Middle-sized icon is displayed on the map
scale between 1 Mile to 2.5 Miles (2 km to 5
km).
❒ The traffic-related items can be shown on
“City Map”.
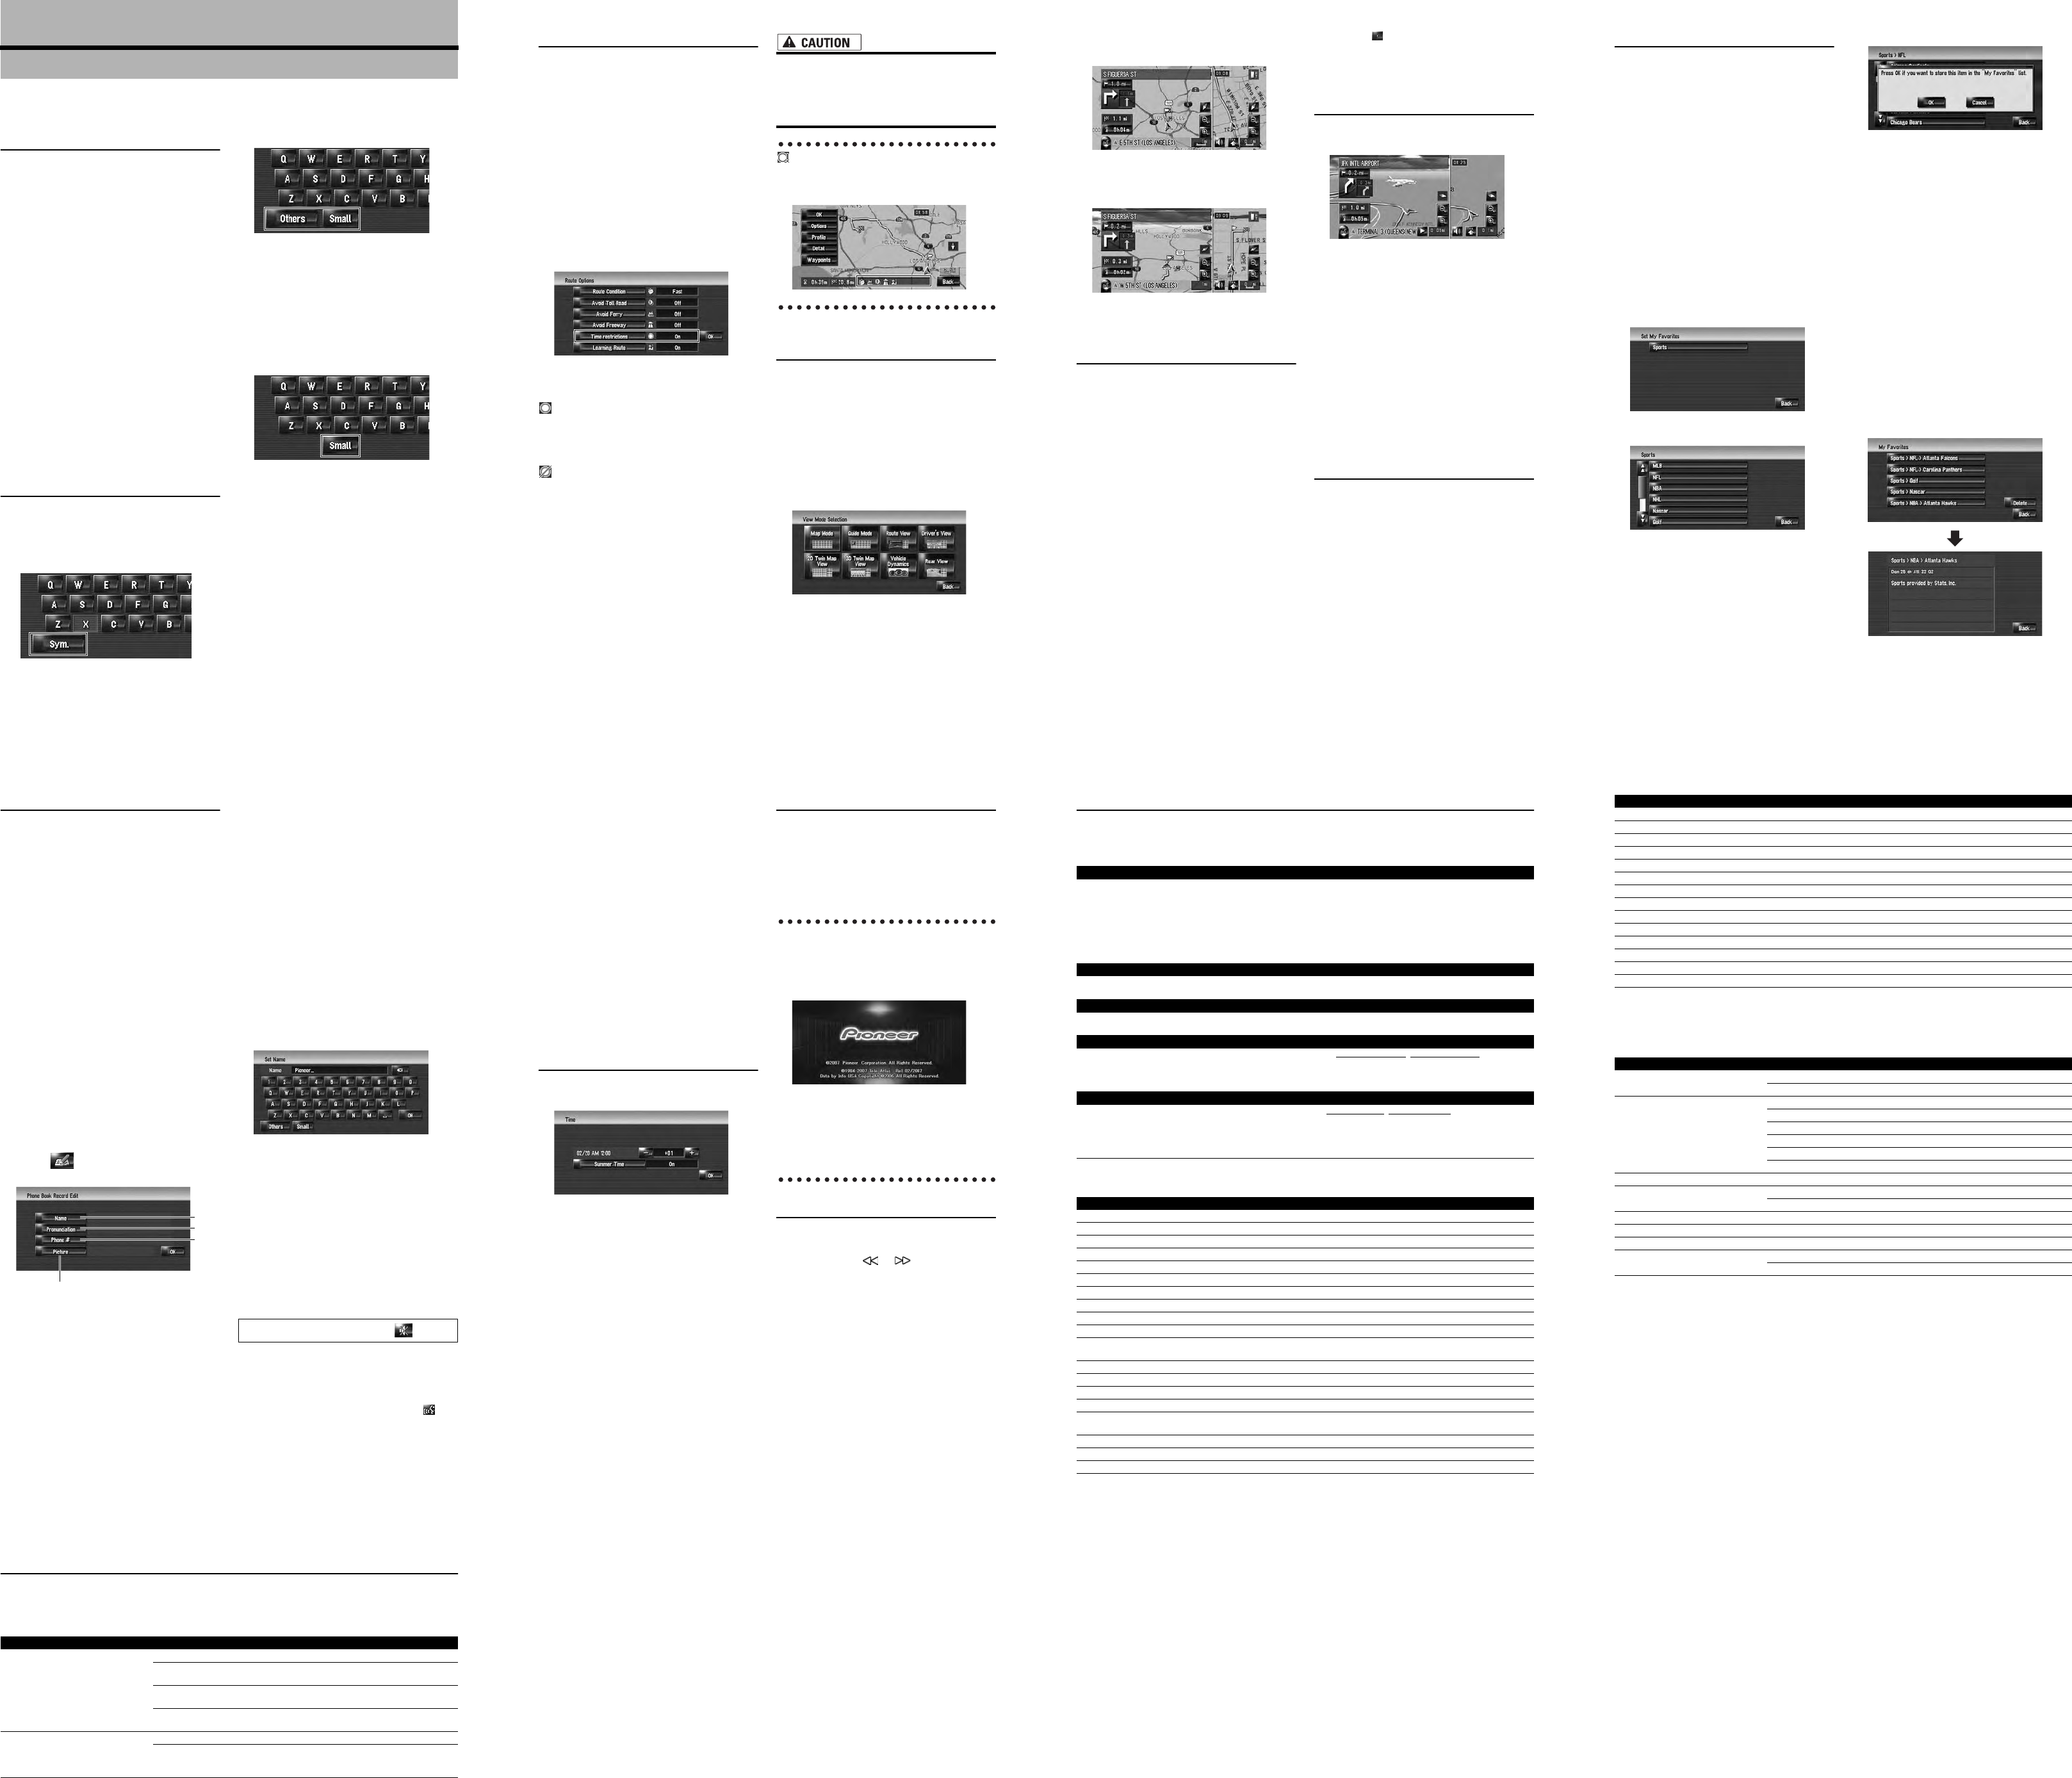
Browsing the XM special contents
The following features have been modified to
enhance ease of operation.
Storing browsable information
XM special contents can be stored as [My Favor-
ites] so that it can be accessed without search-
ing every time an update is needed.
❒ The displayed items depend on the informa-
tion that is sent from each station.
❒ [My Favorites] can store up to 50 items.
1 Touch [Information] in the navigation
menu, then touch [Set My Favorites].
The screen will display a list of categories. The
information appearing onscreen is automati-
cally updated at regular intervals.
2 Touch a category you want to browse
from the list.
3 Touch an item you wish to store.
If an item is divided into more detail catego-
ries, select the one from the list to narrow
down the category. After narrowing down, a
message confirming whether or not to regis-
ter the item will appear.
4 Touch [OK].
If the storing step is successful, the confirma-
tion screen will appear.
Touch [OK] to complete the storing and
return to the previous screen.
Displaying favorite browsable
Information
You can check and delete the browsable informa-
tion you registered.
1 Store the desired item (topic).
For the operation, refer to “Storing browsable
information” .
2 Touch [Information] in the navigation
menu, and then touch [My Favorites].
A list of registered items (topics) appears on
the screen.
3 Touch an item to display the contents.
The texts appear on each items show the pro-
cess of storing in a hierarchical way.
Hands-free phoning
Device name
The default device name displayed on the cellular
phone is [PIONEER HDD NAVI]. (If you already
modified the default device name, the name
already set remains. If you don’t modify that or
restore the default setting, the device name
becomes [PIONEER HDD NAVI]. )
The display of “Unknown” user
Depending on the caller ID service, the phone
number of the received call may not be displayed.
[Unknown] appears instead.
Editing the entry in “Phone
Book”
You can edit [Pronunciation] to be used for
voice recognition along with [Name], [Phone #],
or [Picture].
1 Touch [Information] in the navigation
menu, and touch [Phone Menu].
2 Touch [Phone Book].
3 Touch or [Add].
The edit screen appears.
(1) Name
Enter the name to be displayed in the phone
book. If you enter the name for new entry, you can
select whether you use this entry as voice com-
mands.
(2) Pronunciation
You can enter the desired pronunciation indepen-
dently from the name. The registered pronuncia-
tion is used for voice recognition.
❒ Up to 40 characters can be input for the pro-
nunciation.
❒ If “Pronunciation” is blank, you cannot use
the item as a voice command.
❒ Depending on which language is being
switched to, you may not be able to use the
registered pronunciation without modifica-
tion.
(3) Phone #, (4) Picture
These operations are the same as before
upgrade.
Changing a name
1 Touch [Name], then touch [Yes].
The message confirming whether or not to
register the entered name as voice command
is displayed. When not registering a name as
a voice command, select [No].
2 Enter a new name, then touch [OK].
The current name appears in the text box.
3 If the pronunciation is suitable, touch
[Yes].
The details you set are registered, and “Phone
Book Record Edit” screen appears.
Alternative options:
[No]:
Completes the registration without editing the
pronunciation.
[Repeat]:
You can reconfirm the pronunciation of the
name you entered.
❒ If the pronunciation is not the desired one,
edit the characters so that the pronunciation
matches your desired pronunciation.
❒ When you confirm the pronunciation, is
shown on the left side of the location name
displayed in the entries of “Phone Book”. This
icon indicates that this name can be used as
a voice command during voice operation.
(1)
(2)
(3)
(4)
No sounds can be output during .
Changing a pronunciation
1 Touch [Pronunciation].
2 Enter a new pronunciation, then touch
[OK].
The current pronunciation appears in the text
box (if already set).
3 If the pronunciation is suitable, touch
[Yes].
The details you set are registered, and “Phone
Book Record Edit” screen appears.
Alternative options:
[No]:
Cancels the editing.
[Repeat]:
You can reconfirm the pronunciation of the
name you entered.
Setting the time difference
The time difference can be set from –4 to +9
hours.
Changing the Background Picture
The customizing of Splash Screen is added. The
operation is the same as [Navigation Back-
ground] or [AV Background]. Please refer to
the operation manual of the navigation system to
operate.
(Splash Screen: The screen that appears when
the Navigation system starts up.)
Precautions when changing the Splash
Screen
The following is the default Splash Screen for the
Navigation System.
[PIONEER Original]
If an image other than the one shown above is
previously set (such as an image from the dealer
or other source) and you change the Splash
Screen once, you must use the CD-R (RW)
where the image is recorded to restore the previ-
ous Splash Screen.
DVD playback
Touching or resumes normal playback
at a desired point during continuous fast rewind/
fast forward (when or is shown.).
❒ You can also perform these operations by
using the TRK (/) button.
Voice recognition
Additional Voice Operations
Terms written in italics are voice commands.
Renewed Other Commands
Dialed with the pronunciation of the entry in Phone Book
Call*➞ Telephone Book ➞ <Registered phone book’s pronunciation> ➞ If the registered entry in phone book has
telephone number data, touch VOICE icon to call the entry.
Notes:
• The voice operations related to telephone are available only when using the hands-free phoning feature of this
system and is unavailable during a call.
• For <Registered phone book’s pronunciation> shown above, say the registered pronunciation. For example, if
the registered pronunciation in the entry of phone book is “My friend” and you want to operate “Telephone Book”,
say “My friend”.
Making phone call to your home
Call* ➞ Call Home ➞ Touch VOICE icon to call your home (Only when the phone number is registered in your
home.)
Making phone call to the entry on the address book
Call* ➞ Call <Registered location’s pronunciation> ➞ If the registered location has telephone number data, touch
VOICE icon to call the registered location.
Operating the view mode
Map Operation* ➞ Change View Mode* ➞ Map View, Driver’s View, 2D Twin Map View
, 3D Twin Map View, Route View,
Guide View, Rear View, Vehicle Dynamics ➞ Map screen will be changed to selected view mode.
Note:
Underlined commands are renewed.
Recalculating the route
Route Options* ➞ Change Route* ➞ Rerouting, Use Main Road, Use Fast Route
, Use Short Route, Use Freeway, Avoid
Freeway, Use Ferry, Avoid Ferry, Use Toll Road, Avoid Toll Road ➞ If the route already set, touch VOICE icon to recal-
culate.
Note:
Underlined commands are added.
Preferential voice command Other voice command
Back Return, Before
Set As Destination Set, Go, Route To Destination, Begin Guidance, Start
POI Point Of Interest, Points Of Interest, Business Listing
Address Addresses, Address Search, Search By Address
Address Book Registered Points, My Addresses, Search By Address Book
Vicinity Search Vicinity, Search Around, Search In Vicinity
2D Twin Map View 2D Twin, 2D Split
3D Twin Map View 3D Twin, 3D Split
Use Fast Route Fast Route, Fastest Route
Use Short Route Short Route, Shortest Route
Traffic Information Traffic, View Traffic Info, Display Traffic Information, Current Traffic Informa-
tion, Display Traffic Condition
Traffic Events List Event List, Events, Traffic Events
Traffic On Route List On Route List, Route List, Traffic On Route
Traffic Flow List Flow List, Flows, Traffic Flow
Call Dial, Ring, Dial Out, Place A Call, Make A Call
Call Phone Number Call By Number, Call Number, Call By Phone Number, Call Using Phone Num-
ber
Navigation Screen Navigation, Navi
AV Screen AV, Audio
Change Source Next Source, Source Change
Category list for vicinity search (Renewal)
Modified Categories
The following categories are modified or added as the sub-category.
CD Change To CD, Switch To CD
DVD Change To DVD, Switch To DVD
TV Change To TV, Switch To TV
AM Change To AM, Switch To AM
FM Change To FM, Switch To FM
Music Library Change To Music Library, Switch To Music Library
Music Search Search My Music, Search Music
Album Search By Album, Search Album
Artist Search By Artist, Search Artist
Genre Search By Genre, Search Genre
Track Search Search By Track
iPod Change To iPod, Switch To iPod
XM Change To XM, Switch To XM
Sirius Change To Sirius, Switch To Sirius
Preferential voice command Other voice command
Category name Old New
Gas Station EXXON-MOBIL EXXON
EXXON-MOBIL MOBIL
Bank & ATM BANK ONE (Not available.)
CHASE MANHATTAN BANK (Not available.)
FIRST UNION NATIONAL BANK (Not available.)
FLEET BANK (Not available.)
— J P MORGAN CHASE
SOUTHTRUST BANK (Not available.)
Fast Food Chains — DUNKIN DONUTS
Restaurant Chains — BONEFISH GRILL
— CARRABBA'S ITALIAN GRILL
Supermarkets JEWEL JEWEL-OSCO
Automotive RV Facility RV/TRUCK FACILITY
Retailer Chains FACTOR 2-U FACTORY 2-U
Electronics Retailer — COMP USA
GOOD GUYS (Not available.)
Messages and How to React to Them
The following messages may be displayed in the updating.
❒ There are occasions when you may see error messages other than those shown here. In such a
case, follow the instructions given on the display.
Message When What to do
Inserted disc is invalid.
Please confirm that the disc is cor-
rect.
If you insert a disc upside down. Insert the disc with the label upward.
If the disc is dirty. Clean the disc and retry.
If extreme vibration occurs continu-
ously.
Retry in vibration-free condition.
If the disc is cracked or otherwise
damaged.
Consult your dealer.
An error occurred and the update
failed.
Update is restarted by pressing
“Retry”.
If the disc is dirty. Clean the disc and retry.
Unexpected error occurred in the
update process.
Consult your local Pioneer dealer if
this message persist.


