


Playing discs
1
Press [
x
, OPEN/CLOSE] on the main unit to
open the disc tray.
Put in a disc with the label facing up.
Press [
x
, OPEN/CLOSE] again to close the disc
tray.
2
Press [CD] and then press [
4
/
9
] to start
playback.
Stop
playback
Press [
8
] during playback.
Pause
playback
Press [
4
/
9
] during playback.
Press again to continue playback.
Skip album
Press [
R
,
T
].
Skip track
Press [
2
] or [
6
]
(main unit:
[
2
/
3
] or [
5
/
6
]).
Search
through track
Press and hold [
3
] or [
5
]
(main unit: [
2
/
3
] or
[
5
/
6
]).
Repeat playback
You can repeat “Program playback” or other
selected “Playmode function”.
1
Press [PLAY MENU] to select “REPEAT”.
2
Press [
Y
,
U
] to select “ON REPEAT” and then
press [OK].
“ ” is shown.
To cancel, select “OFF REPEAT”.
Playmode function
1
Press [PLAY MENU] to select “PLAYMODE”.
2
Press [
Y
,
U
] and then press [OK] to select
the desired mode.
OFF
PLAYMODE
Play all tracks.
1-TRACK
1TR
Play one selected track on the disc.
Press the numeric buttons to select
the track.
1-ALBUM
1ALBUM
Play one selected album on the
disc.
Press [
R
,
T
] to select the album.
RANDOM
RND
Play a disc randomly.
1- ALBUM
RANDOM
1ALBUM RND
Play all tracks in one selected
album randomly.
Press [
R
,
T
] to select the album.
Note:
• During random playback, you cannot skip to
tracks which have been played or press the
numeric buttons.
• This function does not work with “Program
playback”.
• The setting returns to the default “OFF
PLAYMODE” when you open the disc tray.
Viewing available information
You can view the available information on the display
panel.
Press [DISPLAY].
Note:
• Maximum characters that can be shown:
approximately 16
• This system supports ver. 1.0, 1.1 and 2.3 ID3
tags.
• Text data that the system does not support can
show differently.
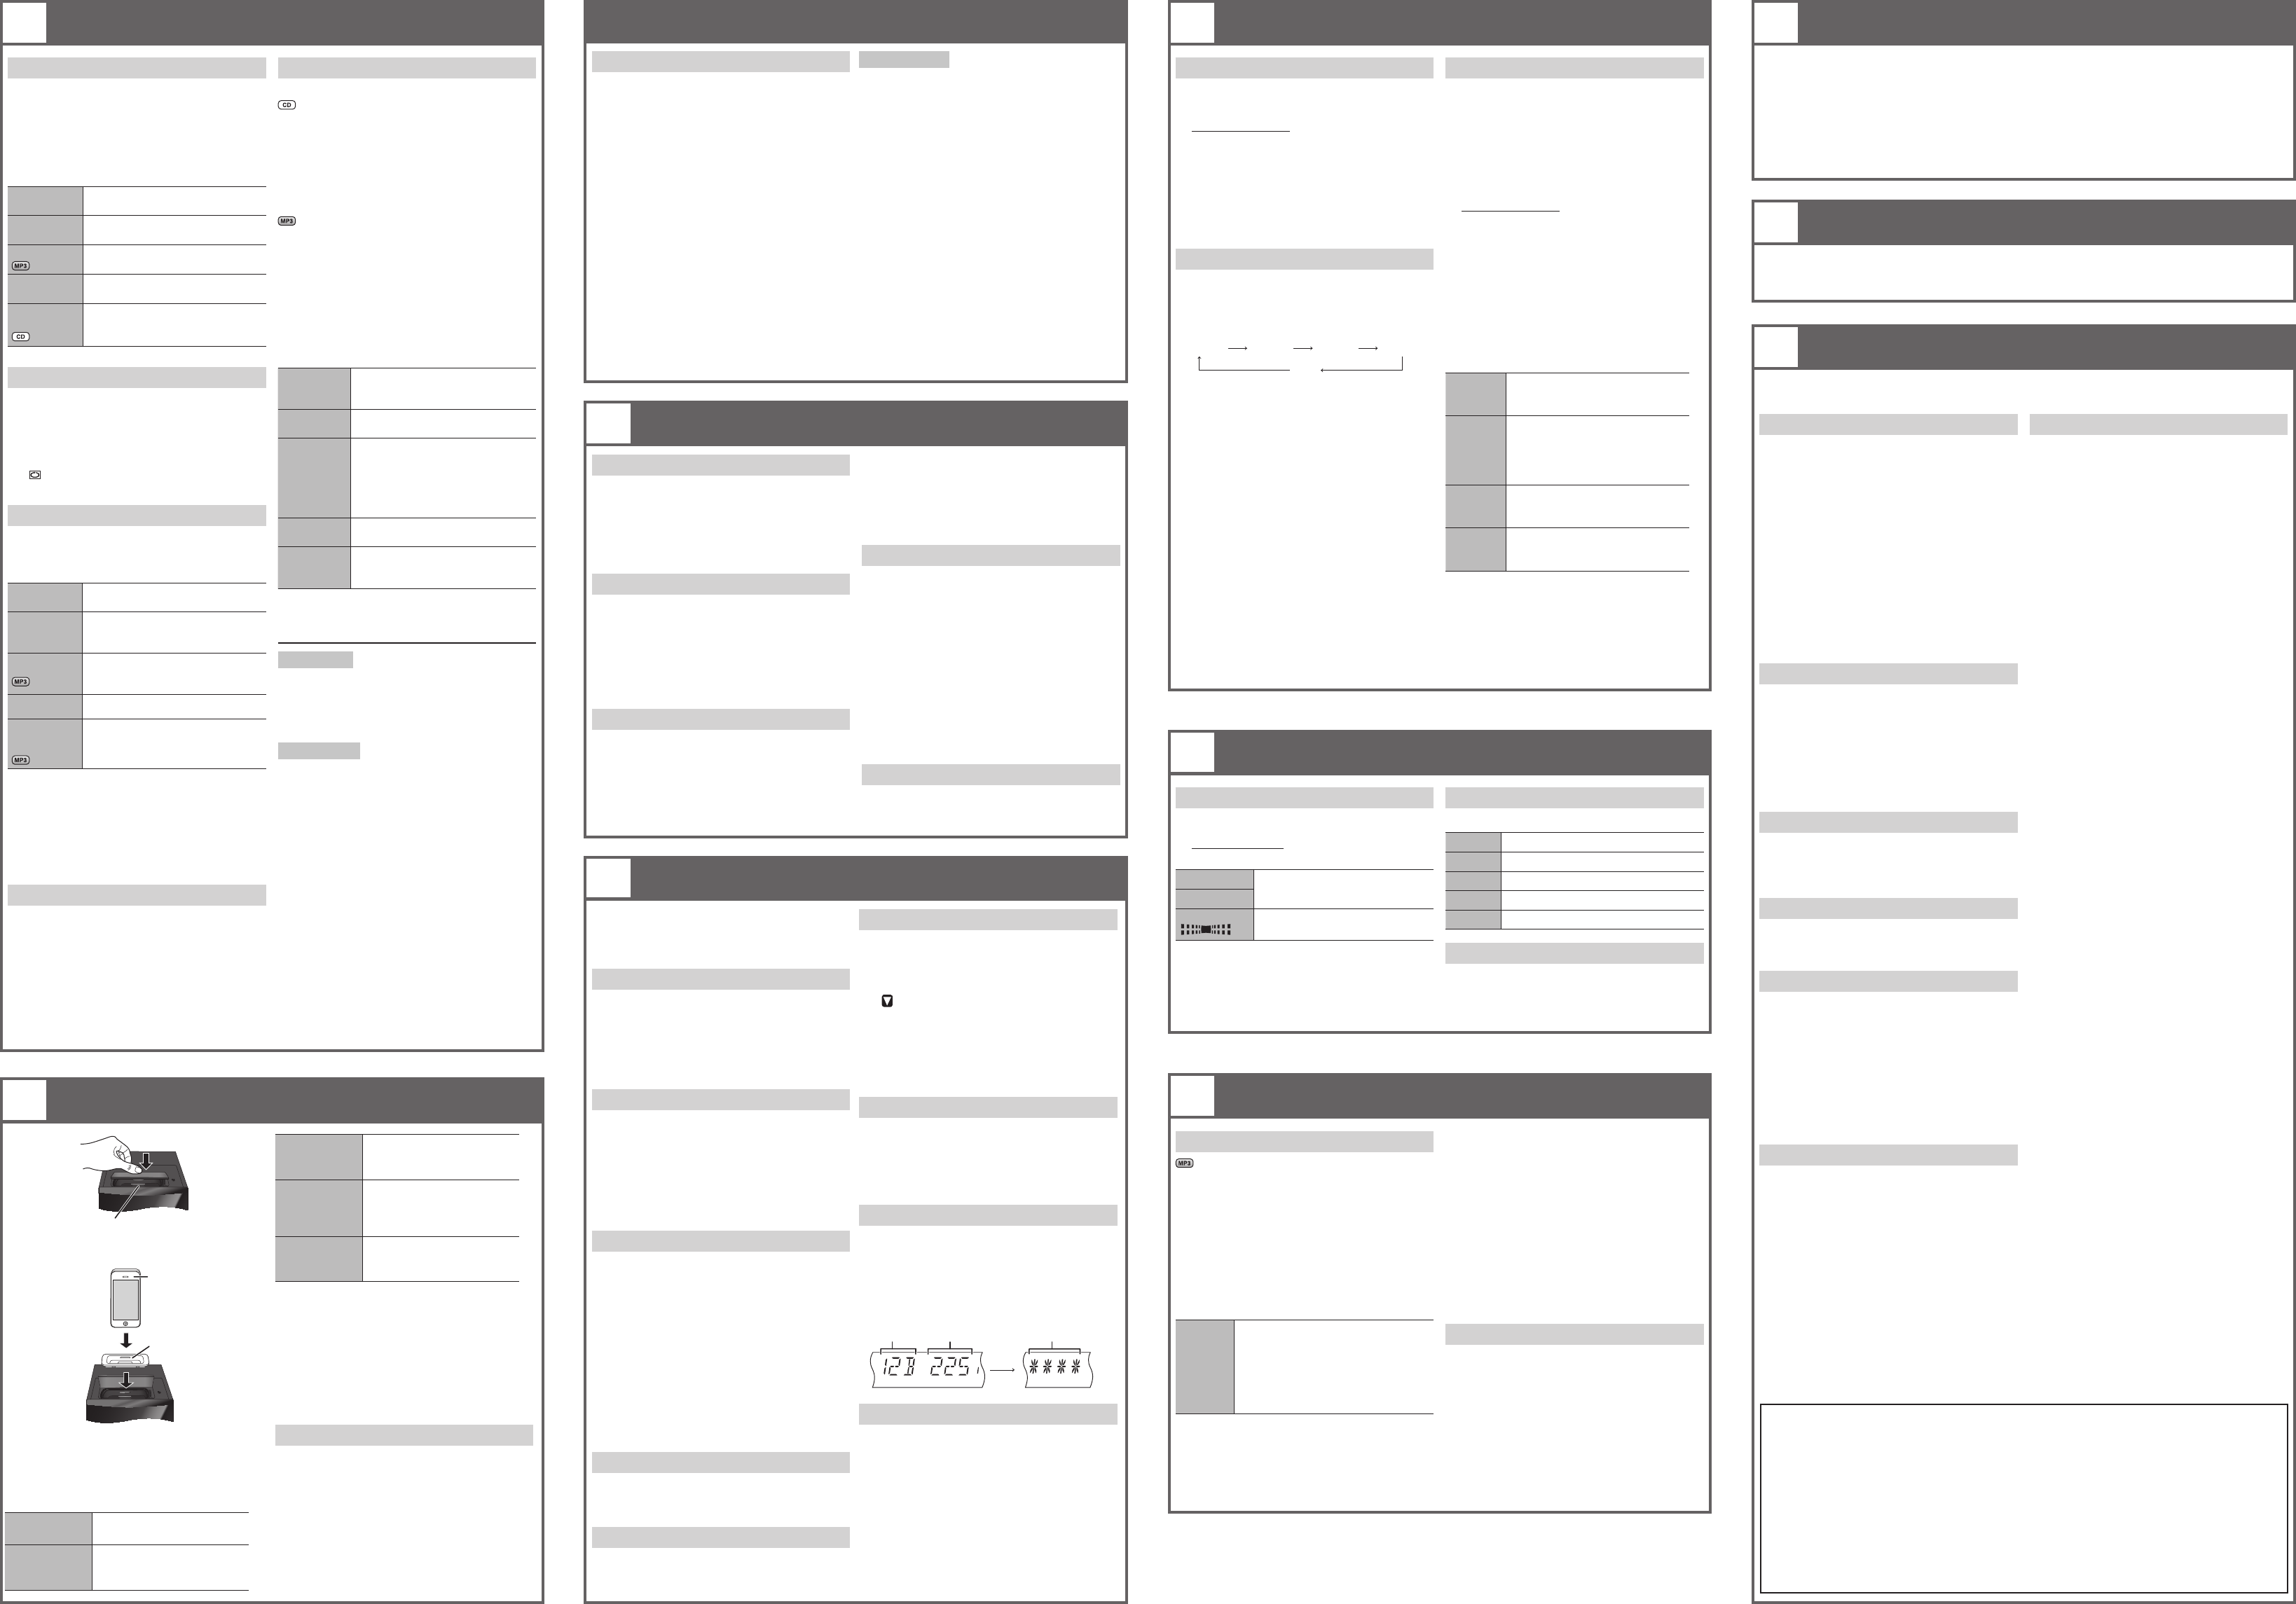
Connector
1
Press to open the cover and insert a
compatible dock adapter.
iPhone
(not included)
Dock adapter
(not included)
2
Connect the iPod or iPhone firmly.
Make sure to remove the iPod or iPhone from
its case.
3
Press [iPod] and then press [
4
/
9
] to start
playback.
Pause
playback
Press [
4
/
9
] or [
8
].
Skip track
Press [
2
] or [
6
]
(main unit: [
2
/
3
] or
[
5
/
6
]).
Before requesting service, make the following checks. If you are in doubt about some of the check points,
or if the solutions indicated do not solve the problem, consult your dealer for instructions.
Setting the clock
This is a 24-hour clock.
1
Press [CLOCK/TIMER] to select “CLOCK”.
2
Within 10 seconds, press [
R
,
T
] to set the
time.
3
Press [OK].
Press [CLOCK/TIMER] to show the clock for a few
seconds.
Note:
Reset the clock regularly to maintain accuracy.
Sleep timer
The sleep timer switches off the system after the
set time.
Press [SLEEP] to select the setting (in minutes).
To cancel, select “OFF”.
OFF
120 MIN90 MIN
30 MIN
60 MIN
To show the remaining time
Press [SLEEP].
Note:
• The sleep timer can be used together with the
play timer.
• The sleep timer always comes first. Be sure not to
set an overlap of timers.
Manual tuning
1
Press [RADIO, EXT-IN] (main unit:
[RADIO/EXT-IN(USB)]) to select “FM”.
2
Press [
3
] or [
5
] to select the frequency
of the required station.
To tune automatically, press and hold the button
until the frequency starts changing quickly.
To improve the sound quality
1
Press [RADIO MENU] to select “FM MODE”.
2
Press [
Y
,
U
] to select “MONO” and then
press [OK].
To cancel, select “STEREO”.
• “MONO” is also cancelled when you change the
frequency.
• Switch off “MONO” for normal listening.
Automatic presetting
30 FM stations can be preset.
Preparation
Press [RADIO, EXT-IN] (main unit:
[RADIO/EXT-IN(USB)]) to select “FM”.
Program playback
This function allows you to program up to 24 tracks.
1
Press [PROGRAM] in the stop mode.
“PGM” is shown.
2
Press the numeric buttons to select the
desired track.
Do this step again to program other tracks.
3
Press [
4
/
9
] to start playback.
1
Press [PROGRAM] in the stop mode.
2
Press [
R
,
T
] to select the desired album.
3
Press [
6
] and then press the numeric
buttons to select the desired track.
4
Press [OK].
Do steps 2 through 4 again to program other
tracks.
5
Press [
4
/
9
] to start playback.
Cancel
program
mode
Press [PROGRAM] in the stop
mode.
Replay the
program
Press [PROGRAM] and then press
[
4
/
9
].
Check
program
contents
Press [
2
] or [
6
] when “PGM”
is shown in the stop mode.
To check while programming,
press [PROGRAM] two times after
“PGM” is shown, then press [
2
]
or [
6
].
Clear the
last track
Press [DEL] in the stop mode.
Clear all
programmed
tracks
Press [
8
] in the stop mode.
“CLR ALL” is shown. Within
5 seconds, press [
8
] again.
Note:
The program memory is cleared when you open the
disc tray.
Note on CDs
• This system can access up to 99 tracks.
• This system can play MP3 files and CD-DA format
audio CD-R/RW that have been finalised.
• This system can fail to play some CD-R/RW
because of the condition of the recording.
Note on MP3s
• Files are treated as tracks and folders are treated
as albums.
• This system can access up to 999 tracks,
255 albums (including root folder) and
20 sessions.
• Disc must conform to ISO9660 level 1 or 2 (except
for extended formats).
• To play in a certain order, prefix the folder and file
names with 3-digit numbers in the order you want
them to play.
Limitations on MP3 playback
• If you have recorded MP3s on the same disc as
CD-DA, only the format recorded in the first
session can be played.
• Some MP3s cannot be played because of the
condition of the disc or recording.
• Recordings will not necessarily be played in the
order you recorded them.
Search the
current track
Press and hold [
3
] or
[
5
] (main unit: [
2
/
3
]
or [
5
/
6
]).
View iPod or
iPhone menu,
Return to
previous menu
Press [iPod MENU] in the
play mode.
Select an iPod
or iPhone
menu item
Press [
R
,
T
] and then press
[OK].
Note:
• Make sure to align your iPod or iPhone with the
connector when inserting the iPod or iPhone.
• The operations may vary or not work depending
on the iPod or iPhone models.
• Depending on the model, it may be necessary to
remove the iPod or iPhone and select the album,
artist, etc. on the iPod or iPhone.
• Read the User Guide of the iPod or iPhone for the
operating instructions.
Charging an iPod or iPhone
An iPod or iPhone is charged automatically when
connected to the system (even when the system is
in standby mode).
• See the iPod or iPhone display for its battery
charging status.
• Disconnect the iPod or iPhone if it is not used
for an extended period of time after charging is
complete.
• Charging stops when the battery is fully charged.
The battery will deplete naturally.
Play timer
You can set the timer to come on at a certain time
to wake you up.
Switch on the system and set the clock.
Prepare the music source you want to listen to
(disc, radio, USB, iPod or iPhone) and set the
volume.
1
Press [CLOCK/TIMER] to select “
#
PLAY 1”,
“
#
PLAY 2” or “
#
PLAY 3”.
2
Within 10 seconds, press [
R
,
T
] to set the
start time.
3
Press [OK].
4
Do steps 2 and 3 again to set the end time.
To start the timer
5
Press [
#
, PLAY] to start “
#
PLAY 1”,
“
#
PLAY 2” or “
#
PLAY 3”.
6
Press [
`
] to switch off the system.
The system must be switched off for the timer to
operate.
Change
the
settings
Do steps 1 through 4 and 6 again
(
Z
above).
Change
the
source or
volume
1) Press [
#
, PLAY] two times to
remove the timer indicator on
the display panel.
2) Change the source or volume.
3) Do steps 5 and 6 (
Z
above).
Check
the
settings
Press [CLOCK/TIMER] to select
“
#
PLAY 1”, “
#
PLAY 2” or
“
#
PLAY 3”.
Cancel
Press [
#
, PLAY] two times to
remove the timer indicator on the
display panel.
Note:
• The timer starts at a low volume and increases
gradually to the preset level.
• The timer comes on at the set time every day if
the timer is on.
• If you switch off the system and switch on again
while a timer is in operation, the timer will not stop
at the end time.
1
Press [OK] to select “LOWEST” or
“CURRENT” frequency.
2
Press [RADIO MENU] to select “A.PRESET”
and then press [OK].
“START?” is shown.
3
Press [OK] to start presetting.
Manual presetting
30 FM stations can be preset.
Preparation
Press [RADIO, EXT-IN] (main unit:
[RADIO/EXT-IN(USB)]) to select “FM”.
1
Press [
3
] or [
5
] to tune in to the
station.
2
Press [PROGRAM].
3
Press the numeric buttons to select a preset
number.
Do steps 1 through 3 again to preset more
stations.
The new station replaces any station that
occupies the same preset number.
Selecting a preset station
Press the numeric buttons, [
2
] or [
6
]
(main unit: [
2
/
3
] or [
5
/
6
]) to select the
preset station.
5
DISCS
DAB (Digital Audio Broadcasting) is a procedure
of broadcasting the radio digitally. It gives less
interference and better quality sound.
This system support DAB in “BAND III” bands.
DAB operation
1
Press [RADIO, EXT-IN] (main unit:
[RADIO/EXT-IN(USB)]) to select “DAB”.
If you select DAB for the first time, the system
will start the “DAB AUTO SCAN” procedure.
2
Press [
3
] or [
5
] to select the frequency
of the required station.
DAB auto scan
1
Press [RADIO MENU] to select
“AUTOSCAN” and then press [OK].
“START?” is shown.
2
Press [OK].
“DAB AUTO SCAN” is shown.
Note:
If no station is detected, “SCAN FAILED” is shown.
Memory presetting
20 channels can be preset.
1
Press [
3
] or [
5
] to select a station.
2
Press [PROGRAM].
3
Press the numeric buttons to select a preset
number.
Do steps 1 through 3 again to preset more
stations.
The new station replaces any station that
occupies the same preset number.
Note:
You cannot preset a station when the station is
not broadcasting or when you have selected a
secondary service.
Selecting a preset station
Press the numeric buttons, [
2
] or [
6
]
(main unit: [
2
/
3
] or [
5
/
6
]) to select the
preset station.
Viewing available information
Press [DISPLAY] to view available information.
You can view information about the DAB broadcast,
program type, ensemble label, frequency and time.
Compatible iPod and iPhone
Update your iPod or iPhone with the latest software
before using this system.
Compatibility depends on the software version of
your iPod or iPhone.
• iPod touch 4th generation (8GB, 32GB, 64GB)
• iPod nano 6th generation (8GB, 16GB)
• iPod touch 3rd generation (32GB, 64GB)
• iPod nano 5th generation (video camera)
(8GB, 16GB)
• iPod touch 2nd generation (8GB, 16GB, 32GB)
• iPod classic [120GB, 160GB (2009)]
• iPod nano 4th generation (video) (8GB, 16GB)
• iPod classic (160GB) (2007)
• iPod touch 1st generation (8GB, 16GB, 32GB)
• iPod nano 3rd generation (video) (4GB, 8GB)
• iPod classic (80GB)
• iPod nano 2nd generation (aluminum)
(2GB, 4GB, 8GB)
• iPod 5th generation (video) (60GB, 80GB)
• iPod 5th generation (video) (30GB)
• iPod nano 1st generation (1GB, 2GB, 4GB)
• iPhone 4 (16GB, 32GB)
• iPhone 3GS (8GB, 16GB, 32GB)
• iPhone 3G (8GB, 16GB)
• iPhone (4GB, 8GB, 16GB)
Listening to secondary services
1
Press [RADIO MENU] to select “DAB
SECONDARY”.
2
Press [
Y
,
U
] to select a secondary service
and then press [OK].
“ ” is shown.
To return to primary service
1
Press [RADIO MENU] to select “DAB
SECONDARY”.
2
Press [
Y
,
U
] to select “PRIMARY” and then
press [OK].
Auto clock adjustment
1
Press [RADIO MENU] to select “AUTO
CLOCK ADJ”.
2
Press [
Y
,
U
] to select “ON ADJUST” and then
press [OK].
To cancel, select “OFF ADJUST”.
DAB signal quality
When adjusting the antenna, you can check the
reception quality.
1
Press [RADIO MENU] to select “SIGNAL
QUALITY”.
2
Press [
Y
,
U
] to select frequency.
Frequency
block
Frequency
Reception quality
0 (poor) to
8 (excellent)
Auto scan frequency
Only the frequencies currently used in United
Kingdom as of May 2011 on BAND III are auto
scanned.
Select “ALL BAND III” when you want to store
stations on other frequencies to memory.
1
Press [RADIO MENU] to select
“SCANMODE”.
2
Press [
Y
,
U
] to select “UNITED KINGDOM” or
“ALL BAND III” and then press [OK].
Auto scan begins automatically after you make
the changes.
Note on iPhone
• All phone features can only be controlled by the
touch screen of the iPhone.
• The system does not show incoming calls or the
phone status.
• Playback will stop when there is an incoming call.
• A call is not cancelled when you connect or
disconnect the iPhone from the system.
• There is no Apple Inc. specification that will
guarantee the above iPhone response. iPhone
responses can be different on newer models or
with new software.
8
DAB
6
USING AN iPod OR iPhone
14
TROUBLESHOOTING GUIDE
When other Panasonic equipment responds to the remote control of this system, change the remote
control code for this system.
To clean this system, wipe with a soft, dry cloth.
• Never use alcohol, paint thinner or benzine to clean this system.
• Before using chemically treated cloth, read the instructions that came with the cloth carefully.
12
REMOTE
CONTROL CODE
13
MAINTENANCE
USB
You can connect and play MP3 tracks from your
USB mass storage device.
Do not use a USB extension cable. The system
cannot recognise USB mass storage device
connected through a cable.
1
Decrease the volume and connect the USB
mass storage device to the USB port.
2
Press [RADIO, EXT-IN] (main unit:
[RADIO/EXT-IN(USB)]) to select “USB” and
then press [
4
/
9
] to start playback.
Stop
playback
Press [
8
] during playback.
“RESUME” is shown.
Press [
4
/
9
] to continue playback
from the start of the track.
OR
Press [
8
] two times to stop the
playback fully.
For other operations, refer to “DISCS” .
Compatible devices
• USB mass storage devices that support bulk-only
transfer.
• USB mass storage devices that support USB 2.0
full speed.
Supported format
• Folders are defined as album.
• Files are defined as track.
• Track must have the extension “.mp3” or “.MP3”.
• CBI (Control/Bulk/Interrupt) is not supported.
• NTFS file system is not supported (only FAT
12/16/32 file system is supported).
• Some files can fail to work because of the sector
size.
Note:
• Maximum album: 255 albums (including root
folder)
• Maximum track: 2500 tracks
• Maximum track in one album: 999 tracks
Connecting to headphones
Connect the headphones to the headphones jack.
Plug type: Ø 3.5 mm stereo (not included)
• Avoid listening for prolonged periods of time to
prevent hearing damage.
• Excessive sound pressure from earphones and
headphones can cause hearing loss.
• Listening at full volume for long periods may
damage the user’s ears. Be sure to use the
supplied or recommended headphones or
earphones.
11
EXTERNAL EQUIPMENT
Changing the sound quality
1
Press [SOUND] to select a sound effect.
2
Within 3 seconds, press [
Y
,
U
] to select the
desired setting.
BASS
-4 to +4
TREBLE
SURROUND
“ON SURROUND” or
“OFF SURROUND”
By main unit only
1
Press [BASS/TREBLE] to select “BASS” or
“TREBLE”.
2
Press [
2
/
3
] or [
5
/
6
] to adjust the
level.
Preset EQ
Press [PRESET EQ] to select a setting.
HEAVY Adds punch to rock
SOFT For background music
CLEAR Clarifies higher frequencies
VOCAL Adds gloss to vocal
FLAT Cancels the sound effect
D.BASS
This function lets you enjoy a powerful bass effect.
Press [D.BASS] to select “ON D.BASS” or
“OFF D.BASS”.
10
SOUND EFFECTS
9
CLOCK AND TIMERS
7
RADIO
USING AN iPod OR iPhone (continued)
To set the code to “REMOTE 2”
1
Press and hold [CD] on the main unit and [2]
on the remote control until “REMOTE 2” is
shown.
2
Press and hold [OK] and [2] for a minimum of
4 seconds.
To set the code to “REMOTE 1”
1
Press and hold [CD] on the main unit and [1]
on the remote control until “REMOTE 1” is
shown.
2
Press and hold [OK] and [1] for a minimum of
4 seconds.
Common problems
No operations can be done with the remote
control.
• Examine that the battery is installed correctly.
Sound is distorted or no sound.
• Increase the volume.
• Switch off the system, determine and correct the
cause, then switch the system on again. It can
be caused by straining of the speakers through
excessive volume or power, and when using the
system in a hot environment.
A “humming” sound can be heard during
playback.
• An AC mains lead or fluorescent light is near the
cables. Keep other appliances and cords away
from the cables of this system.
Discs
Display not shown correctly.
Playback does not start.
• You have not put in the disc correctly. Put it in
correctly.
• Disc is dirty. Clean the disc.
• Replace the disc if it is scratched, warped, or
non-standard.
• There is condensation. Let the system dry for 1 to
2 hours.
DAB
DAB reception is poor.
• Keep the antenna away from computers, TVs,
other cables and cords.
• Use an outdoor antenna.
Radio
A beat sound is heard.
• Switch off the TV or move it away from the
system.
iPod or iPhone
You cannot switch on the iPod or iPhone.
• Examine that the battery of the iPod or iPhone is
not depleted.
• Switch off the iPod or iPhone and the system
before you connect the iPod or iPhone. Connect
the iPod or iPhone and try again.
No sound.
• Switch off the iPod or iPhone and remove from the
system. Connect the iPod or iPhone to the system
and switch it on and play it again.
USB
The USB mass storage device or the contents in
it cannot be read.
• The format of the USB mass storage device or
the contents in it is/are not compatible with the
system.
• USB mass storage devices with storage capacity
of more than 32 GB cannot work in some
conditions.
Slow operation of the USB mass storage device.
• Large content size or large memory USB mass
storage device takes longer time to read.
The elapsed time shown is different from the
actual play time.
• Transfer the data to another USB mass storage
device or backup the data and reformat the USB
mass storage device.
Main unit displays
“NO PLAY”
• Examine the content. You can only play supported
format.
• If there are more than 255 albums or folders
(audio and non-audio), some of the MP3 files in
these albums cannot be read and played. Transfer
these music albums to another USB mass storage
device. Alternatively, reformat the USB mass
storage device and save these music albums prior
to saving the other non-audio folders.
“F61” or “F76”
• There is a power supply problem.
“ERROR”
• An incorrect operation was done. Read the
instructions and try again.
“NOT MP3/ERROR”
• An unsupported MP3 format. The system will skip
that track and play the next one.
“VBR–”
• The system cannot show the remaining play time
for variable bit rate (VBR) tracks.
“NODEVICE”
• The USB mass storage device, iPod or iPhone is
not connected. Examine the connection.
“NO DISC”
• You have not put in a disc or put in a disc that the
system cannot play (refer to “DISCS”).
“NOT SUPPORT”
• You have inserted an iPod or iPhone that cannot
be played.
“--:--”
• You connected the AC mains lead for the first
time or there was a power failure recently. Set the
clock.
“ADJUST CLOCK”
• Clock is not set. Adjust the clock accordingly.
“ADJUST TIMER”
• Play timer is not set. Adjust the play timer
accordingly.
“PGM FULL”
• The number of programmed tracks is more than
24.
“DATA”
• Data broadcast being received over the DAB
broadcast signal, cannot be used on this system.
“SCRAMBLED”
• The broadcast station being received cannot be
accessed.
“NO SERVICE”
• The station is currently not broadcasting.
“NO SIGNAL”
• This station cannot be received. Check your
antenna.
“SCAN FAILED”
• Stations are not receivable. Check your antenna
and try auto scanning.
Memory reset (Initialisation)
When the following situations occur, refer to the instructions below to reset the memory:
• There is no response when buttons are pressed.
• You want to clear and reset the memory contents.
To reset the memory
1
Disconnect the AC mains lead.
(Wait 3 minutes before you continue with step 2.)
2
While you press and hold [
1
] on the main unit, connect the AC mains lead again.
“– – – – – – – –” shows on the display panel.
3
Release [
1
].
All the settings are set back to the factory preset.
It is necessary to set the memory items again.
PM500DB_EB1_gb.indd 2PM500DB_EB1_gb.indd 2 6/20/2011 7:07:11 PM6/20/2011 7:07:11 PM