


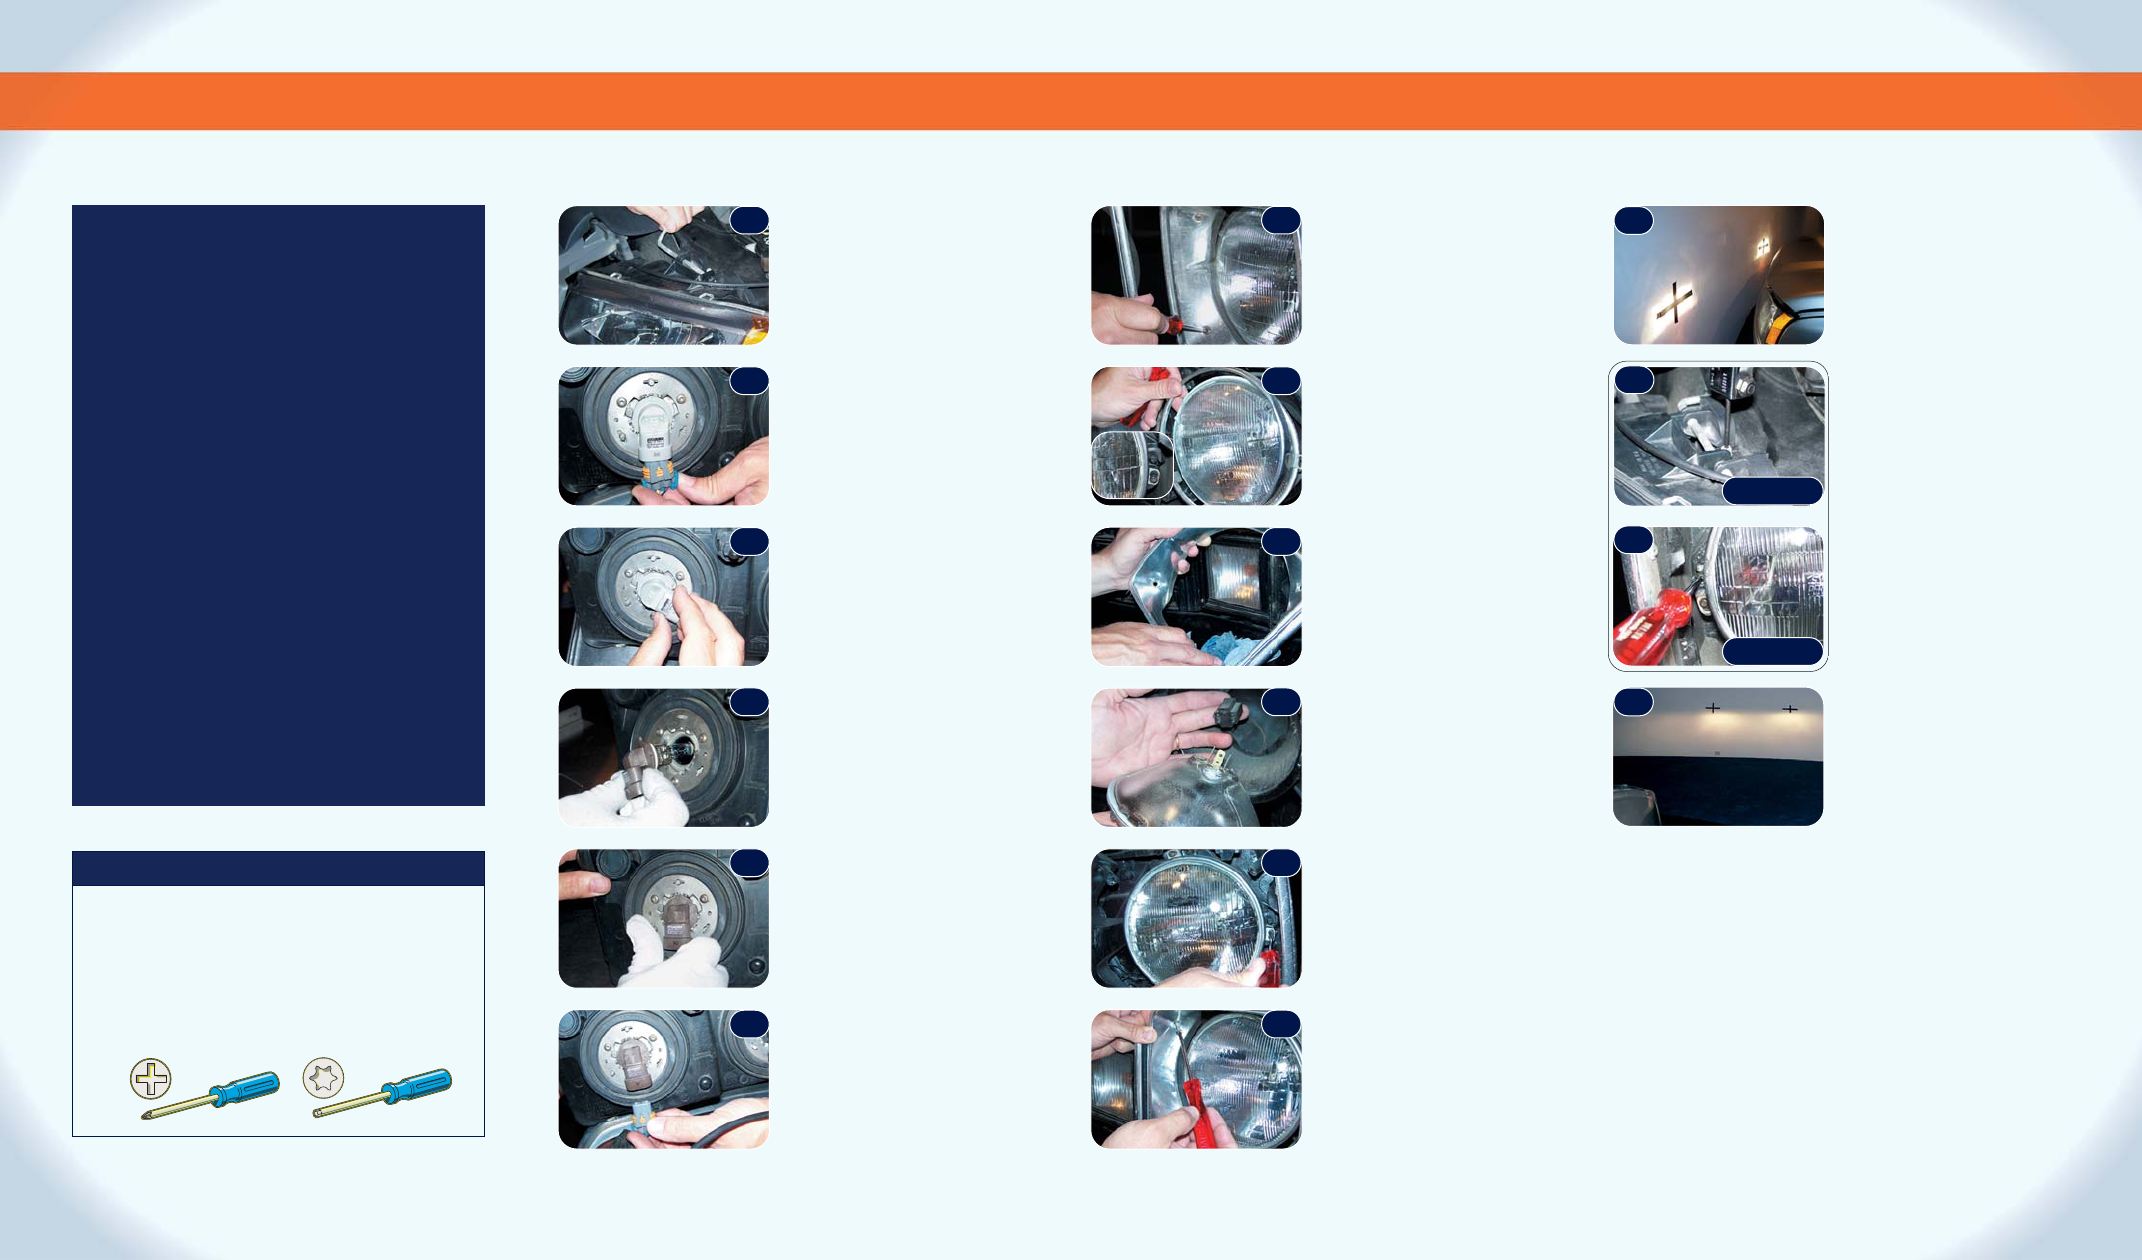
Sealed Beam Headlight Replacement
1 Remove the exterior fascia.
2 The metal retainer ring is held in
with 3-4 screws and should not be
confused with the aiming screws.
Remove the retainer ring while sup-
porting the sealed beam (which may
come out at the same time). Remove
the electrical connector by pulling and
gently rocking (note: if the wire length
is short it may be necessary to
remove the plug from the back side
while temporarily holding the sealed
beam back in position).
3 Carefully, clean the retainer and fascia.
4 Inspect the new sealed beam for
excess epoxy or glue and remove if
present.
5 Plug the electrical connector into the
sealed beam securely. Support sealed
beam to test low and/or high beam
operation before proceeding.
6 Insert the sealed beam insuring that
the lettering/labeling in the glass lens
is upright. Work the sealed beam
to insure it seats properly (if it does
not you may have the wrong type).
Replace the retainer ring and screws,
then tighten.
Note: Go to
Aiming Instructions
before
completing steps 7 & 8.
7 Replace and secure exterior fascia.
8 Check the engine compartment and
surfaces carefully and remove tools
and parts before closing the hood.
Make sure the hood is fully latched.
Bulb Type Headlight Replacement
1 In the example shown here, the entire
headlamp is accessed by easily
removing a pin.
2 Unplug the connectors from the
bulb(s) by pulling and gently rocking. If
there is a rubber boot, brace the bulb
while removing the connector.
3 Remove the old bulbs by twisting and
pulling. In some cases, first remove
the retaining ring or spring clip.
4 Clean the seating surfaces. Prevent
dirt or water intrusion.
5 Wearing gloves, remove the bulb from
its package (do not touch the bare
bulb). Inspect to insure o-ring is properly
fitted. Insert bulb into the headlamp.
6 Rotate bulb into place. Be sure to
replace all retaining rings and rubber
boots if applicable.
7 Plug in the electrical connectors and
battery to check for operability.
Reinstall and secure headlamp.
8 Replace any other parts removed
during installation.
9 Check engine and surfaces carefully
and remove tools and parts before
closing the hood. Make sure the hood
is fully latched.
Once both sides are finished, and the plastic
lenses have been cleaned, you are ready to
aim the headlamps (see
Aiming Instructions
).
Aiming Instructions
• The aiming method described below
relies on best beam appearance.
• For sealed beams, consult your
owner’s manual for alternate aiming
method using raised pads.
1 Find a location where there is at least
40
′
(12 m) of FLAT ground from a
garage door or wall.
2 Pull the vehicle straight up to within
6
″
(15 cm) from the wall. With vehicle
in park and emergency brake set, turn
on the LOW BEAMS and mark the
center of each light with a masking
tape “+” target on the wall.
3
a.
Back the vehicle STRAIGHT back
until you are about 25
′
(7.5 m) from
the wall. Put the vehicle in park and
set the emergency brake.
b.
Using the vertical adjustment* only:
adjust the low beam.
c.
The top of the beam pattern should
be about 1-2
″
(3-5 cm) below the
horizontal line created by the targets.
Horizontal adjustment is not usually
required but the beam pattern created
by each headlight should be down and
to the right of each respective target.
4 IF THE HIGH BEAMS ARE AIMED INDE-
PENDENTLY OF THE LOW BEAMS: fol-
low the same general procedure for
low beam aiming, except that the
beam centers will now fall on new
target centers.
5 Check the engine compartment and
surfaces carefully and remove tools
and parts before closing the hood.
Make sure the hood is fully latched.
*The adjusters are typically addressed with a large
Phillips Head screwdriver or Torx screwdriver,
depending on the vehicle, and accessed from the
top (hood open), and from the front with sealed
beams. Consult the owner’s manual or dealer if in
doubt, or make small adjustments and watch to see
the effect on the beam.
Changing and Aiming Your Headlights
Precautions
• Consult owner’s manual for bulb/headlight
replacement procedures, needed tools and
safety precautions.
• Always wear safety glasses— headlight bulbs
are pressurized. Remove watches and loose
jewelry. In extreme cases, fenders and other
hardware must be removed (professional shop
recommended).
• Make sure vehicle is on a level surface, in park
(or in gear for standard), with emergency brake
applied and engine cooled down. Remove the
non-grounded terminal of the battery if applicable.
Recommended Tools
•
Safety glasses
• Clean cloth gloves
• Clean cloth
• Phillips
®
Head Screwdriver or Torx
®
Screwdriver
1
2
3
5
6
7
1
2
3
5
6
7
3b
3c
2
3b
In newer cars
In vintage cars