


EN
9
2. Press CHANNEL to select user 1-4.
3. Press and hold MODE for 2 seconds to enter the
Skin Type Setting Mode of the selected user.
4. Press UP or DOWN to choose 1 of the 4 skin type
settings. Then press MODE to confirm and enter the
SPF Set Up Mode.
5. Press UP or DOWN to increase or decrease the SPF
value. Then press MODE to confirm and enter the
UV Exposure Time Count Down Setting Mode.
6. Press UP or DOWN to enable or disable countdown.
Press MODE to exit the UV Exposure Time
Countdown Mode and start the exposure time
countdown. The remaining user UV exposure time
will display and the
icon will flash.
7. When the countdown has reached "0", an alarm will
sound for 2 minutes. Press any button to turn the
alarm off. The
icon will flash for 2 minutes even
if you have stopped the alarm sound.
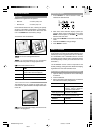
MAXIMUM / MINIMUM MEMORY FOR UVI
To view the maximum and minimum memory for UVI:
1. Press SELECT to navigate to the Barometer Area.
2. Press MODE to select the UV display.
3. Press MEMORY to show maximum, minimum and
current UVI readings.
4. Press and hold MEMORY for 2 seconds to clear the
UVI memory.
The UV sensor must be activated before you
try and set the additional features. Please refer to the
UVR138 User Manual for more information.
TEMPERATURE AND HUMIDITY
The weather station can display the following information
from any of the 5 remote sensors:
• Current, minimum, and maximum temperatures and
relative humidity percentages.
• Comfort level indicator and trend line (rising, falling,
or steady).
Data is collected and displayed approximately every
60 seconds.
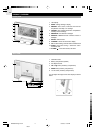
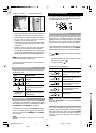
VIEW TEMPERATURE AND HUMIDITY AREA
Press SELECT to navigate to the Temperature and
Humidity Area.
NOTE
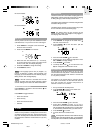
NEW ADDITIONAL UV FEATURES
UV EXPOSURE TIME COUNTDOWN
To set the exposure time countdown you need to set
the Skin Type and Sun Protection Factor (SPF) as
follows:
1. Press SELECT to navigate to the Barometer Area,
then press MODE to select the UV display.
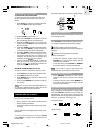
SELECT MEASUREMENT UNIT
Slide the °C / °F switch (inside the battery compartment),
to the setting you want.
SELECT SENSOR CHANNEL
Press CHANNEL to switch between outdoor sensors
1-5 and indoor temperature and humidity readings.
indicates outdoor remote sensor channel;
corresponding temperature and humidity readings are
displayed.
indicates indoor temperature and humidity
readings are displayed.
• To auto-scan between sensors, press and hold
CHANNEL for 2 seconds. Each sensor's data will
be displayed for 3 seconds.
• To end auto-scan, press CHANNEL or MEMORY
with the Temperature / Humidity Area selected.
If you select a sensor that collects only
temperature data, the humidity will not be shown.
MINIMUM / MAXIMUM RECORDS
• Press MEMORY repeatedly to view current,
maximum and minimum records for the selected
sensor.
• To clear the records, press and hold MEMORY for
2 seconds. A beep will sound to confirm that the
memory has been cleared
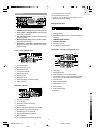
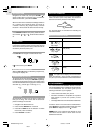
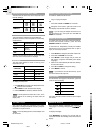
VIEW TEMPERATURE AND HUMIDITY HISTORY
To view the last 24 hours temperature and humidity
history, navigate to the Temperature or Humidity Area.
Then press HISTORY repeatedly to scroll through the
measurements. The number shown to the right of the
display indicates how long ago each measurement was
taken (e.g., 2 hours ago, 3 hours ago, etc.).
Temperature history:
NOTE
Humidity history:
Temperature data is given at the top, humidity is below.
BAR933HG Eng R7 OP 8/20/04, 11:03 PM9
Black