


This checklist helps when programming features. Before
attempting feature programming, please carefully read pages
27-38 to become familiar with the features and the programming
procedure.
To best use this checklist, mark each applicable box with "\"
next to the feature to be changed before entering Features
Programming Mode. As each feature is programmed, change
its mark to "X".
To program features, follow these steps:
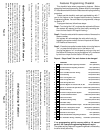
Features Programming Checklist
Step 1 - Turn the ignition "off", and press the valet switch 5 times.
(the system will respond a chirp, then briefly sounding the
siren and the Status LED begins flashing)
Step 2 - Press the valet switch the same number of times as the
feature number.
(the system will acknowledge the valet switch entry by
repeating the same number of siren chirps and the Status
LED flashes a like amount)
Step 3 - Press the transmitter's center button to turn the feature
"on", or press the left button to turn the feature "off".
(turning the feature "on" is indicated by one horn chirp and
the Status LED being on; turning the feature "off" is indicated
by two horn chirps and the Status LED being off)
Repeat - Steps 2 and 3 for each feature to be changed
1 Ignition-Activated Anti-Carjacking Protection OFF (left button)
2 Door-Activated Anti-Carjacking Protection OFF (left button)
3 Last Door Arming ON (center button)
4 Doors Lock With Last Door Arming ON (center button)
5 Current Sensing ON (center button)
6 Doors Lock At Ignition "On" ON (center button)
7 Unlock #1 At Ignition OFF ON (center button)
8 Unlock #2 At Ignition OFF OFF (left button)
9 Open Door Bypass To Features #6, #7, #8 ON (center button)
10 Lights On 5 / 30 Seconds Upon Disarm 30 Seconds (center button)
11 Automatic Rearming ON (center button)
12 2nd Channel Output Disarms System ON (center button)
13 .8 / 3 Second Doorlock Pulse .8 Second (center button)
14 Double Unlock Pulse OFF (left button)
15 3 / 45 Second Arming Delay 3 Second (center button)
16 Confirmation Chirp ON (center button)
17 30 / 60 Second Activated Alarm Cycle 60 Seconds (center button)
18 Pulsed Horn / Steady Siren Output Steady Siren (left button)
19 Loud / Soft Pulsed Horn Chirps Loud (center button)
20 Total Closure Lock Output OFF (left button)
21 Remote-Activated Anti-Carjacking Protection OFF (left button)
22 One / Two Button Arming / Disarming One Button (center button)
# FEATURE DEFAULT
If no programming activity occurs within a 10 second
period, the Features Programming Mode will expire.
The system exiting Features Programming Mode is indicated by
the siren briefly sounding.
Page - 22
continued from page 19
9) A series of siren chirps lasting two seconds after the ignition switch is turned
"on": The Automatic Transmitter Verification
TM
feature (page 4) has been
activated. This will also occur for 48 hours after installation.
10) Three siren chirps upon arming the system: The Zone Bypass feature is
indicating that the system is arming, but bypassing a violated protected zone.
11) Three siren chirps while the system is armed: The Prewarning feature has been
activated.
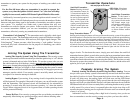
Your vehicle security system features a port which allows an optional auxiliary
sensor to be easily added to increase the effectiveness of your system. A light shock
or impact to the vehicle will initiate the Prewarn feature, while a heavier shock or
impact will trigger the security system. Other sensors are available which include
those that monitor shock to the vehicle, detect changes in atmospheric pressure
within the vehicle, and radar sensors that can detect motion inside and outside the
vehicle.
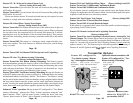
Auxiliary Optional Sensor Port With Prewarn
Page - 23
This security system features three optional forms of Anti-Carjacking protec-
tion. The Anti-Carjacking features may be activated by turning "on" the ignition
switch, opening and closing a door after the ignition has been turned "on", or by the
transmitter activating the 3rd Channel Output, but only when the ignition is "on".
Anti-Carjacking Protection
The sensor may be temporarily bypassed using the transmitter. If the system is
triggered by the sensor plugged into this port, the Zone Violation feature will flash
the LED Status Light four times between pauses.
Prewarning Shock Detection Circuit: This circuit requires connection to an
auxiliary detection sensor device. When the sensor is triggered by a light impact or
shock to the vehicle, the security system will respond by chirping the siren (or
honking the horn) 3 times and locking all of the doors. After this circuit has been
triggered 5 times it will automatically shutdown until the alarm system is rearmed
again. This will prevent the security system from being a nuisance to the general
public, and in some cases to allow compliance with local noise ordinances.